RC Minecraft Boat Patrols The Pool For Treasure

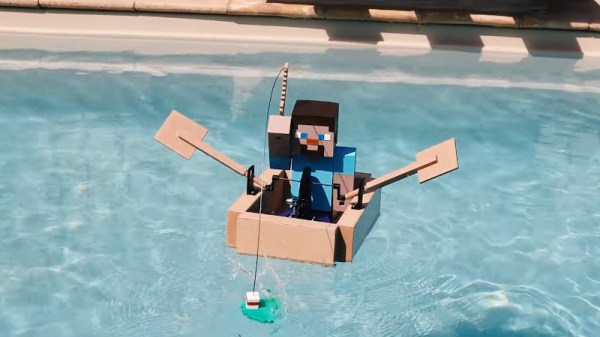
Looking to recreate those relaxing Minecraft fishing sessions in real life, [electrosync] recently set out to 3D print himself a blocky remote controlled boat, complete with a similarly cubic occupant to ride in it. Each element of the build, from the oars to the bobber on the end of the fishing line, has been designed to look as faithful to the source material as possible. In fact, the whole thing is so accurate to the game that it’s almost surreal to see it rowing around the pool.

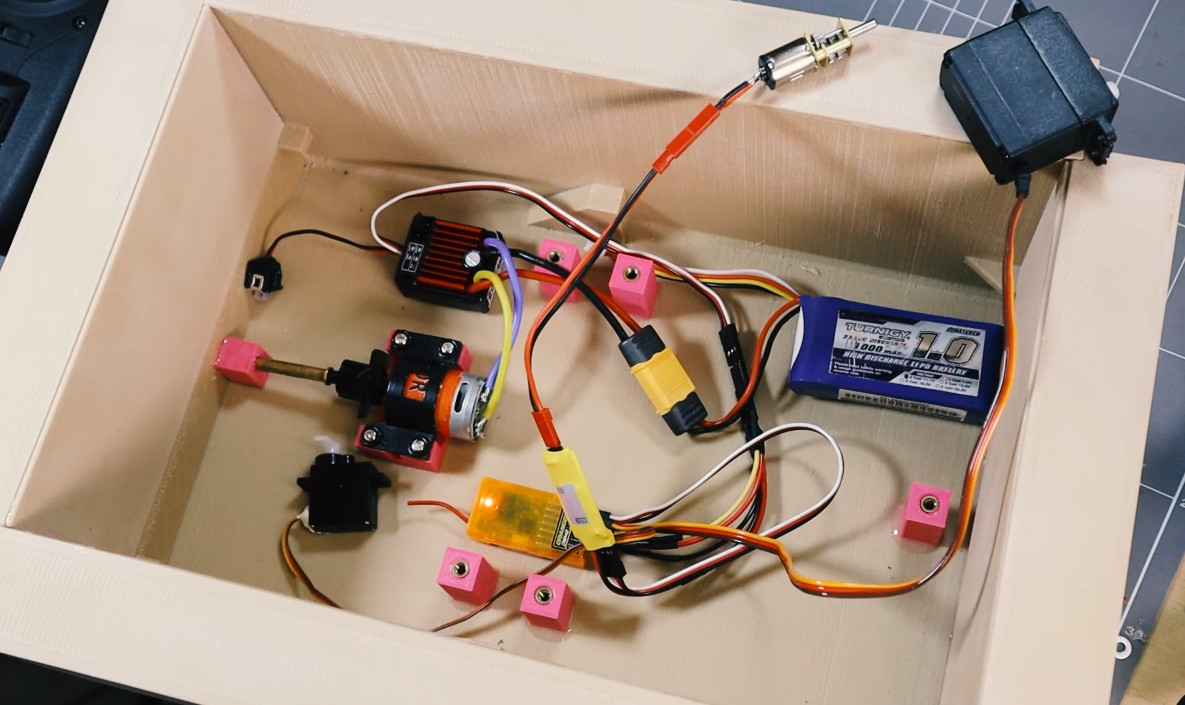
That said, some of the resemblance is only skin deep. For example the rowing action, though it appears to be properly synchronized to the boat’s movement through the water, is completely for show. A standard propeller and rudder arrangement under the boat provide propulsion and directional control, and [electrosync] notes its actually powerful enough to push the boat very near to its scale top speed from the game, despite the exceptionally poor hydrodynamics of what’s essentially just a rectangle.

A look under the deck.

Speaking of which, [electrosync] even went through the trouble of printing the hull in wood-fill PLA and coating it in polyester resin to make sure it was watertight. Granted he could have just made the boat out of wood in the first place, saving himself the nearly 60 hours it took to print the hull parts, but that would have been cheating.

Beyond the servos and motors that move the boat and the oars, [electrosync] had to give his 3D printed fisherman a considerable amount of dexterity. Servos embedded into the 3D printed parts allow “Steve” to rotate at the hips and raise and lower his arm. With a fishing pole slipped into a hole printed into the hand, he’s able to cast out his magnetic bobber and see whats biting.

We’ve actually seen quite a number of projects that allow virtual objects inside Minecraft to interact with the real world, but comparatively few efforts to recreate objects from the game’s blocky universe, so the change of pace is nice.

Continue reading “RC Minecraft Boat Patrols The Pool For Treasure”

GamecubePC Puts a PC into a Gamecube chassis

GamecubePC Packs Plenty Of Punch Into GameCube Plastics

If reading Hackaday teaches us anything, it’s that there is a subset of hackers who take things like emulator builds a step farther than most. [RetroModder] is very clearly one such hacker. Enter the GamecubePC, which you can read about on Hackaday.io. The GamecubePC is a multi-year project that aims to stuff an entire Windows 10 PC into a GameCube shell while still being able to play Wii and GameCube titles at native resolution and performance.

Internals of the GamecubePC with all the custom chassis and PCB's on display
Internals of the GamecubePC with all the custom chassis and PCB’s on display

Although it only takes a spare computer and the Dolphin emulator to make a GameCube and Wii emulator, great attention has been paid to keeping the GameCube at the forefront. Contributing to the illusion is the preservation of the original GameCube power switch and reset buttons by way of custom PCB’s that interface the parts to the mSTX motherboard.

The bottom of the GameCube shell is replaced with a 3D printed base that mounts the motherboard while smartly giving access to the motherboard’s front panel. The minuscule motherboard sports an Intel Core™ i5-7600 with 8GB memory, and SSD storage. Topping off the experience are four functional controller ports that can be switched to be used with the emulator or with PC games too. Surely the GamecubePC will be the subject of many double takes!

Custom game builds are no stranger to Hackaday, and you might appreciate this portable Wii that can play Wii and GameCube games or this GameCube controller hacked into a Joycon for the Nintendo Switch.

Edit from the far future: it’s now a project on Tindie.  Check it out.

A troublesome Triple-Z80 arcade board requires negative voltage for audio output

Vintage Arcade Used Negative Voltage To Turn Volume Up To 11

When [Nicole Express] got her hands on the logic board for the 1986 SNK arcade game Athena, she ran into a rather thorny problem: The board expected to be fed negative five volts! [Nicole]’s analysis of the problem and a brilliant solution are outlined in her well written blog post.

[Nicole]’s first task was to find out which devices need negative voltage. She found that the negative five volts was being fed through a capacitor to the ground pins on the Mitsubishi M151516L, an obscure 12 W audio amplifier. After finding the data sheet, she realized something strange: the amp didn’t call for negative voltage at all! A mystery was afoot.

To fully understand the problem, she considered a mid-1980’s arcade and its cacophony of sounds. How would a manufacturer make their arcade game stand out? By making it louder, obviously! And how did they make their game louder than the rest?

The answer lays in the requirement for negative five volts. The amplifier is still powered with a standard 12 V supply on its VCC pin. But with ground put at -5 V, the voltage potential is increased from 12 V to 17 V without overpowering the chip. The result is a louder game to draw more players and their fresh stacks of quarters.

How was [Nicole Express] to solve the problem? ATX PSU’s stopped providing -5 V after the ISA slot disappeared from PC’s, so that wouldn’t work. She could have purchased an expensive arcade style PSU, but that’s not her style. Instead, she employed a wonderful little hack: a charge pump circuit. A charge pump works by applying positive voltage to a capacitor. Then the capacitor is quickly disconnected from power, and the input and ground are flipped, an equal but negative voltage is found on its opposite plate. If this is done with a high enough frequency, a steady -5 V voltage can be had from a +5 V input. [Nicole Express] found a voltage inverter IC (ICL7660) made just for the purpose and put it to work.

The IC doesn’t supply enough power to get 12 W out of the amplifier, and so the resulting signal is fed into an external amplifier. Now [Nicole]’s arcade game has sound and she can play Athena from the original arcade board, 1986 style!

Arcades are few and far between these days, but that doesn’t mean you can’t introduce your young ones to the joys of dropping a quarter or two, or build a gorgeous oak Super Mario Bros cabinet complete with pixel art inlays. Do you have a favorite hack to share? Be sure let us know via the Tip Line!

POLF: Retro 3D Game Uses Only A Character Display

Got a retrocomputing itch? So does [David Given], and luckily for us all he indulged it by writing POLF: a first-person 3D game for the Commodore PET that uses only the system’s 40×25 text mode character display for visuals. It’s a fantastic achievement, considering that the 80s-era computer boasts 32 kB of memory and doesn’t even have a graphical display.

Each level has an 8×8 layout.

Each level in POLF is a small, maze-like room in which one’s goal is to play a sort of cross between billiards and golf, aiming to move the round “ball” object into the square “hole” object. The 3D view is rendered using raycasting, which is a way of efficiently drawing a workable 3D perspective using limited resources. Raycasting can only do so much, but as a method it works fantastically within its limitations, and there are useful tutorials out there that lay the process bare.

The GitHub repository for the project is here, and it should run on any 40-column screen PET with at least 16 kB of RAM. Watch it in action in the video, embedded below. (Hint: the little bar graphs under the compass headings at the bottom of the screen represent the player’s proximity to the ball and hole objects. )

Continue reading “POLF: Retro 3D Game Uses Only A Character Display”

A game board with five LEDs and a hand shining a laser pointer at it

Laser Pointer And Arduino Make A Minimalistic Shooting Game

Video games are great and all, but sometimes you just want the thrill of manipulating actual objects in addition to watching action on a screen. This must have been the reason why Nintendo’s Duck Hunt became so popular despite the simplicity of its gameplay. Prolific hacker [mircemk] similarly made a computer-plus-physical game called “Laser Shooter“, which somehow reminds us of the good old NES game.

The game is based on an Arduino Nano, to which five LEDs as well as five photoresistors (LDRs) are connected. When the game is started, the LEDs light up at random and the player has a limited time to “shoot” the corresponding LDR with a laser pointer. This time limit is decreased as the game progresses, and the game is over once the player fails to hit the target on time. The “Game Over” message is accompanied by a sad tune, but luckily no giggling dog.

Complete schematics and code are available for anyone willing to try their hand at replicating or improving this game. And no, you can’t simply sweep your laser across the five LDRs all the time, because you lose if you shoot at the wrong target. For more laser pointer-based games, try this Laser Command clone or this laser tag badge system.

Continue reading “Laser Pointer And Arduino Make A Minimalistic Shooting Game”

The Doom computer game rendered with HTML checkboxes

Play DOOM Using Web Browser Checkboxes (Finally)

If you’ve ever felt the need to render DOOM using nothing but web browser checkboxes, [Andrew Healey] has you covered with his recent port of the first-person shooter. Naturally, this gets our tick of approval.

Yes, you read that right. You can now play DOOM in a 160 x 100 grid of HTML-generated checkboxes, much like this: ☑. The secret sauce for this project is partly derived from the fascinating Checkboxland project by fellow hacker Brian Braun, who uses HTML checkboxes to generate a variety of artistic demos.

[Andrew Healey] also made use of Cornelius Diekmann’s port of DOOM using WebAssembly, which we recently covered here on Hackaday. A smattering of code ties both projects together, and the end result is DOOM at 160×100 resolution, rendered entirely with HTML checkboxes.

The port can be played here using Chrome or Edge (other browsers may have issues if they do not support the zoom property in CSS). The source code is also available over on GitHub.

While the resolution and color palette aren’t what we have come to expect from DOOM, it’s likely that the graphics could be further improved by tinkering with the dithering and threshold settings. Higher resolutions may also be possible with further optimization.

We would be hard pressed to pick our favorite port of DOOM, as the list is becoming quite long. However for something completely different, check out our story on how DOOM was brought to Twitter.

Continue reading “Play DOOM Using Web Browser Checkboxes (Finally)”

Valve Reluctantly Shows How To Mod The Steam Deck

As the narrator in this official instructional video from Valve reminds the viewer several times, the gaming company would really rather you not open up your brand new Steam Deck and start poking around. They can’t guarantee that their software will function should you start changing the hardware, and since there’s no source for replacement parts yet anyway, there’s not much you can do in the way of repairs.

That said, Valve does believe you have the right to take apart your own device, and has produced the video below as an aid to those who are willing risk damaging their new system by opening it up. Specifically, the video goes over how to replace the most likely wear items on the handheld, namely the thumb sticks and the SSD. It seems inevitable that the stock thumb sticks will wear down after a couple years of hard use, so we’re glad to see they are easily removable modules. As for the SSD, it stands to reason that users would want to swap it out for faster and higher capacity models as they become available in the coming years.

Sooner or later, these are going to need to be replaced.

Now to be clear, we appreciate Valve making this video, and would love to see other manufacturers be so forthcoming. But we have to admit that some of its messaging does seem a bit heavy handed. The narrators admonition that users who open their Steam Deck are literally taking their lives into their own hands due to the danger of potentially rupturing the system’s lithium-ion battery is a bit hyperbolic for our tastes. The constant reminders of how badly you could bungle the job just comes off as overly preachy, though to be fair, we probably aren’t the intended audience.

Outside of its obvious gaming functions, we’re excited too see what the community can do with the Steam Deck. With official reference material like this, perhaps we’ll even start seeing some hardware modifications before too long. Though we wouldn’t blame you for hitting the Mute button halfway through.

Continue reading “Valve Reluctantly Shows How To Mod The Steam Deck”