The first program anyone writes for a microcontroller is the blinking LED which involves toggling a general-purpose input/output (GPIO) on and off. Consequently, the same GPIO can be used to read digital bits as well. A traditional microcontroller like the 8051 is available in DIP packages ranging from 20 pins to 40 pins. Some trade the number of GPIOs for compactness while other devices offer a larger number of GPIOs at the cost of complexity in fitting the part into your design. In this article, we take a quick look at applications that require a larger number of GPIOs and traditional solutions for the problem.
A GPIO is a generic pin on an integrated circuit or computer board whose behavior, including whether it is an input or output pin, is controllable by the user at runtime. See the internal diagram of the GPIO circuit for the ATmega328 for reference.
Simply put, each GPIO has a latch connected to a drive circuit with transistors for the output part and another latch for the input part. In the case of the ATmega328, there is a direction register as well, whereas, in the case of the 8051, the output register serves as the direction register where writing a 1 to it sets it in output mode.
The important thing to note here is that since all the circuits are on the same piece of silicon, the operations are relatively fast. Having all the latches and registers on the same bus means it takes just one instruction to write or read a byte from any GPIO register. Continue reading “General Purpose I/O: How To Get More”→
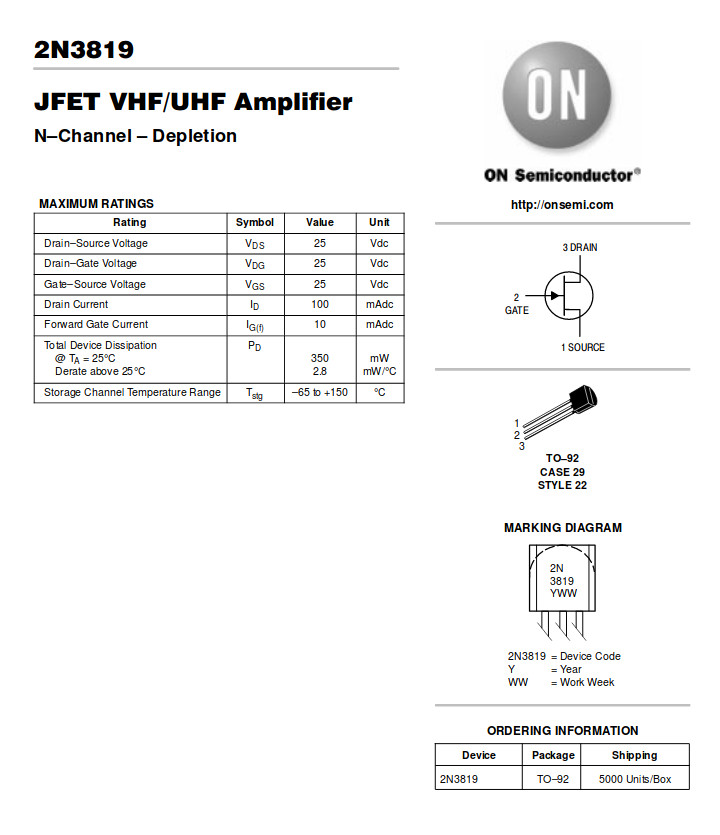
The 2N3819 is the archetypal general-purpose N-channel FET. (ON Semiconductor)
Over the recent weeks here at Hackaday, we’ve been taking a look at the humble transistor. In a series whose impetus came from a friend musing upon his students arriving with highly developed knowledge of microcontrollers but little of basic electronic circuitry, we’ve examined the bipolar transistor in all its configurations. It would however be improper to round off the series without also admitting that bipolar transistors are only part of the story. There is another family of transistors which have analogous circuit configurations to their bipolar cousins but work in a completely different way: the Field Effect Transistors, or FETs.
In a way it’s less pertinent to look at FETs in the way we did bipolar transistors, because while they are very interesting devices that power much of what you will do with electronics, you will encounter them as discrete components surprisingly rarely. Every CMOS device you deal with relies on FETs for its operation and every high-quality op-amp you throw a signal at will do so through a FET input, but these FETs are buried inside the chip and you’d be hard-pressed to know they were there if we hadn’t told you. You’d use a FET if you needed a high-impedance audio preamp or a low-noise RF amplifier, and FETs are a good choice for high-current switching applications, but sadly you will probably never have a pile of general-purpose FETs in the way you will their bipolar equivalents.
That said, the FET is a fascinating device. Join us as we take an in-depth look at their operation, and how and where you might use one.
FET basics
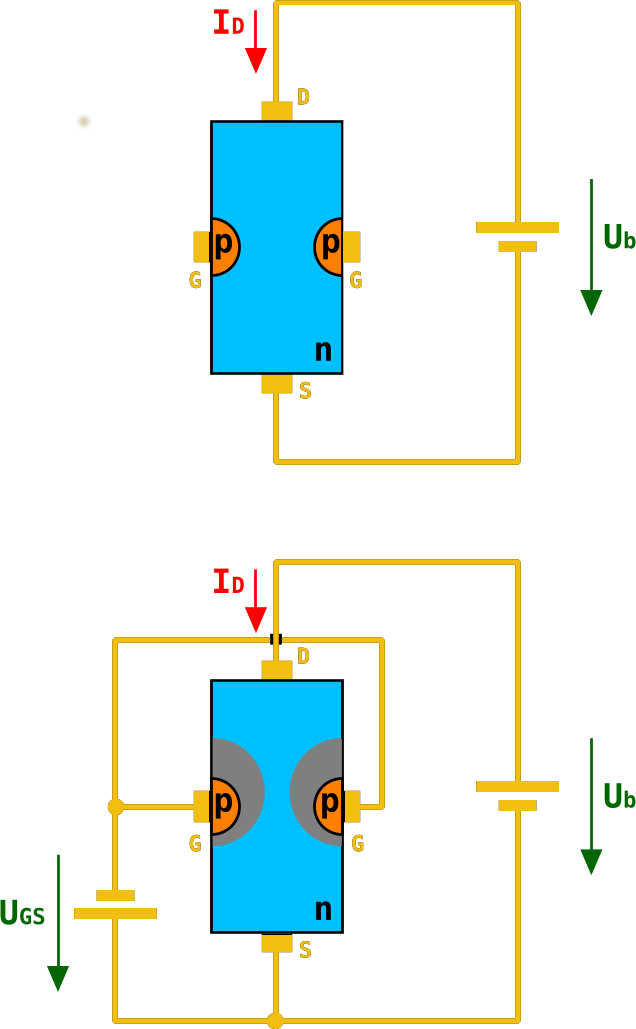
A diagram of an n-channel JFET. As the negative gate voltage on the p-type silicon decreases in the lower diagram, its electric field restricts the area through which electrons can flow in the n-type channel. Chtaube,(CC BY-SA 2.0 DE)
A basic FET has three terminals, a source (the source of electrons), a gate (the control terminal), and a drain (where electrons leave the device). These are analogous to the terminals on a bipolar transistor, in that the source fulfills a similar role to the emitter, the gate to the base, and the drain to the collector. Thus the three basic bipolar transistor circuit configurations have equivalents with a FET; common-emitter becomes common-source, common-base becomes common-gate, and an emitter follower becomes a source follower. It is dangerous to stretch the analogy between bipolar transistors and FETs too far, though, because of their different mode of operation. A closer similarity exists between a FET and a triode tube, if that helps.
The simplest FET for demonstration purposes has a piece of N-type semiconductor with source and drain connections at opposite ends, and a zone of P-type semiconductor deposited in its middle. This is referred to as an N-channel junction FET or JFET, because the channel through which current flows is N-type semiconductor, and because a diode junction exists between gate and channel. There are equivalent P-channel devices, just as there are PNP and NPN bipolar transistors.
Were you to bias an n-channel JFET as you would a bipolar transistor with a positive bias on its gate, the diode between gate and source would conduct, and the transistor would remain a diode with two cathode terminals. If however you give the gate a negative bias compared to the source, the diode becomes reverse-biased, and no current to speak of flows in the gate.
A characteristic of a reverse-biased diode is that it has a depletion zone between anode and cathode, an area in which there are no electrons. This is what causes the diode to no longer conduct, and the size of the depletion zone depends upon the size of the electric field that exists across it. If you’ve ever used a varicap diode, the capacitance between the two sides of this variable-width zone is the property you are exploiting.
In a FET, the depletion zone stretches from the gate region into the channel, and since its size can be adjusted by the gate voltage it can be used to “pinch” the remaining conductive region within the channel. Thus the area through which electrons can flow is controlled by the gate voltage, and thus the current that flows between drain and source is proportional to the gate voltage. We have an amplifier.
A simple FET radio receiver circuit showing FET biasing. The gate is biased at ground potential through the inductor, and the source is held above ground by the current in the 5K resistor. Herbertweidner [Public domain].In the JFET diagram above, the negative gate bias is represented by a battery. Tube enthusiasts may have encountered equipment that derives negative grid bias from a power supply, and you will find tube power units that include a -150 V rail for this purpose. In general though this is inconvenient in a FET circuit even though the voltage is lower, because of the extra cost of a negative regulator.. Instead the gate is held at a lower potential than the source by careful selection of a source resistor such that the current flowing through it brings the source up above ground, and a gate bias circuit that holds the gate close to ground. The base resistor chain from the bipolar circuit is for this reason often replaced with either a single resistor to ground, or a gate circuit with a very low DC resistance to ground such as an inductor.
MOSFETs, where the FET becomes more useful
Internal structure of an N-channel MOSFET. Fred the Oyster [Public domain].The JFET we have described is the simplest of field-effect devices, but it is not the one you will encounter most frequently. MOSFETs, short for Metal Oxide Semiconductor FETs, have a similar source, gate, and drain, but instead of relying on a depletion zone in a reverse-biased diode, they have a thin layer of insulation. The electric field from the gate acts across this insulation and pinches the conductive region in the channel through repulsion of electrons, with the same effect as it has in the JFET. It is beyond the scope of this piece to go into their mechanisms, but you will encounter two types of MOSFET: depletion mode devices that require the same negative bias as the JFET, and enhancement mode MOSFETS that require a positive bias.
Why would you use a FET?
So we’ve described the FET, and noted that while its mode of operation is different to that of a bipolar transistor it does a substantially similar job. Why would we use a FET then, what advantages does it offer us? The answer comes from the gate being insulated either by a depletion region in a JFET or by an insulating layer in a MOSFET. A FET is a voltage amplifier rather than a current amplifier, its input impedance is many orders higher than that of a bipolar transistor, and thus you will find FETs used in many applications that require a high impedance small-signal amplifier. The input of a high-performance op-amp will almost certainly be a FET, for example.
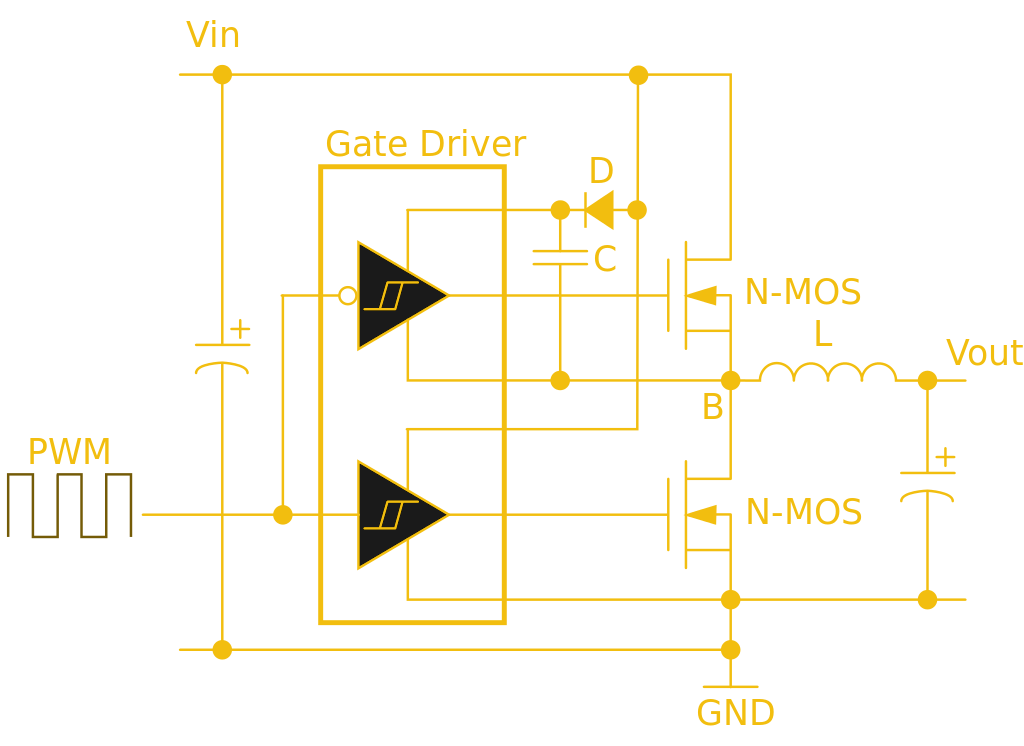
This half-bridge power MOSFET driver circuit uses a specialist gate driver IC with a pair of Schmidt buffers to deliver the initial surge required for a fast-turn-on time. Wdwd (CC BY 3.0).
The high input impedance has another effect less coupled to small signal work. Where a bipolar transistor requires significant base current to turn itself on, the corresponding FET requires almost none. Thus almost all complex integrated circuit logic devices are FET-based rather than bipolar because of the huge power saving that can be made by not needing to supply the base current demands of many thousands of bipolar transistors.
The same effect influences the choice of FETs for power switching, while a bipolar transistor’s base current is proportional to its collector current and thus it will need a significant driver, by contrast a power MOSFET requires virtually no standing gate current after an initial surge. A MOSFET power switch can thus be built requiring much less in the way of drive electronics and much more efficiently than a corresponding bipolar switch, and makes possible some of the tiny driver boards you might be used to for driving motors in your 3D printer, or your multirotor.
Through the course of this series you should have acquired a solid grounding in basic bipolar transistor principles, and now you should be able to add FETs to that knowledge base. We suggested you buy a bag of 2N3904s to experiment with in one of the previous articles, can we now suggest you do the same with a bag of 2N3819s?
The UNIX Way™ is to cobble together different, single-purpose programs to get the effect you want, for instance in a Bash script that you run by typing its name into the command line. But sometimes you want the system to react to changes in the system without your intervention. For example, you might like to watch a directory and kick off some program automatically when a file appears from a completed FTP transaction, without having to sit there and refresh the directory yourself.
The simple but ugly way to do this just scans the directory periodically. Here’s a really dumb shell script:
#!/bin/bash
while true
 do
   for I in `ls`
    do cat $I; rm $I
   done
 sleep 10
done
Just for an example, I dump the file to the console and remove it, but in real life, you’d do something more interesting. This is really not a good script because it executes all the time and it just isn’t a very elegant solution. (If you think I should use for I in *, try doing that in an empty directory and you’ll see why I use the ls command instead.)
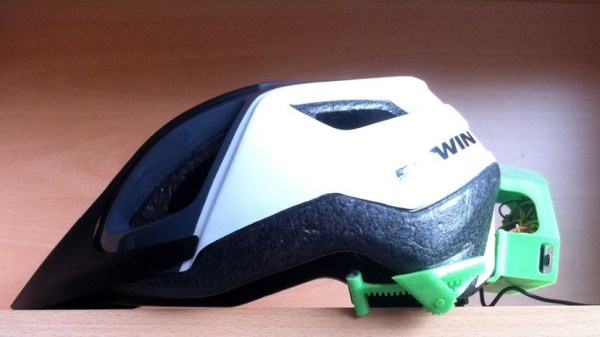
[Matlek] had an interesting problem. On one hand, a 40 minute bike commute without music is a dull event but in France it is illegal for any driver to wear headphones. What to do? Wanting neither to break the law nor accept the risk of blocking out surrounding sounds by wearing headphones anyway, and unwilling to create noise pollution for others with a speaker system, [Matlek] decided to improvise a custom attachment for a bike helmet that plays audio via bone conduction. We’ll admit that our first thought was a worrisome idea of sandwiching metal surface transducers between a helmet and one’s skull (and being one crash away from the helmet embedding said transducers…) but happily [Matlek]’s creation is nothing of the sort.
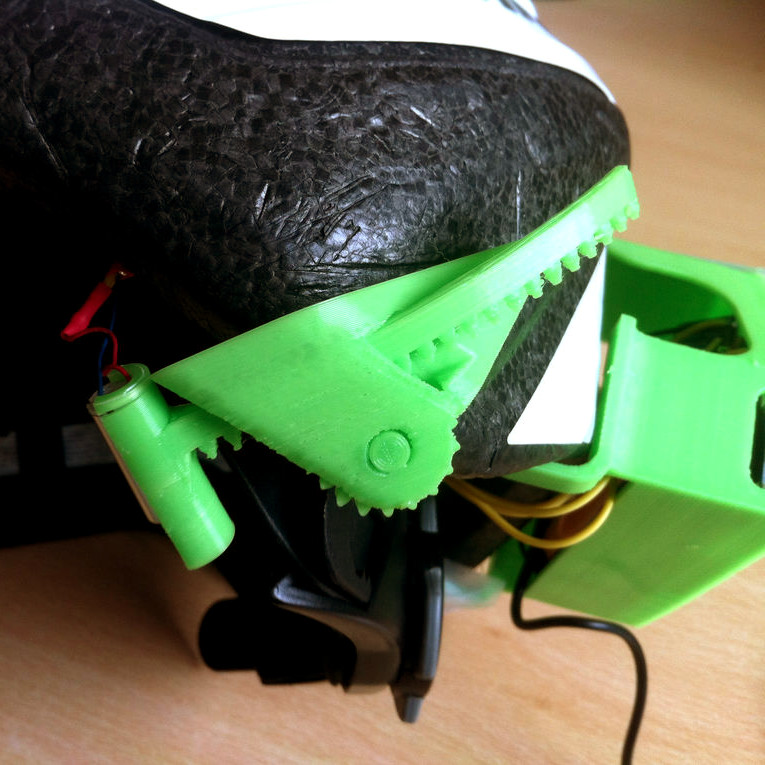
A 3D printed rack and pinon provides adjustability and stable contact with the “sweet spot” behind each ear.
The bone conduction is cleverly achieved by driving small DC motors with an audio signal through a TPA2012 based audio amplifier, which is powered by a single 18650 cell. By using motors in place of speakers, and using a 3D printed enclosure to hold the motors up to a sweet spot just behind the ears, it’s possible to play music that only the wearer can hear and does not block environmental sounds.
[Matlek] didn’t just throw this together, either. This design was the result of researching bone conduction audio, gathering a variety of different components to use as transducers, testing which performed best, and testing different locations on the body. Just behind the ear was the sweet spot, with the bony area having good accessibility to a helmet-mounted solution. Amusingly, due to the contact between the motors and the rest of the hardware, the helmet itself acts as a large (but weak) speaker and faint music is audible from close range. [Matlek] plans to isolate the motors from the rest of the assembly to prevent this.
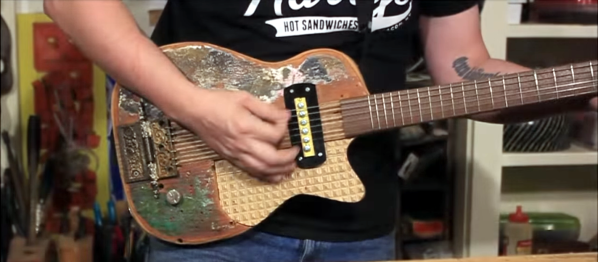
[Keith Decent] recently got himself involved in a plywood challenge, and decided to make a single-pickup electric guitar. Since he is a prolific hoarder of scrap wood, the result is a lovely stack of laminates from many sources, including reclaimed cabinet doors. Really though, the wood is just the beginning—nearly every piece of this texture-rich axe started life as something else.
He’s made a cigar box guitar before, but never a bona fide solid-body electric. As you might guess, he learned quite a bit in the process. [Keith] opted for a neck-through design instead of bolting one on and using a truss rod. The face pieces are cut from his old bench top, which has a unique topology thanks to several years of paint, glue, and other character-building ingredients.
We love the geometric inlay [Keith] made for the pick guard, and the fact that he used an offcut from the process as a floating bridge. He also made his own pickup from bolts, an old folding rule, and reclaimed magnet wire from discarded wall wart transformers. Once he routed out the body and installed the electronics, [Keith] cut up an old painting he’d done on plywood to use as the back panel. Our only complaint about this beautiful guitar is that he didn’t design the back piece to be dinosaur side out. Shred past the break to give her a listen.
[Keith] wound his pickup with a little help from a drill, but a DIY pickup winder might have caused him less grief.
Every hacker knows what it is to venture down a rabbit hole. Whether it lasts an afternoon, a month, or decades, finding a new niche topic and exploring where it leads is a familiar experience for Hackaday readers.
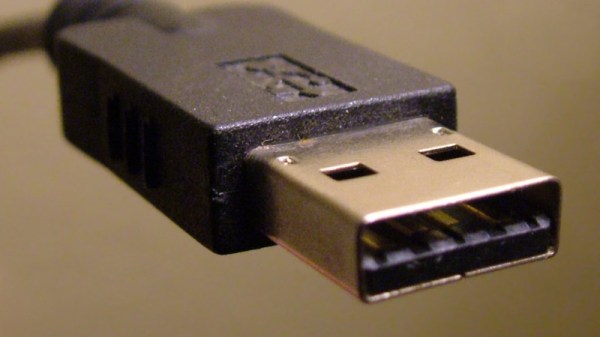
[Glenn ‘devalias’ Grant] is a self-proclaimed regular rabbit hole diver and is conscious that, between forays into specific topics, short-term knowledge and state of mind can be lost. This time, whilst exploring reverse engineering USB devices, [Glenn] captured the best resources, information and tools – for his future self as well as others.
His guide is impressively comprehensive, and covers all the necessary areas in hardware and software. After formally defining a USB system, [Glenn] refers us to [LinuxVoice], for a niftytutorial on writing a linux USB driver for an RC car, in Python. Moving on to hardware, a number of open-source and commercial options are discussed, including GoodFET, FaceDancer, and Daisho – an FPGA based monitoring tool for analysing USB 3.0, HDMI and Gigabit Ethernet. If you only need to sniff low speed USB, here’s a beautifully small packet snooper from last year’s Hackaday prize.
This is a guide which is well-informed, clearly structured, and includes TL;DR sections in the perfect places. It gives due credit to LibUSB and PyUSB, and even includes resources for USB over IP.
We get it. You love your fish, but they can’t bark or gently nip at your shin flesh to let you know they’re hungry. (And they always kind of look hungry, don’t they?) One day bleeds into the next, and you find yourself wondering if you’ve fed them yet today. Or are you thinking of yesterday? Fish deserve better than that. Why not build them a smart fish feeder?
Domovoy is a completely open-source automatic fish feeder that lets you feed them on a schedule, over Bluetooth, or manually. This simple yet elegant design uses a small stepper motor to drive a 3D-printed auger to deliver the goods. Just open the lid, fill ‘er up with flakes, and program up to four feedings per day through the 3-button and LCD interface. You can even set the dosage, which is measured in complete revolutions of the auger.
It’s built around an ATMega328P, but you’ll have to spin your own board and put the feeder together using his excellent instructions. Hungry to see this feeder in action? Just swim past the break.

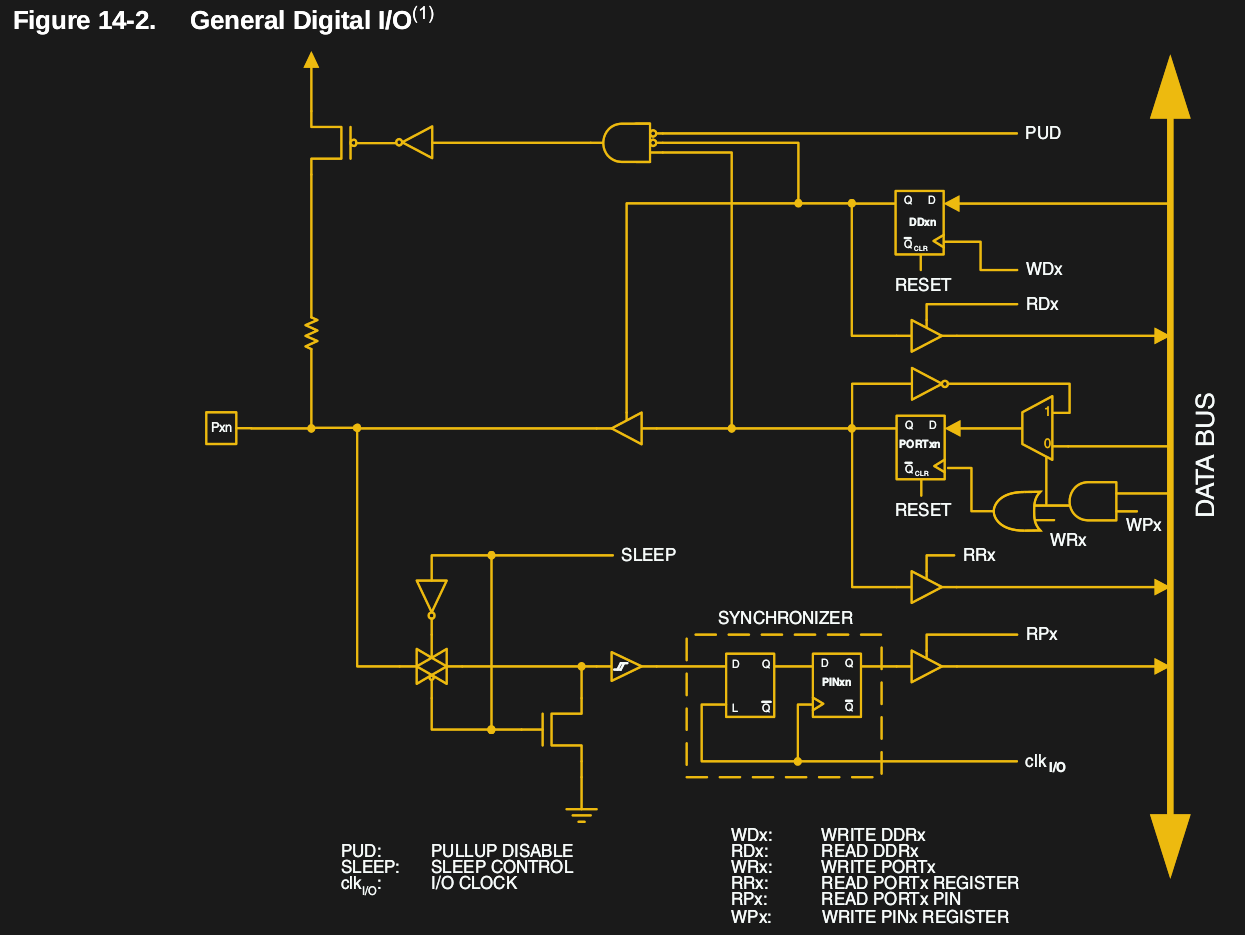 A GPIO is a generic pin on an integrated circuit or computer board whose behavior, including whether it is an input or output pin, is controllable by the user at runtime. See the internal diagram of the GPIO circuit for the ATmega328 for reference.
![A simple FET radio receiver circuit showing FET biasing. The gate is biased at ground potential through the inductor, and the source is held above ground by the current in the 5K resistor. Herbertweidner [Public domain].](https://hackaday.com/wp-content/uploads/2018/06/1kreiser_mit_fet.png)
![Internal structure of an N-channel MOSFET. Fred the Oyster [Public domain].](https://hackaday.com/wp-content/uploads/2018/04/n-channel_mosfet-svg1.png)