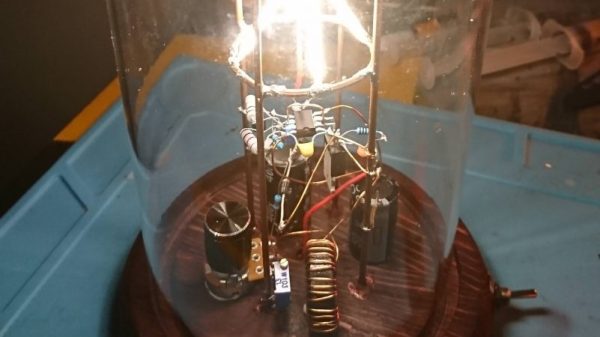
Dead Bug Soldered LED Ring Of Awesome

Sometimes the simplest things in life are the most beautiful. [The Tweaker] has soldered an LED circle on the top of an ATmega328P chip, and it looks great.

Using nothing more than some solder, wire, 20 x Pico 0402 (1mm x 0.5mm) blue LEDs and an ATmega328P (7mm x 7mm), [The Tweaker] managed to cram 20 LEDs into a circle on the top of the chip soldered in dead bug style. The chip is running some Arduino code and is operating on the 8 MHz internal crystal oscillator, so that manages to keep the part count low. The soldering is done in a spiral so the LED terminals are hooked up to the right pins, but it seems to add to the aesthetics of the project and looks like it would take a really steady hand. Once you connect a power source it displays chasing lights as well as other light patterns.

There may not be much to this project but it does look great.

Continue reading “Dead Bug Soldered LED Ring Of Awesome”

Edge-lit Pendants Show Two Layers Are Better Than One

Engraved acrylic lights up nicely with LED lighting. Simply engrave clear acrylic with a laser engraver, then edge-light the acrylic and watch the engraving light up. This badge made by [Solarbotics] shows how they used this principle when creating some pendants for an event that performed particularly well in the dark.

The pendants they created have two engraved acrylic panels each, and that’s about it. Two LEDs and a CR2032 battery nestle into pre-cut holes, and the engraved sides are placed face-to-face, so the outer surfaces of the pendant are smooth. By using some color-cycling RGB LEDs on one panel and blue LEDs on the other panel, the effect is that of an edge-lit outer design with a central element that slowly changes color separately from the rest of the pendant.

The design stacks the LED leads and coin cells in such a way that a simple wrap of tape not only secures things physically, but also takes care of making a good electrical connection. No soldering or connectors of any kind required. [Solarbotics] found that CR2032 cells would last anywhere between a couple of days to a week, depending on the supplier.

This design is great for using a minimum of materials, but if that’s not a priority it’s possible to go much further with the concept. Multiple layers of edge-lit acrylic were used to make numeric 0-9 display modules as well as a full-color image.


No-Solder Breadboarding For SMD LEDs

Breadboarding is a great way to get started with electronics, and with the wide availability of those little wire jumpers, it’s never been easier – until you hit roadblocks due to poor connections and parasitic capacitance futzing with your signals. However, in today’s current climate, the latest and greatest modules are too often available only in SMD packages, and while breakout boards can help, it’s probably overcomplicating things a bit when it comes to SMD LEDs. It’s all good, though – [Simon Merrett] has a workaround, as part of his Yapolamp project.

[Simon] first took a flat strip of steel, and placed two neodymium magnets on top. The assembly was then wrapped in electrical tape for insulation, and two contacts were created with copper tape. The LEDs were then placed across the two contacts and wires were attached to join them to the breadboard. The 5630 LEDs [Simon] must contain some sort of ferrous material, because they were attracted to the magnets and sat neatly in place.

It’s a neat hack that would be particularly useful if you needed to quickly swap out LEDs, and saves them from damage by soldering. Meanwhile, check out this SMD LED matrix from 2009. 

Graduation Cap Shows Us What It’s Got!

A high school graduation ceremony is well due the pomp and circumstance for making it through one of life’s many milestones. To commemorate the event with their own flair, redditor [PM_(cough)_FOR_KITTENS] hid a 32 x 32 GIF-playing LED matrix in their graduation cap!

The board is controlled by a Teensy hosting a SmartMatrix shield. With the shield’s assistance, the matrix enables scrolling text and GIFs to play across the LEDs, as well as an SD card slot to load up your favourites. Currently, it’s set to a 50-50 chance of playing a gif — one of sixty — or one of the twenty scrolling text lines loaded onto the SD card. [PM_(ahem)_FOR_KITTENS] co-opted his friend’s expertise to write the code — available here — while he designed the circuit and handled the assembly.

Carefully unwrapping his cap, [PM_(yep)_FOR_KITTENS] reinforced it with thinner and stronger cardboard, cutting slots into it, allowing the boards and wires to — barely — fit inside. A hole in the side of the cap is enough for a barely noticeable USB cable to run down his neck to a 2000 mAh battery which can power the cap for over five hours at 5V and 2A. Check out a demo video after the break!

Continue reading “Graduation Cap Shows Us What It’s Got!”

A Table From Beyond Infinity

Infinity mirrors are some far-out table mods and make a great centerpiece. Instructables user [bongoboy23] took a couple steps beyond infinity when designing this incredible table tailor-made for our modern age.

Poplar and pine wood make up the framing, and red oak — stained and engraved — make for a chic exterior. Programmed with Arduino and run on a Teensy 3.1, the tabletop has 960 LEDs in forty sections. There are, four USB ports hidden behind sliding panels, as well as a two-port AC outlet and an inductive charging pad and circuit.  A hidden Adafruit TFT touchscreen display allows the user to control the table’s functions. Control is limited to changing lighting functions, but Pac-Man, Snake, and text features are still to come!

Weighing in at $850, it’s not a cheap build, but it looks amazing.

Continue reading “A Table From Beyond Infinity”

Helix Display Brings Snake Into Three Dimensions

Any time anyone finds a cool way to display in 3D — is there an uncool way? — we’re on board. Instructables user [Gelstronic]’s method involves an array of spinning props to play the game Snake in 3D.

The helix display consists of twelve props, precisely spaced and angled using 3D-printed parts, each with twelve individually addressable LEDs. Four control groups of 36 LEDs are controlled by the P8XBlade2 propeller microcontroller, and the resultant 17280 voxels per rotation are plenty to produce an identifiable image.

In order to power the LEDs, [Gelstronic] used wireless charging coils normally used for cell phones, transferring 10 W of power to the helix array.  A brushless motor keeps things spinning, while an Arduino controls speed and position via an encoder. All the links to the code used are found on the project page, but we have the video of the display in action is after the break.

Continue reading “Helix Display Brings Snake Into Three Dimensions”

LED display controlled by Bluetooth speaker

How Many Hacks In An LED Display?

There are so many nice hacks in [Joekutz]’s retro LED display project that it’s hard to know where to start. There’s his DIY LED display controlled by an Arduino UNO. To have some text or picture for the display, he’s wired the output of a Bluetooth speaker directly to the Arduino, and sends it speaker tones that encode the text to draw. And as if that wasn’t enough, he’s hacked a quartz driver board from an analog clock to use the display as a clock as well.

Let’s start with the LED matrix display, perhaps the best excuse for trying your hand at shift registers. This display uses two such 8-bit shift registers daisy chained together feeding two 8-bit Darlington arrays. The display has ten rows of sixteen columns, and you guessed it, the columns are controlled by the sixteen shift registers. Two Arduino pins tell the shift registers which column to turn on. The rows are turned on and off using ten transistors controlled by ten more Arduino pins. Scanning at 80 frames per second he gets a nice, flickerless display.

To make both the LED matrix circuit board and the control board, [Joekutz] carved out isolation paths in copper clad boards using his homemade CNC mill. Be sure to check out the first video below to see his misadventures with it that ultimately led to his gorgeous boards.

Continue reading “How Many Hacks In An LED Display?”