Always Misplacing Your Keys? You Can Fix That With Some Logic Chips

Every time he came home, it was the same thing. As soon as he crossed the threshold, his keys just disappeared. There was no other logical explanation for it. And whenever it was time to leave again, he had to turn the house upside down to find them.

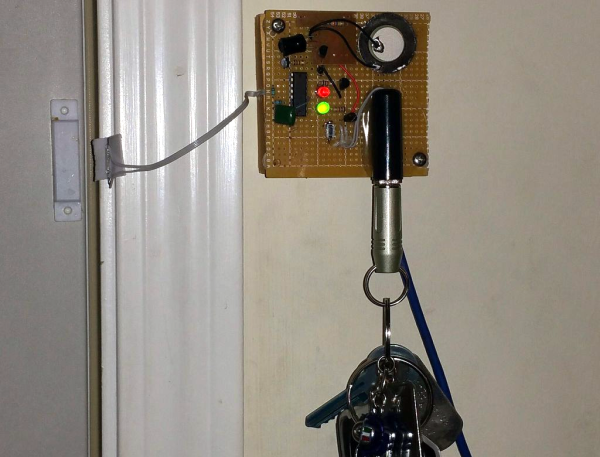
One day, [out-of-the-box] decided he’d had enough and built a door-activated alarm system out of stuff he had on hand—a decade counter, a cheapo reed switch-based door alarm, and some transistors. When the door is closed, the decade counter’s output is set to light up a green LED. When he comes home and opens the door, the reed switch closes, triggering the decade counter to shift its output to the next pin. The red LED comes on, and NPN transistor grounds the piezo, sounding the alarm. The only way to stop it is by inserting a shorted 1/4″ phone plug conveniently attached to his key ring into a jack on the circuit board until he hears that satisfying click of safe key-ping.

For those times when immediately plugging the keys into the wall isn’t feasible, or if his keys should disappear before he has the chance, there’s a momentary on the board that will stop the symphony of robotic cicadas blasting out from the piezo. It’s also good for family members who don’t want to play along or haven’t yet earned their 1/4″ plug.

Be sure to check out the build video after the break, which is just through that door there. And keep an eye on your keys, eh? Hackaday is not responsible for lost or stolen personal articles. Should you lose them, we can only suggest making a new car key from the spare and printing replacements for any standard keys.

Continue reading “Always Misplacing Your Keys? You Can Fix That With Some Logic Chips”

Careful Testing Reveals USB Cable Duds

What’s worse than powering up your latest build for the first time only to have absolutely nothing happen? OK, maybe it’s not as bad as releasing the Magic Smoke, but it’s still pretty bewildering to have none of your blinky lights blink like they’re supposed to.

What you do at that point is largely a matter of your troubleshooting style, and when [Scott M. Baker]’s Raspberry Pi jukebox build failed to chooch, he returned to first principles and checked the power cable. That turned out to be the culprit, but instead of giving up there, he did a thorough series of load tests on multiple USB cables to see which ones were suspect, with interesting results.

[Scott] originally used a cable with a USB-A on one end and a 3.5-mm barrel plug on the other with a switch in between, under the assumption that the plug on the Pi end would be more robust, as well as to have a power switch for the jukebox. Testing that cable using an adjustable DC load would prove that the cable was unfit for Pi duty, dropping the voltage to under 2 volts at a measly 500-mA load. Other cables proved much better under load, even those with USB mini jacks and even one with a 5.5-mm barrel. But the larger barrel-plug cable also proved to be a stinker when it was paired with an inline switch. In the video below, [Scott] walks through not only the testing process, but also gives a quick tour of his homebrew DC load.

The lesson is clear: not all USB cables are created equal, so caveat hacker. And if you’ve got a yen to check the cables in your junk bin like [Scott] did, this full-featured smart DC load might be just the thing.

Continue reading “Careful Testing Reveals USB Cable Duds”

Twitter Celebration Of Scientist Hacks For Lab And Field

If you like reading about scientists creatively using household objects for their work, you will enjoy browsing Twitter hashtag #reviewforscience where scientists are sharing stories of repurposing everyday things for their lab and field.

Research papers focus on the scientific hypothesis and the results of testing it. It is very common for such papers to leave out details of tools and techniques as irrelevant. (A solid scientific conclusion should be reproducible no matter what tools and techniques are used.) This sadly meant much of scientists’ ingenuity never see light.

We can thank Amazon user [John Birch] for this event. His son wished to study how ants from different colonies interact. In order to observe how these groups of ants react to each other while still keeping the populations separate, he wanted to keep one group of ants inside a tea strainer. He posted this technique as a review on the tea strainer’s Amazon product page, where it caught the attention of @RobynJWomack and started spreading, taking off when @DaniRabaiotti suggested the tag #reviewforscience.

Sadly, it appears our original scientist (who posted under his dad’s Amazon account) did not succeed with the tea strainer technique. But he has succeeded in drawing attention to creativity in science worldwide, as well as making his dad internet famous.

We love lab hacks here. For scientists who wish there was a place to document their creative lab hacks, might we suggest Hackaday.io?

[via Washington Post]

What Is This, A Controller For Ants?!

What’s the smallest controller you’ve ever used? [BitBuilt] forum user [Madmorda] picked up a cool little GameCube controller keychain with semi-working buttons at her local GameStop. As makers are wont to do, she figured she could turn it into a working controller and — well — the rest is history.

This miniaturized controller’s original buttons were essentially one piece of plastic and all the buttons would depress at once — same goes for the D-pad. Likewise, the original joystick and C-stick lacked springs and wouldn’t return to a neutral position after fidgeting with them. To get the ball rolling, [Madmorda] picked up a GC+ board — a custom GameCube controller board — just small enough to fit this project, eleven hard tact switches for the various buttons, and two squishy tact switches to replicate the original controller’s L and R button semi-analog, semi-digital functionality.

Continue reading “What Is This, A Controller For Ants?!”

Quick And Dirty Driver Tips For Surplus VFDs

Sometimes it seems like eBay is the world’s junk bin, and we mean that in the best possible way. The variety of parts available for a pittance boggles the mind sometimes, especially when the parts were once ordered in massive quantities but have since gone obsolete. The urge to order parts like these in bulk can be overwhelming, and sooner or later, you’ll find yourself with a fistful of old stuff but no idea how to put it to use.

Case in point: the box of Russian surplus seven-segment vacuum fluorescent displays (VFDs) that [w_k_fay] had to figure out how to use. The result is a tutorial on quick and dirty VFD drivers that looks pretty handy. [w_k_fay] takes pains to point out that these are practical tips for putting surplus VFDs to work, as opposed to engineered solutions. He starts with tips on characterizing your surplus tubes in case you don’t have a pinout. A 1.5 V battery will suffice for the hot cathode, while a 9 V battery will turn on the segments. The VFDs can be treated much like a common cathode LED display, and a simple circuit driving the tube with a 4026 decade counter can be seen below. He also covers the challenges of driving VFDs from microcontrollers, and promises a full build of a frequency counter wherein the mysteries of multiplexing will be addressed.

Sounds like it’s time to stock up on those surplus VFDs and put them to work. For inspiration, take a look at this minimalist VFD clock, or perhaps mix VFDs with Nixies to satisfy your urge for all things glowy.

Continue reading “Quick And Dirty Driver Tips For Surplus VFDs”

Tricked-out Barbecue Will Make You Do A Spit Take

[Strn] and his friends love to barbecue no matter what it’s like outside. But something always seems to interrupt the fun: either it’s time to get up and turn the meat, or the music stops because somebody’s phone ran out of juice, or darkness falls and there aren’t enough flashlights or charged-up phones. He had the idea to build the Swiss Army knife of barbecues, a portable powerhouse that solves all of these problems and more (translated).

Most importantly, the E-Mangal rotates the skewers for even cooking. It does this with a 3D-printed worm gear system driven by the heater flap actuator from a car. After 25 minutes of slow rotation, a voice announces that it’s time to eat. [Strn] and friends will never hurt for music options between the pre-loaded tracks, Bluetooth audio, FM antenna, USB, and SD options running through a 3W amp. Two USB lights illuminate nighttime barbecuing, and the 10 Ah battery can do it all and keep everyone’s phone charged. For safety’s sake, [Strn] included a half-liter water tank to extinguish the coals via jet stream. Everything is run by a PIC18F, and it can be controlled at the box or through a simple web interface.

We love the look of this barbecue controller almost as much as the functionality. The sturdy stance of those short, angled legs give it a mid-century appliance feel, and seeing all the guts on display is always a plus. Grab a turkey leg and take the tour after the break.

The E-Mangal has a thermocouple in the coal box to measure the temperature, but there’s no direct control. If you’re more interested in temperature options than entertainment, here’s a project that micromanages everything on the grill.

Continue reading “Tricked-out Barbecue Will Make You Do A Spit Take”

DIY Spray Booth Is Both Light And Lit

Industrial designer [Eric Strebel] has access to big, walk-in spray booths, but bigger isn’t always better. For small jobs, it’s overkill, and he wanted his own spray booth anyway. If you’re ready to upgrade from that ratty old cardboard box in the garage, look no further than [Eric]’s spray booth how-to after the break.

If you don’t already know, [Eric] is something of a foam core legend. He has several videos about model building techniques that produce really slick results, so it’s no surprise to see these skills transfer to a larger build. The booth is built from a single 40″ x 60″ sheet of 1/2″ foam core board, a furnace filter, and a vent fan modified to fit his shop’s system. The whole thing cost less than $200, most of which goes toward the fan.

[Eric] modified an existing spray booth plan to fit his needs and added some really nice touches along the way. All the edges are beveled and the unfinished faces are taped, so at first glance it looks like it’s made out of painted wood or melamine board. The furnace filter slides out one side for easy replacement and is braced with foam scraps so it won’t fall forward. The best part of this booth is the LED strips—they make for way better working conditions than the dim recesses of a cardboard box.

If you’d rather build a walk-in spray booth, why not make your own sliding barn doors, too?

Continue reading “DIY Spray Booth Is Both Light And Lit”