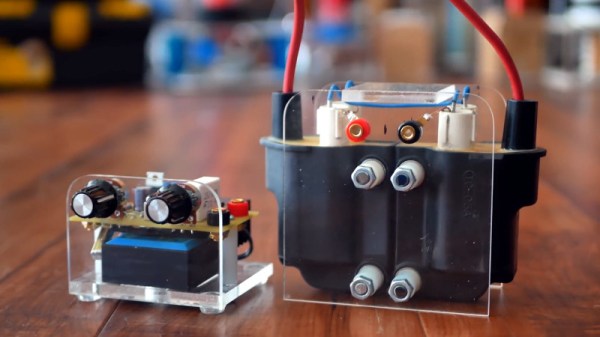
Arduino Takes Control Of Dead Business Card Cutter

It’s a common enough situation, that when an older piece of equipment dies, and nobody wants to spend the money to repair it. Why fix the old one, when the newer version with all the latest bells and whistles isn’t much more expensive? We all understand the decision from a business standpoint, but as hackers, it always feels a bit wrong.

Which is exactly why [tommycoolman] decided to rebuild the office’s recently deceased Duplo CC-330 heavy duty business card cutter. It sounds like nobody really knows what happened to the machine in the first place, but since the majority of the internals were cooked, some kind of power surge seems likely. Whatever the reason, almost none of the original electronics were reused. From the buttons on the front panel to the motor drivers, everything has been implemented from scratch.

An Arduino Mega 2560 clone is used to control four TB6600 stepper motor drivers, with a common OLED display module installed where the original display went. The keypad next to the screen has been replaced with 10 arcade-style buttons soldered to a scrap of perfboard, though in the end [tommycoolman] covers them with a very professional looking printed vinyl sheet. There’s also a 24 V power supply onboard, with the expected assortment of step up and step down converters necessary to feed the various electronics their intended voltages.

In the end, [tommycoolman] estimates it took about $200 and 30 hours of work to get the card cutter up and running again. The argument could be made that the value of his time needs to be factored into the repair bill as well, but even still, it sounds like a bargain to us; these machines have a four-figure price tag on them when new.

Stories like this one are important reminders of the all wondrous things you can find hiding in the trash. Any time a machine like this can be rescued from the junkyard, it’s an accomplishment worthy of praise in our book.

DIY Relay Module Saves Time

As any programmer could tell you, there’s significant value in automating a process that is performed often enough. The more times that process is used, the more it makes sense to automate it or at least improve its efficiency. This rule isn’t limited to software though; improvements to hardware design can also see improvements in efficiency as well. For that reason, [Hulk] designed a simple relay module in order to cut the amount of time he spends implementing this solution in his various other projects.

While driving a relay with a transistor is something fundamental, this project isn’t really about that per se. It’s about recognizing something that you do too much, and then designing that drudgery out of your projects. [Hulk] was able to design a PCB with 12 modules on it, presumably saving fabrication costs. He can then easily populate them with specific components as soon as he needs one. Another benefit of designing something like this yourself, rather than an off-the-shelf relay module, is that you can do away with any useless features you’ll never need (or add ones that aren’t available in commercial devices).

We can appreciate the efficiency gains this would make for our next project that needs a simple driver for a light, garage door opener, or any other binary electronic device. It can be a hassle to go find the correct transistor and relay, solder it all on the project board, and hope it all works. A pre-made solution solves all these issues, but we do wish the schematics were available to keep us from having to design our own. Driver boards are a pretty common project for all the different types of relays we see around here, so there is probably one available out there.

Incredible Soldering In The Name Of Hardware Support

If you’re developing a performant IP-KVM based on the Raspberry Pi, an HDMI capture device that plugs into the board’s CSI port would certainly be pretty high on your list of dream peripherals. Turns out such devices actually exist, and somewhat surprisingly, are being sold for reasonable prices. Unfortunately the documentation for the chipset they use is a bit lacking, which is a problem if you’re trying to wring as much performance out of them as possible.

As the creator of Pi-KVM, [Maxim Devaev] needed to truly understand how the Toshiba TC358743 chip used in these capture devices worked, so he decided to build his own version from scratch. In the name of expediency, he didn’t have a proper breakout board made and instead decided to hand-solder the tiny BGA chip directly to some parts bin finds. The resulting perfboard capture device is equal parts art and madness, but more importantly, actually works as expected even with 1080p video signals.

Ultimately, the lessons learned during this experiment will lead to a dedicated KVM board that will plug into the Pi’s expansion header and provide all the necessary hardware in one shot. As [Maxim] explains in the Pi-KVM docs, the move to the CSI connected Toshiba TC358743 cuts latency in half compared to using a USB capture device. That said, USB capture devices will remain fully supported for anyone who just needs a quick way to get things working.

This DIY capture card is a perfect example of how the skills demonstrated while working on a project can be just as impressive as the end result. [Maxim] didn’t set out to hand-solder a BGA HDMI capture chip, it was merely one step in the process towards creating something better. Those intermediary achievements are often lost in the rush to document the final project, so we’re always glad when folks take the time to share them.

[Thanks to Eric for the tip.]

A Cyclopic LCD Case For Your Raspberry Pi Server

If you’ve got a personal website that needs hosting or a few hundred gigabytes of files that could use a centralized storage location, the Raspberry Pi’s small size and extreme energy efficiency make it a compelling server choice compared to that curbside Pentium 4 box you’ve been trying to find a home for. All you need is something to put in.

Of course there’s no shortage of Pi case designs ready to be extruded from your 3D printer, but we recently found ourselves particularly taken with this unique one designed by [Ken Segler]. It’s not only small and sleek with a dash of futuristic flair, but it includes a front-mounted two inch 240 x 320 IPS display that connects to the Pi over SPI. At the minimum that gives you a way to see all those beautiful boot messages on startup, but with a little code, it could provide you with various system statics and status messages at a glance.

While the LCD is clearly the star of the show here, the case also has a few other nice features that make it worthy of your consideration. The magnetically attached fan filter on the the top, for one. The stacked layout that puts the Pi directly above the SSD also makes for a relatively compact final product.

One thing to note though is that [Ken] is using Power-over-Ethernet, meaning there’s no spot for a dedicated power jack on the case. It’s an easy enough feature to add into your own build, but naturally not everyone’s network is suitably equipped. In that case, beyond the normal annoyances of editing STL files, it shouldn’t be too much trouble to add one in without having to literally hack your way through the printed plastic.

A Miniature Power Supply For High Voltage Hacking

If you’re looking to experiment with plasma, you’re going to need a high voltage power supply. Usually that means something big, complex, and (naturally) expensive. But it doesn’t have to be. As [Jay Bowles] demonstrates in his latestĀ Plasma Channel video, you can put together a low-cost power supply capable of producing up to 20,000 volts that fits in the palm of your hand. Though you should probably just put the thing down on a table when in use…

Finding the feedback coil with a multimeter.

The secret to the build is the flyback transformer. A household staple during the era of CRT televisions, these devices can still be readily found online or even salvaged from a broken TV. We’d recommend searching eBay for new old stock (NOS) transformers rather than risk getting blown through a wall while poking around in an old TV you found on the side of the road, but really it all depends on your experience level with this sort of thing.

In any event, once you have the flyback transformer in hand, the rest of the build is very simple. [Jay] demonstrates how you can determine the pinout for your transformer even if you can’t find a datasheet for it, and then proceeds to assemble the handful of ancillary parts necessary to drive it. Housed on a scrap of perfboard and mounted to a piece of plastic to keep stray objects away from the sparky bits underneath, this little power supply would be a reliable workhorse for anyone looking to start experimenting with high voltage. Perhaps an ionic lifter is in your future?

Readers with a photographic memory may recall that [Jay] used this same diminutive power supply in his recently completed water-based Marx generator.

Continue reading “A Miniature Power Supply For High Voltage Hacking”

Print Your Way To Keyboard Stability

Keyboard key stabilizers, or stabs as they’re known in enthusiast circles, do exactly what you’d expect — they stabilize longer keys like the Shifts and the space bar so that they don’t have to be struck dead-center to actuate evenly. Stabs work by flanking the key switch with two non-functional switch actuators linked with a thick wire bar. Some people love stabs and insist on stabilizing every key that’s bigger than 1u, while other people thinkĀ  stabs are more trouble than they’re worth for various reasons, like rattling.

[Riskable 3D Printing] has been working on a parametric, printable stabilizer system for Cherry MX caps that uses small disk magnets to keep the wire in place. As you can see in the video (embedded after the break), the result is a crisp clacker that doesn’t rattle. The magnets stabilize the wire, so it snaps back quite nicely.

Although the print is an easy one, [Riskable] says the design process wasn’t as cut and dried as it seems. The center points of the stabilizer stems aren’t supposed to be in the center of cutouts, even though it looks that way to the naked eye. After that, the pain point has shifted to the wire, and getting it as straight as possible before making the necessary bends. [Riskable] is going to make a straightener to help out, and we suggest something like this one.

Clacker hacking is quite the rabbit hole, especially when combined with 3D printing. We recently saw a completely 3D-printed macro pad, springs and all.

Continue reading “Print Your Way To Keyboard Stability”

3D Printable Kinematic Couplings, Ready To Use

Time may bring change, but kinematic couplings don’t. This handy kinematic couplings resource by [nickw] was for a design contest a few years ago, but what’s great is that it includes ready-to-use models intended for 3D printing, complete with a bill of materials (and McMaster-Carr part numbers) for hardware. The short document is well written and illustrated with assembly diagrams and concise, practical theory. The accompanying 3D models are ready to be copied and pasted anywhere one might find them useful.

What are kinematic couplings? They are a way to ensure that two parts physically connect, detach, and re-connect in a precise and repeatable way. The download has ready-to-use designs for both a Kelvin and Maxwell system kinematic coupling, and a more advanced design for an optomechanical mount like one would find in a laser system.

The download from Pinshape requires a free account, but the models and document are licensed under CC – Attribution and ready to use in designs (so long as the attribution part of the license is satisfied, of course.) Embedded below is a short video demonstrating the coupling using the Maxwell system. The Kelvin system is similar.

Continue reading “3D Printable Kinematic Couplings, Ready To Use”