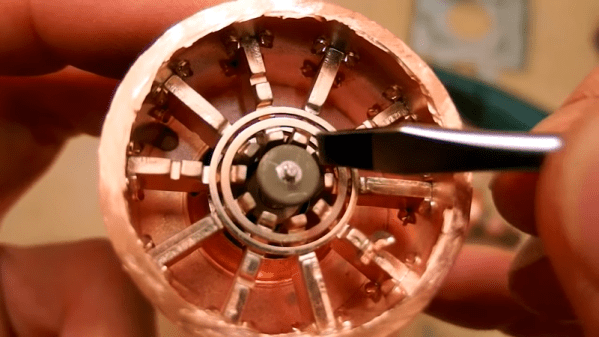
Microwave ovens are everywhere, and at the heart of them is a magnetron — a device that creates microwaves. [DiodeGoneWild] tore one apart to show us what was inside and how it works. If you decide to do this yourself, be careful. The magnetron may have insulators made of beryllium oxide and inhaling dust from the insulator even one time can cause an incurable lung condition.
Luckily, you can’t get a lung problem from watching a video. In addition to just seeing the guts of the magnetron, there are also explanations about how everything works with some quick sketches to illustrate the points.
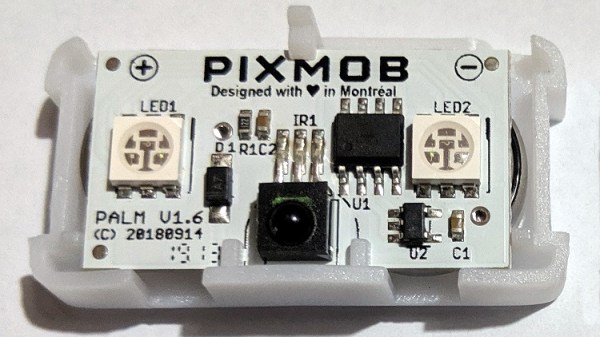
PixMob units are wearable LED devices intended for crowds of attendees at events like concerts. These devices allow synchronized LED effects throughout the crowd. [yeokm1] did a teardown of one obtained from a preview for the 2019 Singapore National Day Parade (NDP), and in the process learned about the devices and their infrastructure.
Suspected IR emitter for the PixMob units, mounted on a lighting tower (marked here in white).
PixMob hardware has been known to change over time. This version has two RGB LEDs (an earlier version had only one), an unmarked EEPROM, an unmarked microcontroller (suspected to be the Abov MC81F4104), and an IR receiver module. Two CR1632 coin cells in series power the device. [yeokm1] has made the schematic and other source files available on the teardown’s GitHub repository for anyone interested in a closer look.
One interesting thing that [yeokm1] discovered during the event was the apparent source of the infrared emitter controlling the devices. Knowing what to look for and reasoning that such an emitter would be mounted with a good view of the crowd, [yeokm1] suspected that the IR transmitter was mounted on a lighting tower. Viewing the tower through a smartphone’s camera revealed a purplish glow not visible to the naked eye, which is exactly the way one would expect an IR emitter to look.
Sadly, there wasn’t any opportunity to record or otherwise analyze the IR signals for later analysis but it’s possible that the IR protocol might be made public at some point. After all, running custom code on an earlier PixMob board was made possible in part by asking the right people for help.
Back in the days before kids could be placated with a $50 Android burner phone, many a youngster was gifted a so-called “educational computer” to keep them occupied. Invariably looking like a fever dream version of the real computer their parents didn’t want to let them use, these gadgets offered monochromatic exploits that would make Zork look like Fortnite. Due equally to their inherent hardware limitations and the premise of being an educational toy, the “games” on these computers often took the form of completing mathematical equations or answering history questions.
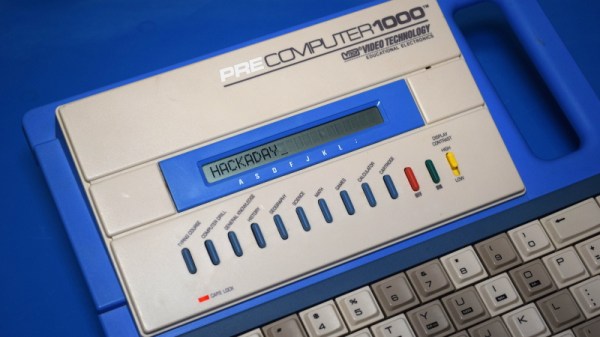
The VTech PreComputer 1000 is a perfect specimen of this particular style of educational toy. Released in 1988, it was advertised as a way for pre-teens to become more comfortable with operating a real computer; since at that point, it had become abundantly clear that the coming decade would see a beige box on every professional’s desk. Its full-size QWERTY keyboard was specifically mentioned in the product’s accompanying literature as a way to get young hands accustomed to the ways of touch typing.
Words of wisdom from the PreComputer 1000’s manual.
By the mid-1990s these devices would have progressed far enough to include passable text-to-speech capabilities and primitive graphics, but the junior professional who found him or herself seated in front of the PreComputer 1000 was treated to a far more spartan experience. It’s perhaps just as well that this particular educational computer was listed as a training tool, because even in 1988, surely a session with this toy must have felt very much like work.
But that’s not to say the PreComputer 1000 is without its own unique charms. In an effort to help cement its role as a “trainer” for more conventional computers, VTech saw fit to equip the PreComputer with its own BASIC interpreter. They even included generous written documentation that walked young programmers through the various commands and functions. Even today, there’s something oddly appealing about a mobile device with a full keyboard that can run BASIC programs for better than 24 hours on batteries (even if they’re alkaline “C” cells).
Let’s take a look inside this more than 30 year old mobile device, and see how the designers managed to create a reasonable facsimile of actual computing on a kid-friendly budget.
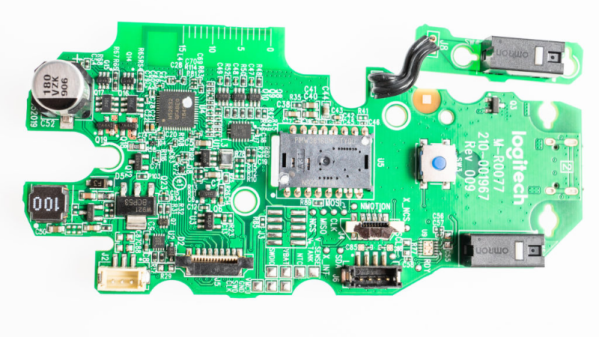
[Eric Weinhoffer] and his colleagues did a great comparative tear down of the MX Master 3 and the MX Master 2S mice from Logitech. Tear down’s are great fun and often end up teaching us a lot. Looking at the insides of a product can tell us a great deal about how to solve certain problems, or avoid pitfalls. Opening up two versions of the same product provides an even greater wealth of useful information on how product design evolves based on lessons learned from the earlier versions. Logitech is no greenhorn when it comes to Mice design, so the MX Master 2S was already almost perfect. But looking at the Master MX 3 shows where the earlier version fell short of expectations and how it could be improved upon.
These mice have intelligent scroll wheels, which can rotate in either “detente” or “freewheel” modes. Detente allows slower, precise scrolling, while freewheeling allows rapid scrolling. The two mice models have completely different, and interesting, methods of achieving these actions. The older version has a rubber-coated wheel and uses a motor, which turns a cam. This forces a detent ball onto the inside of the wheel for detent mode and releases it for free mode. Once the rubber wears off, the mouse is pretty much headed for the dumpster. The new metal wheel does away with the rubber coating as well as the noisy, slow, and prone to wear-and-tear motor assembly. The actuation is now done using a bi-stable electromagnet. A 25 V pulse magnetizes the coil which sits inside the wheel and it pulls on little metal teeth on the inside rim of the wheel. This gives a noiseless detente feel, without any physical contact. A second 25 V spike de-magnetizes the coil, allowing the scroll wheel to spin freely.
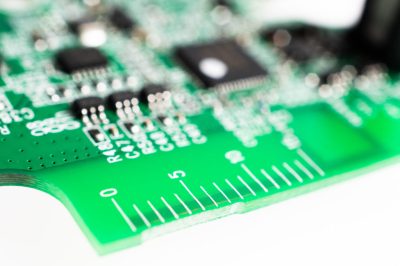
[Eric] points out several incremental changes in design which have resulted in improved ergonomics. He also uncovers a few nuggets of useful information. The use of interchangeable mold inserts help make molds last longer while still offering the flexibility to make changes in the molded part. It’s interesting to see special components being used for withstanding vibration and high-G forces. Some of these insights can be useful for those moving from prototyping to production. There’s one puzzling feature on the new PCB that [Eric] cannot figure out. There is a 15 mm scale screen-printed over the blue tooth antenna. If you have an answer on its purpose, let us know in the comments below.
If you are left-handed (which makes 10% of us), you’re out of luck with these right-handed mice and might like to sign one of the several online petitions demanding lefty versions.
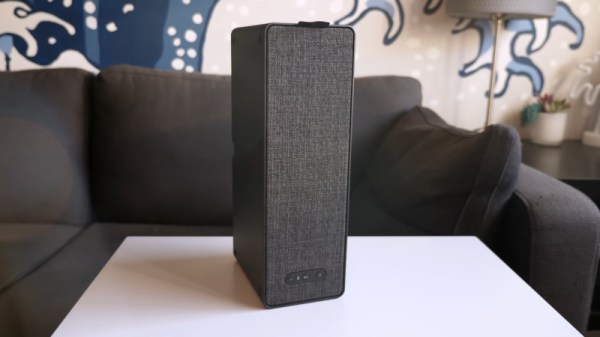
There’s little better way to learn about a piece of electronics than by tearing it down. Taking a peek under the hood can reveal all manner of things about a device’s design, manufacturing, and origins. [This Does Not Compute] does a great job of doing just that, digging into the guts of IKEA’s Symfonisk speaker.
Symfonisk is a WiFi-enabled speaker, working with the Sonos ecosystem. Tearing down the device reveals some similarities to IKEA’s earlier Eneby speaker, with both devices sharing similar speaker drivers, apparently sourced from GGEC. However, upon digging deeper, it’s revealed that the Symfonisk has more in common with a speaker from another manufacturer entirely.
The video does a great job of not only investigating the manufacturing origins of the device, but breaking down the way it all works. This shows how the speaker relies on an Atheros WiFi-only chipset, thus explaining the lack of Bluetooth functionality, as well as discussing things like the neat solutions for cable management. Interestingly, the speaker uses a two-channel DAC and Class-D amplifier, but only operates in mono. Instead, the two channels are instead used to separately drive the tweeter and woofer, allowing EQ to be done in software on the main CPU, negating the need for analog crossover electronics.
It’s a teardown that would serve as a great primer for anyone considering building a piece of consumer electronics, but particularly those involved in the hi-fi space. To see how it was done way back when, perhaps try this 8-track teardown instead. Video after the break.
Many of the biggest stars are hesitant to do sequels, believing that the magic captured the first time around is hard to reproduce in subsequent productions. As I’m known (at least around the former closet that now serves as my home office) as the “Meryl Streep of Teardowns”, I try to follow her example when it comes to repeat performances. But if they could get her to come back for another Mamma Mia film, I suppose I can take a look at a second Quirky product.
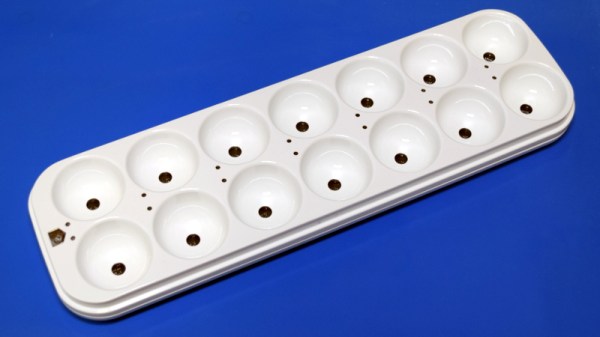
An elderly egg calls to inquire about euthanasia services.
This time around we’ll be looking at the Quirky Egg Minder, a smart device advertised as being able to tell you when your eggs are getting old. Apparently, this is a problem some people have. A problem that of course is best solved via the Internet of Things, because who wouldn’t pay $80 USD for a battery-powered WiFi device that lives in their refrigerator and communicates vital egg statistics to an online service?
As it turns out, the answer to that question is “most people”. The Egg Minder, like most of its Quirky peers, quickly became a seemingly permanent fixture of retailer’s clearance shelves. This particular unit, which I was able to pick up new from Amazon, only cost me $9.99. This is still more than I would have paid under normal circumstances, but such sacrifices are part and parcel with making sure the readers of Hackaday get their regular dose of unusual gadgetry.
You may recall that our last Quirky device, the “Refuel” propane tank monitor, ended up being a fantastically engineered and built piece of hardware. The actual utility of the product was far from certain, but nobody could deny that the money had been spent in all the right places.
What will the internals of the Egg Minder reveal? Will it have the same level of glorious over-engineering that took us by surprise with the Refuel? Will that zest for form over function ultimately become the legacy of these Quirky devices, or was it just a fluke? Let’s crack this egg and find out.
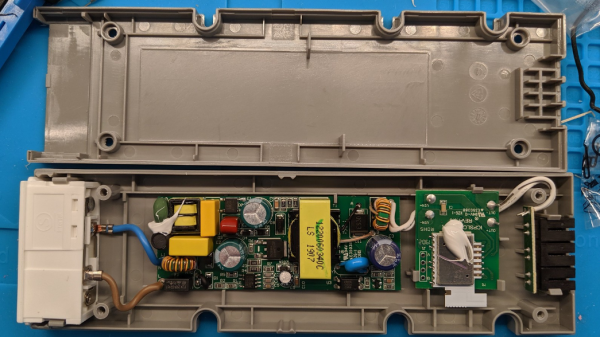
Just because something is being actively documented and tampered with by enthusiastic hackers doesn’t mean the information is handily centralized. There can be a lot of value in gathering disparate resources in one place, and that’s exactly what [Trammell Hudson] has done with his resource page for hacking the IKEA TRÅDFRI LED power supply with wireless interface. Schematic teardown, custom firmware images, it’s all there in one convenient spot.
Back in 2017, the IKEA TRÅDFRI hacking scene was centered around the LED light bulbs but as the group of products expanded, the rest of the offerings have also gotten some attention.
Why bother tampering with these units? One reason is to add features, but another is to make them communicate over your own MQTT network. And MQTT is the reason you are only a Raspberry Pi and a trip to IKEA away from the beginnings of a smart home that is under no one’s control or influence but your own.


 [Eric] points out several incremental changes in design which have resulted in improved ergonomics. He also uncovers a few nuggets of useful information. The use of interchangeable mold inserts help make molds last longer while still offering the flexibility to make changes in the molded part. It’s interesting to see special components being used for withstanding vibration and high-G forces. Some of these insights can be useful for those moving from prototyping to production. There’s one puzzling feature on the new PCB that [Eric] cannot figure out. There is a 15 mm scale screen-printed over the blue tooth antenna. If you have an answer on its purpose, let us know in the comments below.