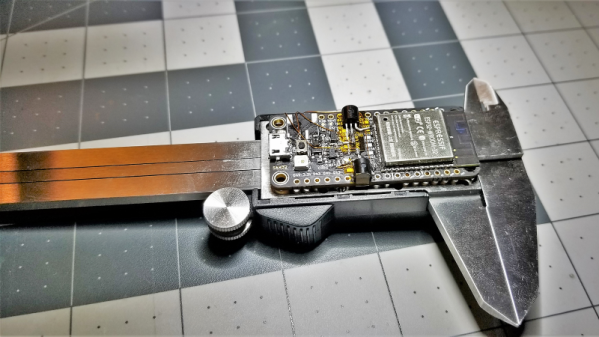
This Air Compressor Sucks

Vacuum is something most people learn about as children, when they’re first tasked with chores around the home. The humble vacuum cleaner is a useful home appliance and a great way to lose an eye as an inquisitive child. When it comes to common workshop tasks though, they can be a bit of a let down. When you need to pull some serious vacuum, you might wanna turn to something a little more serious – like this converted air compressor.

The build starts with a cheap off-the-shelf tyre inflator. These can be had for under $20 from the right places. They’re prone to overheating if used at too high a duty cycle, but with care they can last just long enough to be useful. The hack consists of fitting a hose barb connection over the intake of the pump, to allow air to be sucked out of whatever you’re trying to pull vacuum on. This is achieved with some hardware store parts and a healthy dose of JB-Weld. It’s then a simple matter of removing the valve adapter on the tyre inflator’s outlet so it can flow freely.

You might also consider adding a check valve, but overall this remains a cheap and easy way to get an electric vacuum pump for your workshop up and running. If that’s not quite your jam, you can always go down the handpump route instead.

Casting CNC Parts In Aluminium

When it comes to machining, particularly in metal, rigidity is everything. [Tailortech] had a homebuilt CNC machine with a spindle held in place by a plastic bracket. This just wasn’t up to the job, so the decision was made to cast a replacement.

[Tailortech] decided to use the lost PLA process – a popular choice amongst the maker crowd. The spindle holder was first sketched out, then modeled in Fusion 3D 360. This was then printed in PLA slightly oversized to account for shrinkage in the casting process.

The PLA part was then used to make a plaster mold. [Tailortech] explains the process, and how to avoid common pitfalls that can lead to problems. It’s important to properly heat the mold once the plaster has set to remove moisture, but care must be taken to avoid cracking or wall calcination. It’s then necessary to slowly heat the mold to even higher temperatures to melt out the PLA prior to casting. With the mold completed, it can be filled with molten aluminium to produce the final part. When it’s cooled off, it’s then machined to final tolerances and installed on the machine.

Lost PLA casting is a versatile process, and goes to show that not everything has to be CNC machined out of billet to do the job. It’s also readily accessible to any maker with a furnace and a 3D printer. If you’ve got a casting project of your own, be sure to let us know. Video after the break.

Continue reading “Casting CNC Parts In Aluminium”

Only 90s Kids Want Heelys Made From Pallet Wood

The kids are simply cooler than you. While you’re walking around using your feet like an animal, kids have shoes with wheels in their heels. These are called Heelys, and here’s how you make wooden clogs, with wheels in the heels, out of pallet wood. If you have to ask why, you’ll never know.

This build started off with a fairly large maple log, which would be the traditional way to build clogs. After taking this log to the bandsaw and looking inside, [Jackman] found a bit of spalting, or arguably aesthetically pleasing fungal growth. Whether the spalting would look good or not is a matter for debate, but either way [Jackman] decided to change plans and moved over to creating pallet wood clogs. A word of warning about pallet wood: you shouldn’t make anything out of wood from discarded pallets unless you know what you’re doing, and even if you do know what you’re doing there will be someone in the comments telling you that you shouldn’t use wood from discarded pallets. You can check out the comments to this article to verify this fact.

The construction of the clogs started with a few pieces of one inch stock glued up into a gigantic block, then several pieces of half inch stock resawn into quarter inch stock and laminated onto the sole of the clog. This was then shaped using a variety of tools from Arbortech; of note, we have the Turbo Plane, a wood shaping tool for a grinder that sounds more dangerous than it is, the Turbo Shaft, a plunge router or mortiser-sort-of-thing for a grinder that’s much cooler than it sounds, and the Power Chisel, something we can’t even believe exists and hold on here’s all our money.

These tools couldn’t get all the way into the toe of the clog, which meant [Jackman] had to saw down the middle and hollow everything out that way, but this did give him a nice flat surface on the inside to install the Heely wheels. This turns the clogs into something nine-year-olds simultaneously desire and don’t appreciate, because they’re kids.

Continue reading “Only 90s Kids Want Heelys Made From Pallet Wood”

These Wire Strippers Are Made From PCBs

The rise in cheap PCB fabrication has made old-school prototyping methods such as wire wrapping somewhat passé, but it still has its place. And if you’re going to wire wrap, you’re going to want a quick and easy way to strip that fine Kynar-insulated wire. So why not use PCB material to make this handy wire-wrapping wire stripper?

The tool that [danielrp] built is pretty simple – just a pair of razor blades held together so as to form a narrow slot to cut insulation while leaving the conductor untouched. The body of the tool is formed of two PCBs, between which the blades are sandwiched. [danielrp] designed the outline of the PCBs in DraftSight, then exported a DXF into EAGLE to make the Gerbers. The fabricated boards needed a little post-processing, including tapping the holes on one side to accept the screws that hold the tool together. We were surprised that FR4 took the threads at all, but it seems to work for this low-torque application. The disposable snap-type blades were sandwiched between the PCBs and the gap between them adjusted for nick-free stripping. The video below shows the design and build process.

We always appreciate homemade tools, and the fact that you can get a stack of PCBs for almost nothing makes us wonder what else we could use them for. We recently saw them used in a unique word clock, and even turned into a folding circuit sculpture.

Continue reading “These Wire Strippers Are Made From PCBs”

Build Your Own Vacuum Chamber For Degassing And More

A vacuum chamber can be a useful thing to have around the shop. It can be used for all manner of purposes, from science experiments to degassing paints and epoxies. They’re not something you’d find in every workshop, but never fear – you can always build one from scrap you’ve got lying around! (YouTube video, embedded below.)

[VegOilGuy] begins the build with a simple plywood box, which gets screwed together and then tarted up with bodyfiller and paint. This helps to make the box airtight, as well as improving the aesthetics. A slot is then cut in the lid, and then filled with an excessive amount of silicone sealant. A flat plate covered in aluminium foil is placed on top, and the silicone is left to cure for several days.This is used to create a flat sealing surface for the lid to be placed on later.

Once the seal is complete, it’s a simple plumbing job to finish the chamber. [VegOilGuy] does a great job of demonstrating copper soldering and the proper way to install the necessary taps and check valves. Combined with an electric pump, the vacuum chamber passes its tests with flying colors, completely ruining some marshmallows in the process.

With a few dollars spent online for the special bits, it’s a build that any handy maker could throw together in a weekend. You can always go another route, though – like using an old fridge compressor to get the job done.

[Thanks to Keith O for the tip!]

Continue reading “Build Your Own Vacuum Chamber For Degassing And More”

This Bike Pump Now Sucks

Pulling a vacuum is something every proud maker must do once in a while. Whether you’re degassing epoxy or vacuum forming parts, you’ll need a reliable pump to get the job done. [drcrash] has just the guide to help – on how to convert a regular handpump to vacuum duty. (Video embedded after the break.)

[drcrash] recommends starting with a Slime brand 2060-A pump or similar. It’s a basic hand pump, with no pressure gauges or other frills to get in the way. It’s also got a strong steel shaft that can hold up to repeated use. You’ll also need some tubing and a check valve to get the job done.

The basic concept is to reconfigure the pump to suck air out of things rather than blowing it into them. By removing the original check valve and installing one in the opposite direction, and reversing the pump’s piston, it’s possible to pull good vacuum without breaking a sweat. [drcrash] reports that it’s possible to go up to 11 psi below atmospheric with this setup, which is plenty for a wide range of applications. If you need to go further, you can try building your own turbomolecular pump instead.

Continue reading “This Bike Pump Now Sucks”

Restoring An HP LCZ Meter From The 1980s

We are fantastically lucky not only in the parts that are easily available to us at reasonable cost, but also for the affordable test equipment that we can have on our benches. It was not always this way though, and [NFM] treats us to an extensive teardown and upgrade of a piece of test equipment from the days when a hacker’s bench would have been well-appointed with just a multimeter and a 10MHz ‘scope.

The Hewlett Packard 4276A LCZ meter is, or perhaps was, the king of component testers. A 19″ rack unit that would comfortably fill a shelf, it has a host of functions and a brace of red LED displays. This particular meter had clearly seen better days, and required a look inside just to clean up connectors and replace aged batteries.

In the case is a backplane board with a series of edge connectors for a PSU, CPU, and analogue boards. Aged capacitors and those batteries were replaced, and those edge connectors cleaned up again. The CPU board appears to have a Z80 at its heart, and we’re sure we spotted a 1987 date code. There are plenty of nice high-quality touches, such as the individual 7-segment digits being socketed.

An after-market option for this equipment included a DC offset board, and incredibly HP publish its full schematic and a picture of its PCB in their manual. It was thus a simple process and quick PCB ordering to knock up a modern replica, with just a few component substitutions and single resistors replacing an HP specific encapsulated resistor pack.

As a treat we get a ringside seat for the set-up and alignment of the machine. The DC offset board gives the wrong voltage, which he traces to a voltage reference with a different tolerance to the original HP part. [NFM] makes some adjustments to resistor values, and is able to pull the voltage to the correct value. Finally we see the instrument put through its paces, and along the way have a demonstration of how capacitance of a ceramic capacitor can vary with voltage close to its working voltage. Even if you never have the need for an LCZ meter or never see an HP 4276A, this should be worth a watch. And if you now have an urge to find a bench full of similar treasures, take a look at our guide to old test equipment.

Continue reading “Restoring An HP LCZ Meter From The 1980s”