Reverse-Engineering A Superior Chinese Product

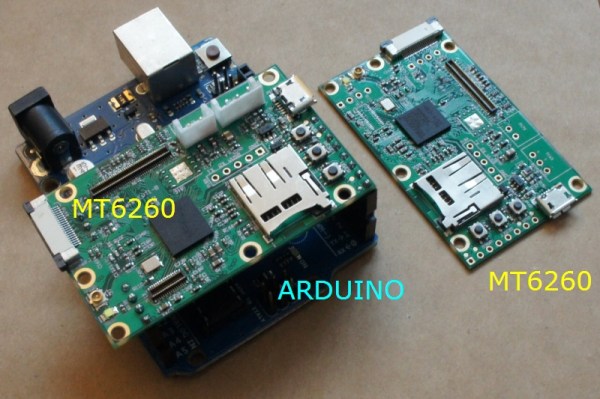
It makes an Arduino look like a 555.  A 364 Mhz, 32 bit processor. 8 MB RAM. GSM. Bluetooth. LCD controller. PWM. USB and dozens more. Smaller than a Zippo and thinner than corrugated cardboard. And here is the kicker: $3. So why isn’t everyone using it? They can’t.

Adoption would mandate tier after tier of hacks just to figure out what exact hardware is there. Try to buy one and find that suppliers close their doors to foreigners. Try to use one, and only hints of incomplete documentation will be found. Is the problem patents? No, not really.

[Bunnie] has dubbed the phenomenon “Gongkai”, a type of institutionalized, collaborative, infringementesque knowledge-exchange that occupies an IP equivalent of bartering. Not quite open source, not quite proprietary. Legally, this sharing is only grey-market on paper, but widespread and quasi-accepted in practice – even among the rights holders. [Bunnie] figures it is just the way business is done in the East and it is a way that is encouraging innovation by knocking down barriers to entry. Chinese startups can churn out gimmicky trash almost on whim, using hardware most of us could only dream about for a serious project.

Continue reading “Reverse-Engineering A Superior Chinese Product”

Flashing Chips With A CNC

[Eberhard] needed to flash several hundred ATMegas for a project he was working on. This was a problem, but the task did have a few things going for it that made automation easy. The boards the ‘Megas were soldered to weren’t depanelized yet, and he had a neat and weird bed of nails programming connector. There was also a CNC machine close by. This sounds like the ideal situation for automation, and it turns out the setup was pretty easy.

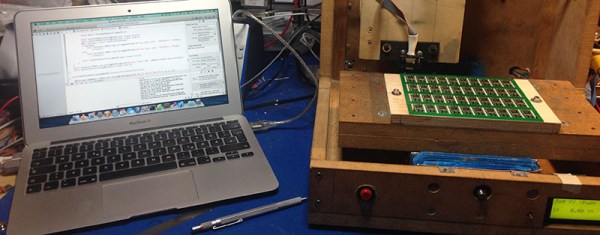
The boards in question were for FPV/radio control telemetry adapter and thankfully the assembly house didn’t depanelize the 40 PCBs on each board before shipping them out. A very cool ATMega flashing tool handled the electrical connections between the computer and the microcontroller, but a real, live human being was still required to move this flashing tool from one chip to the next, upload the firmware, and repeat the process all over again.

The solution came by putting a few metal pins in the bed of a CNC mill, 3D print an adapter for the flashing tool, and writing a little code to move the flashing tool from one chip to the next. An extremely simple app takes care of moving the programmer to an unflashed chip, uploading the firmware, and continuing on to the next chip.

There’s still some work to be done that would basically tie together the Gcode and AVRdude commands into a single interface, but even now a complete panel of 40 PCBs can be programmed in a little over 10 minutes. You can check out a video of that below.

Continue reading “Flashing Chips With A CNC”

Weird Clocks And A Two Chip Apple I

The Apple I, [Woz]’s original, had about sixty chips on a single board. Most of these chips were logic glue or hilariously ancient DRAMs. The real work was done by the 6502, the 6821 PIA, and the Signetics video chip. It’s a simple computer, really, and following the now popular tradition of two-chip computers, [Dave] built a replica of the Apple I using a 6502 and an ATMega.

The ATMega in this project takes care of everything – the 4k of RAM, the few bytes of ROM, the IO, and even the clock. With the 6502 you can have a little bit of fun with the clock; because the 6502 reads data off the bus a few nanoseconds off the falling edge of the clock and writes on the rising edge, [Dave] played around with the duty cycle of the clock to give the ATMega a bit more time to do its thing. With a 50% duty cycle, the 16Mhz ‘Mega has about eight cycles to decode an address and read or write some data. By making the low part of a clock cycle longer, he has about 45 cycles on the ‘Mega to do all the work. All of this was inspired by a fantastic tutorial on the 6502 clock.

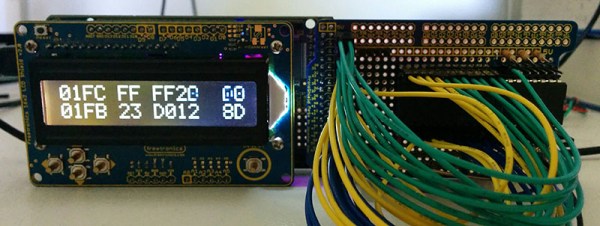
Right now [Dave] has some hex values displaying on a small LCD, while the real I/O is handled by a serial connection to a computer. It’s retro enough, and a future update will include a faux cassette interface, possibly using an SD card for storage.

Boxing Trainer

Boxing Trainer Uses DIY Force Sensors

A team of Cornell students have designed and built their own electronic boxing trainer system. The product of their work is a game similar to Whack-A-Mole. There are five square pads organized roughly into the shape of a human torso and head. Each pad will light up based on a pre-programmed pattern. When the pad lights up, it’s the player’s job to punch it! The game keeps track of the player’s accuracy as well as their reaction time.

The team was trying to keep their budget under $100, which meant that off the shelf components would be too costly. To remedy this, they designed their own force sensors. The sensors are basically a sandwich of a few different materials. In the center is a 10″ by 10″ square of ESD foam. Pressed against it is a 1/2″ thick sheet of insulating foam rubber. This foam rubber sheet has 1/4″ slits cut into it, resulting in something that looks like jail bars. Sandwiching these two pieces of foam is fine aluminum window screen. Copper wire is fixed the screen using conductive glue. Finally, the whole thing is sandwiched between flattened pieces of corrugated cardboard to protect the screen.

The sensors are mounted flat against a wall. When a user punches a sensor, it compresses. This compression causes the resistance between the two pieces of aluminum screen to change. The resistance can be measured to detect a hit. The students found that if the sensor is hit harder, more surface area becomes compressed. This results in a greater change in resistance and can then be measured as a more powerful hit. Unfortunately it would need to be calibrated depending on what is hitting the sensor, since the size of the hitter can throw off calibration.

Each sensor pad is surrounded by a strip of LEDs. The LEDs light up to indicate which pad the user is supposed to hit. Everything is controlled by an ATMEGA 1284p microcontroller. This is the latest in a string of student projects to come out of Cornell. Make sure to watch the demonstration video below. Continue reading “Boxing Trainer Uses DIY Force Sensors”

ASL Glove

Electronic Glove Detects Sign Language

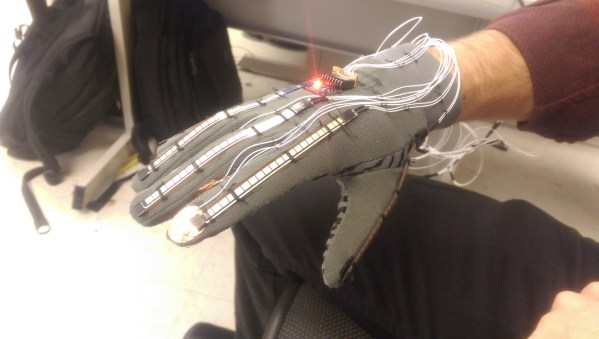
A team of Cornell students recently built a prototype electronic glove that can detect sign language and speak the characters out loud. The glove is designed to work with a variety of hand sizes, but currently only fits on the right hand.

The glove uses several different sensors to detect hand motion and position. Perhaps the most obvious are the flex sensors that cover each finger. These sensors can detect how each finger is bent by changing the resistance according to the degree of the bend. The glove also contains an MPU-6050 3-axis accelerometer and gyroscope. This sensor can detect the hand’s orientation as well as rotational movement.

While the more high-tech sensors are used to detect most characters, there are a few letters that are similar enough to trick the system. Specifically, they had trouble with the letters R, U, and V. To get around this, the students strategically placed copper tape in several locations on the fingers. When two pieces of tape come together, it closes a circuit and acts as a momentary switch.

The sensor data is collected by an ATmega1284p microcontroller and is then compiled into a packet. This packet gets sent to a PC which then does the heavy processing. The system uses a machine learning algorithm. The user can train the it by gesturing for each letter of the alphabet multiple times. The system will collect all of this data and store it into a data set that can then be used for detection.

This is a great project to take on. If you need more inspiration there’s a lot to be found, including another Cornell project that speaks the letters you sign, as well as this one which straps all needed parts to your forearm.
Continue reading “Electronic Glove Detects Sign Language”

Hacklet 26 – Arduino Projects

Arduino is one of those boards that has become synonymous with hacking and making. Since its introduction in 2005, over 700,000 official Arduino boards have been sold, along with untold millions of compatible and clone boards. Hackers and makers around the world have found the Arduino platform a cheap and simple way to get their projects off the ground. This weeks Hacket focuses on some of the best Arduino based projects we’ve found on Hackday.io!
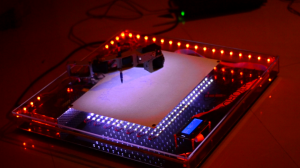
drawingbot[Niazangels] gets the ball – or ballpoint pen – rolling with Roboartist, a robot which creates line drawings. Roboartist is more than just a plotter though. [Niazangels] created a custom PC program which creates line drawings from images captured by a webcam. The line drawings are converted to coordinates, and sent to an Arduino, which controls all the motors that move the pen. [Niazangels] went with Dynamixel closed loop servo motors rather than the stepper motors we often see in 3D printers.
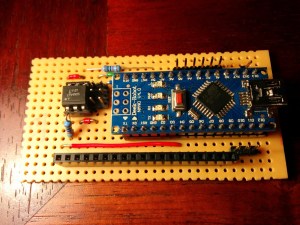
tape[Peter Edwards] is preserving the past with Tapuino, the $20 C64 Tape Emulator. Plenty of programs for the Commodore 64, 128, and compatibles were only distributed on tape. Those tapes are slowly degrading, though the classic Commodore herdware is still going strong. Tapuino preserves those tapes by using an Arduino nano to play the files from an SD card into the original Datasette interface. [Peter] also plans to add recording functionality to the Tapuino, which will make it the total package for preserving  your data. All that’s missing is that satisfying clunk when pressing the mechanical Play button!

infinity

[Dushyant Ahuja] knows what time it is, thanks to his Infinity Mirror Clock. This clock tells time with the help of some WS2812B RGB LED. [Dushyant] debugged the clock with a regular Arduino, but when it came time to finish the project, he used an ATmega328 to create an Arduino compatible board from scratch. Programming is easy with an on-board Bluetooth module. [Dushyant] plans to add a TFT lcd which will show weather and other information when those power-hungry LEDs are switched off.
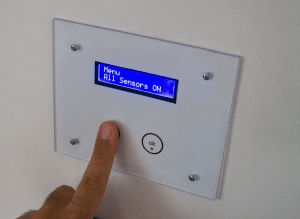
alarm2[IngGaro] built an entire home alarm system with his project Arduino anti-theft alarm shield. [IngGaro] needed an alarm system for his home. That’s a lot to ask of a standard ATmega328p powered Arduino Uno. However, the extra I/O lines available on an Arduino Mega2560 were just what the doctor ordered. [IngGaro] performed some amazing point-to-point perfboard wiring to produce a custom shield that looks and works great! The alarm can interface with just about any sensor, and can be controlled via the internet. You can even disarm the system through an RFID keycard.

Want MORE Arduino in your life? Check out our curated Arduino List!

That’s about all the millis()  we have for this weeks Hacklet. As always, see you next week. Same hack time, same hack channel, bringing you the best of Hackaday.io!

Using The Second Microcontroller On An Arduino

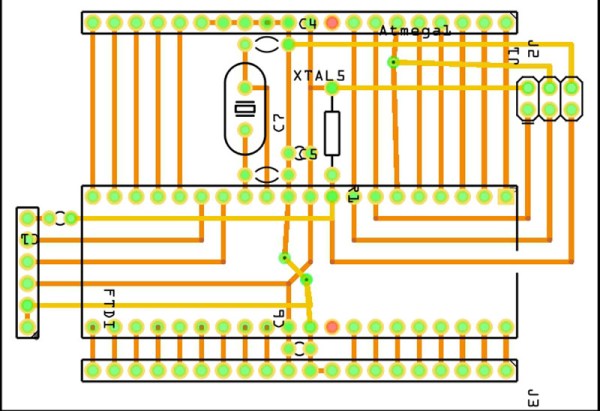
While newer Arduinos and Arduino compatibles (including the Hackaday.io Trinket Pro. Superliminal Advertising!) either have a chip capable of USB or rely on a V-USB implementation, the old fogies of the Arduino world, the Uno and Mega, actually have two chips. An ATMega16u2 takes care of the USB connection, while the standard ‘328 or ‘2560 takes care of all ~duino tasks. Wouldn’t it be great is you could also use the ’16u2 on the Uno or Mega for some additional functionality to your Arduino sketch? That’s now a reality. [Nico] has been working on the HoodLoader2 for a while now, and the current version give you the option of reprogramming the ’16u2 with custom sketches, and use seven I/O pins on this previously overlooked chip.

Unlike the previous HoodLoader, this version is a real bootloader for the ’16u2 that replaces the DFU bootloader with a CDC bootloader and USB serial function. This allows for new USB functions like HID keyboard, mouse, media keys, and a gamepad, the addition of extra sensors or LEDs, and anything else you can do with a normal ‘duino.

Setup is simple enough, only requiring a connection between the ‘328 ISP header and the pins on the ’16u2 header. There are already a few samples of what this new firmware for the ’16u2 can do over on [Nico]’s blog, but we’ll expect the number of example projects using this new bootloader to explode over the coming months. If you’re ever in an Arduino Demoscene contest with an Arduino and you’re looking for more pins and code space, now you know where to look.