You Can Learn A Lot From A Blinkenrocket

At this year’s Chaos Communication Congress, we caught up with [muzy] and [overflo], who were there with a badge and soldering project they designed to teach young folks how to solder and program. Blinkenrocket is a basically a 64-LED matrix display and just enough support hardware to store and display animations, and judging by the number of blinking rockets we saw around the necks of attendees, it was a success.

Their talk at 34C3 mostly concerns the production details, design refinements, and the pitfalls of producing thousands of a thing. If you’re thinking of building a hardware kit or badge on this scale, you should really check it out and crib some of their production optimization tricks.

For instance, instead of labelling the parts “C2” or “R: 220 Ohms”, they used a simple color-coding scheme. This not only makes it easier for kids to assemble, but it also means that they didn’t have to stick 1,000 part labels on every component. Coupled with [overflo]’s Zerhacker, SMD parts in strips were cut to the right length and color-coded in one step, done by machine.

The coolest feature of the Blinkenrocket itself is the audio programming interface. It’s like in the bad old days of software stored on cassette tapes, but it’s a phenomenal interface for getting a simple animation out of a web app and straight into a piece of minimal hardware — just plug it into a laptop or cell phone’s audio out and press “play” in the browser. The original design tried to encode the data in the pulse-length of square waves, but this turned out to be very hardware dependent. The final design used frequency-shift keying. What’s old is new again.

Everything you could want to know about the design, its code, and even the website itself are up on the project’s GitHub page, so go check it out. If you’d like to arrange a Blinkenrocket workshop yourself, shoot [muzy] or [overflo] an e-mail. Full disclosure: [overflo] gave us a kit, the “hard-mode” SMD one with 0805 1206 parts, and it was fun to assemble and program.

The Internet Of Blast Gates

There’s nothing quite like building out a shop filled with tools, but even that enviable task has a lot of boring work that goes into it. You’ve got to run power, you’ve got to build benches, and you need to build a dust collection system. That last one is usually just fitting a bunch of pipe and tubes together and adding in a few blast gates to direct the sucking of your dust collection system to various tools around the shop.

For most shops with a handful of tools and dust collection ports, manually opening and closing each blast gate is an annoying if necessary task. What if all of this was automated, though? That’s what [Bob] over on I Like To Make Stuff did. He automated his dust collection system. When a tool turns on, so does the vacuum, and the right blast gate opens up automatically.

The first part of this build is exactly what you would expect for installing a dust collection system in a shop. The main line is PVC sewer pipe tied to the rafters. Yes, this pipe is grounded, and s otherwise not very interesting at all. The real fun comes with the bits of electronics. [Bob] modified standard blast gates to be servo-actuated. Each individual tool was wired up to a current sensor at the plug, and all of this was connected to an Arduino. With a big ‘ol relay attached to the dust collection system, the only thing standing in the way of complete automation was a bit of code.

This project is a continuation of [Bob]’s earlier Arduinofication of his dust collection system where all the blast gates were controlled by servos, an Arduino, and a numeric keypad. That’s an exceptionally functional system that gets around the whole ‘leaning over a machine to open a gate’ problem, but it’s still not idiot-proof – someone has to press a button to open a gate. This new system is, for the most part, completely automatic and doesn’t really require any thought on the part of the operator. It’s neat stuff, and a great application of cheap Arduinos to make shop life a bit easier.

Continue reading “The Internet Of Blast Gates”

Light Switch For The Lazy

[Will Donaldson] has whipped up a quick hack for anyone thinking of dipping their toe into home automation — or otherwise detest flicking off the bedroom light before navigating their way to their bed: a remote control light switch!

This remote switch uses a sg90 servo, an Arduino Uno, and pairs of ATtiny85s with HC-05 Bluetooth modules assembled on protoboards. The 3D printed mount screws easily on top of a standard light switch cover while still allowing the switch to be flipped the old-fashioned way. It’s also perfect as a temporary solution — [Donaldson] is presently renting his apartment — or for those unwilling to mess with the mains power of their abode.

Continue reading “Light Switch For The Lazy”

Danielle Applestone: Building The Workforce Of 2030

You wake up one morning with The Idea — the one new thing that the world can’t do without. You slave away at it night and day, locked in a garage expending the perspiration that Edison said was 99 percent of your job. You Kickstart, you succeed, you get your prototypes out the door. Orders for the new thing pour in, you get a permanent space in some old factory, and build assembly workstations.  You order mountains of parts and arrange them on shiny chrome racks, and you’re ready to go — except for one thing. There’s nobody sitting at those nice new workstations, ready to assemble your product. What’s worse, all your attempts to find qualified people have led nowhere, and you can’t even find someone who knows which end of a soldering iron to hold.

Granted, the soldering iron lesson is usually something that only needs to happen once, but it’s not something the budding entrepreneur needs to waste time on. Finding qualified workers to power a manufacturing operation in the 21st century is no mean feat, as Dr. Danielle Applestone discussed at the 2017 Hackaday Superconference. Dr. Applestone knows whereof she speaks — she was the driving force behind the popular Othermill, serving as CEO for Other Machine Co. and orchestrating its rise to the forefront of the desktop milling field. Now rebranded as Bantam Tools, the company is somewhat unique in that it doesn’t ship its manufacturing off to foreign shores — they assemble their products right in the heart of Berkeley, California. So finding qualified workers is something that’s very much on her mind on a daily basis.

Continue reading “Danielle Applestone: Building The Workforce Of 2030”

Python Keeps A Gecko Happy: Terrarium Automation With Raspberry Pi

For better or worse, pets often serve as inspiration and test subjects for hardware hacks: smarten up that hamster wheel, tweet the squirrel hunting adventures from a dog’s point of view, or automate and remote control a reptile enclosure. [TheYOSH], a gecko breeder from the Netherlands, chose the latter and wrote TerrariumPi for the Raspberry Pi to control and monitor his exotic companion’s home through a convenient web interface.

The right ecosystem is crucial to the health and happiness of any animal that isn’t native to its involuntarily chosen surroundings. Simulating temperature, humidity and lighting of its natural habitat should therefore be the number one priority for any pet owner. The more that simulation process is reliably automated, the less anyone needs to worry.

TerrariumPi supports all the common temperature/humidity sensors and relay boards you will find for the Raspberry Pi out of the box, and can utilize heating and cooling, watering and spraying, as well as lighting based on fixed time intervals or sensor feedback. It even supports location based sunrise and sunset simulation — your critter might just think it never left Madagascar, New Caledonia or Brazil. All the configuration and monitoring happens in the browser, as demonstrated in [TheYOSH]’s live system with public read access (in Dutch).

It only seems natural that Python was the language of choice for a reptile-related system. On the other hand, it doesn’t have to be strictly used for reptiles or even terrariums; TerrariumPi will take care of aquariums and any other type of vivarium equally well. After all, we have seen the Raspberry Pi handling greenhouses and automating mushroom cultivation before.

Automate Wire Prep With A Robot Wire Cutter

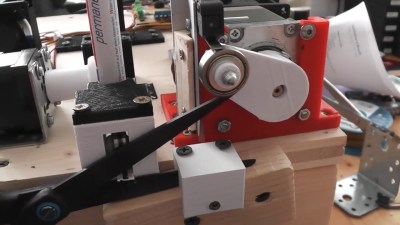
When you move from one-off builds to production scale, perhaps to meet that Kickstarter commitment or to keep your Tindie store stocked, you’re going to need to tool up. Jobs like building wiring harnesses can be tedious and time-consuming, so outsourcing them to this robot wire cutter might be a good idea.

The video below tells the whole tale of this build, which despite the fact that [Maclsk] seems to have put it together quickly from scrap bin parts still looks pretty professional. The business end of the machine is a 3D printer extruder, minus the hot end, of course. A Nano controls the extruder’s stepper to shoot out the right length of wire, as well as the servo that squeezes the snippers. An LCD display and some pushbuttons provide the UI that rounds out the build. Tell it how long and how many, and you’ll be ready to build. We can see how this might be upgraded to strip the wires as well, although getting both ends stripped might be tricky.

Might this component tape-cutting robot from a few weeks back have inspired [Maclsk]’s build? Perhaps, but in any case, both are fun to watch.

Continue reading “Automate Wire Prep With A Robot Wire Cutter”

Rocking Playmobil Wedding

Many of us have put our making/hacking/building skills to use as a favor for our friends and family. [Boris Werner] is no different, he set about creating a music festival stage with Playmobil figures and parts for a couple of friends who were getting married. The miniature performers are 1/24 scale models of the forming family. The bride and groom are on guitar and vocals while junior drums.

Turning children’s toys into a wedding-worthy gift isn’t easy but the level of detail [Boris Werner] used is something we can all learn from. The video after the break does a great job of showing just how many cool synchronized lighting features can be crammed into a tiny stage in the flavor of a real show and often using genuine Playmobil parts. Automation was a mix of MOSFET controlled LEDs for the stage lighting, addressable light rings behind the curtain, a disco ball with a stepper motor and music, all controlled by an Arduino.

Unless you are some kind of Playmobil purist, this is way cooler than anything straight out of the box. This is the first mention of Playmobil on Hackaday but miniatures are hardly a new subject like this similarly scaled space sedan.

Continue reading “Rocking Playmobil Wedding”