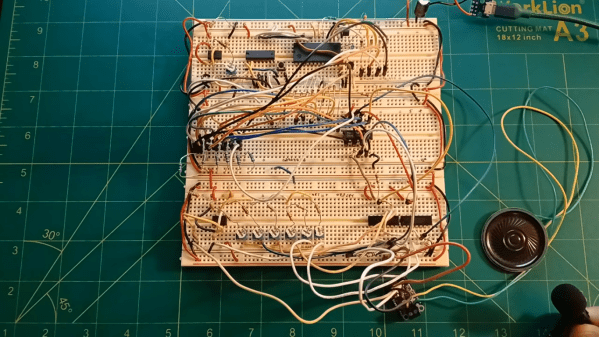
DOOM Played On Series Of 555 Timers

It’s technically true that any piece of software can be reproduced in hardware, although modern software’s size and complexity generally makes this a non-starter. But if we go far enough back in time, older software becomes easier and easier to implement in hardware. The original DOOM from 1993 might one day be recreated in full this way, but that day is not today. Instead, [Nick] has recreated the original music from that game, playing the opening track in nothing but 555 timers.

The circuit starts with a 555 timer that acts as a system clock with a rate of just over 7 Hz. These pulses feed a binary counter which in turn feeds a decoder, giving the circuit 15 positions. Each output of the decoder feeds to a diode matrix which stores information about what pitch the circuit should play. The circuit only needs to play six pitches so the diodes effectively connect each moment in time to one of these six notes. From there the circuit feeds into a set of switches which select different resistor networks of another 555 which is actually responsible for producing sound. The resistor networks have different values to adjust the timing of the 555 to produce different pitches.

Of course this entire exercise is largely academic as almost any microcontroller would be able to be programmed to play this chiptune quite easily, but it’s not a bad idea to get down into the weeds of digital logic from time to time in order to refine one’s skills and knowledge about what’s really going on in the inner workings of circuits. Or, go even deeper than that and build the logic gates themselves from first principles.

Continue reading “DOOM Played On Series Of 555 Timers”

Microscopic view of chiral magnetic material

Twisting Magnetism To Control Electron Flow

If you ever wished electrons would just behave, this one’s for you. A team from Tohoku, Osaka, and Manchester Universities has cracked open an interesting phenomenon in the chiral helimagnet α-EuP3: they’ve induced one-way electron flow without bringing diodes into play. Their findings are published in the Proceedings of the National Academy of Sciences.

The twist in this is quite literal. By coaxing europium atoms into a chiral magnetic spiral, the researchers found they could generate rectification: current that prefers one direction over another. Think of it as adding a one-way street in your circuit, but based on magnetic chirality rather than semiconductors. When the material flips to an achiral (ferromagnetic) state, the one-way effect vanishes. No asymmetry, no preferential flow. They’ve essentially toggled the electron highway signs with an external magnetic field. This elegant control over band asymmetry might lead to low-power, high-speed data storage based on magnetic chirality.

If you are curious how all this ties back to quantum theory, you can trace the roots of chiral electron flow back to the early days of quantum electrodynamics – when physicists first started untangling how particles and fields really interact.

There’s a whole world of weird physics waiting for us. In the field of chemistry, chirality has been covered by Hackaday, foreshadowing the lesser favorable ways of use. Read up on the article and share with us what you think.

Schematic of a circuit

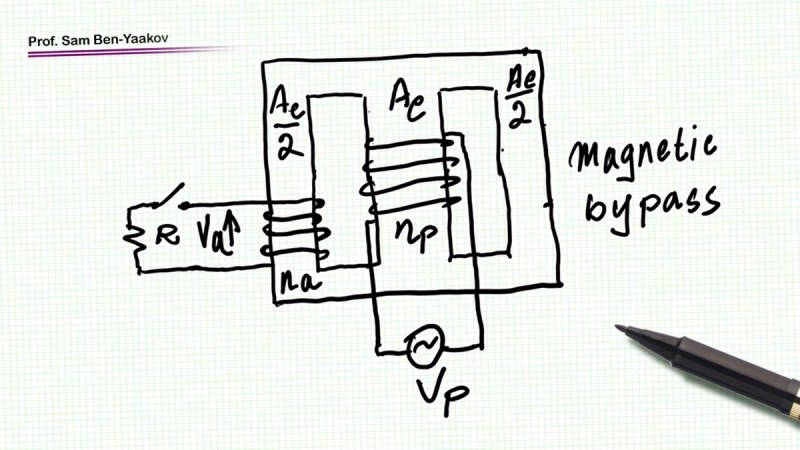
Hacking Flux Paths: The Surprising Magnetic Bypass

If you think shorting a transformer’s winding means big sparks and fried wires: think again. In this educational video, titled The Magnetic Bypass, [Sam Ben-Yaakov] flips this assumption. By cleverly tweaking a reluctance-based magnetic circuit, this hack channels flux in a way that breaks the usual rules. Using a simple free leg and a switched winding, the setup ensures that shorting the output doesn’t spike the current. For anyone who is obsessed with magnetic circuits or who just loves unexpected engineering quirks, this one is worth a closer look.

So, what’s going on under the hood? The trick lies in flux redistribution. In a typical transformer, shorting an auxiliary winding invites a surge of current. Here, most of the flux detours through a lower-reluctance path: the magnetic bypass. This reduces flux in the auxiliary leg, leaving voltage and current surprisingly low. [Sam]’s simulations in LTspice back it up: 10 V in yields a modest 6 mV out when shorted. It’s like telling flux where to go, but without complex electronics. It is a potential stepping stone for safer high-voltage applications, thanks to its inherent current-limiting nature.

The original video walks through the theory, circuit equivalences, and LTspice tests. Enjoy!

Continue reading “Hacking Flux Paths: The Surprising Magnetic Bypass”

MIT Demonstrates Fully 3D Printed, Active Electronic Components

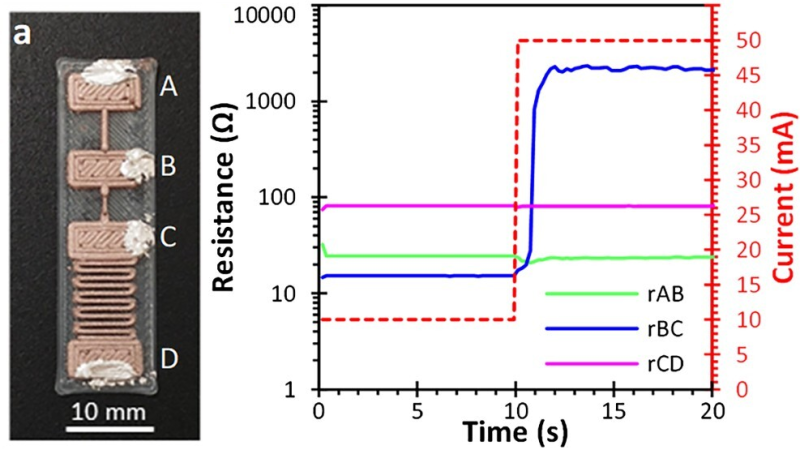
One can 3D print with conductive filament, and therefore plausibly create passive components like resistors. But what about active components, which typically require semiconductors? Researchers at MIT demonstrate working concepts for a resettable fuse and logic gates, completely 3D printed and semiconductor-free.

Now just to be absolutely clear — these are still just proofs of concept. To say they are big and perform poorly compared to their semiconductor equivalents would be an understatement. But they do work, and they are 100% 3D printed active electronic components, using commercially-available filament.

How does one make a working resettable fuse and transistor out of such stuff? By harnessing thermal expansion, essentially.

Continue reading “MIT Demonstrates Fully 3D Printed, Active Electronic Components”

close up hands holding lighting pcb

Circuit Secrets: Exploring A $5 Emergency Light

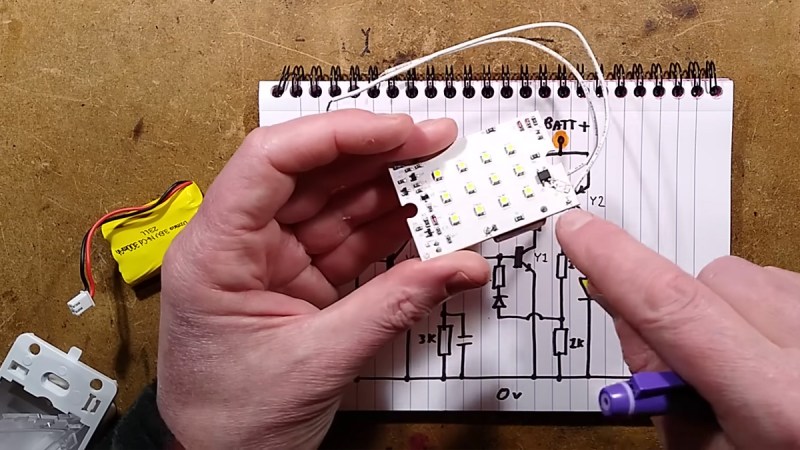
Who would’ve thought a cheap AliExpress emergency light could be packed with such crafty design choices? Found for about $5, this unit uses simple components yet achieves surprisingly sophisticated behaviors. Its self-latching feature and decisive illumination shut-off are just the beginning. A detailed analysis by [BigCliveDotCom] reveals a smart circuit that defies its humble price.

The circuit operates via a capacitive dropper, a cost-effective way to power low-current devices. What stands out, though, is its self-latching behavior. During a power failure, transistors manage to keep the LEDs illuminated until the battery voltage drops below a precise threshold, avoiding the dreaded fade-to-black. Equally clever is the automatic shut-off when the voltage dips too low, sparing the battery from a full drain.

Modifications are possible, too. For regions with 220V+ mains, swapping the dropper capacitor with a 470nF one can reduce heat dissipation. Replacing the discharge resistor (220k) with a higher value improves longevity by running cooler. What remarkable reverse engineering marvels have you come across? Share it in the comments!  After all, it is fun to hack into consumer stuff. Even if it is just a software hack.

Continue reading “Circuit Secrets: Exploring A $5 Emergency Light”

Modeling A Guitar For Circuit Simulation

Guitar effects have come a long way from the jangly, unaltered sounds of the 1950s when rock and roll started picking up steam. Starting in large part with [Jimi Hendrix] in the 60s, the number of available effects available to guitarists snowballed in the following decades step-by-step with the burgeoning electronics industry. Now, there are tons of effects, from simple analog devices that would have been familiar to [Hendrix] to complex, far-reaching, digital effects available to anyone with a computer. Another thing available to modern guitarists is the ability to model these effects and guitars in circuit simulators, as [Iain] does.

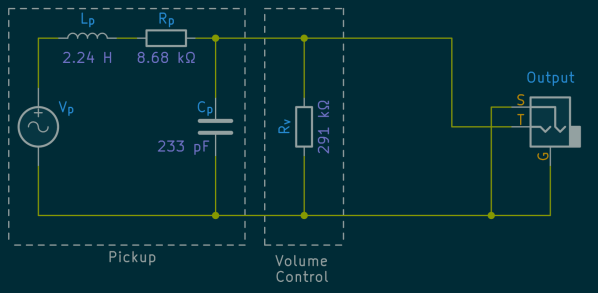
[Ian] plays a Fender Stratocaster, but in order to build effects pedals and amplifiers for it with the exact desired sound, he needed a way to model its equivalent circuit. For a simple DC circuit, this isn’t too difficult since it just requires measuring the resistance, capacitance, and inductance of the overall circuit and can be done with something as simple as a multimeter. But for something with the wide frequency range of a guitar, a little bit more effort needs to go into creating an accurate model. [Iain] is using an Analog Discovery as a vector network analyzer to get all of the raw data he needs for the model before moving on to some in-depth calculations.

[Iain] takes us through all of the methods of figuring out the equivalent impedance of his guitar and its cabling using simple methods capable of being done largely by hand and more advanced techniques like finding numerical solutions. By analyzing the impedance of the pickup, tone and volume controls, and cable, this deep dive into the complexities of building an accurate equivalent circuit model for his guitar could be replicated by anyone else looking to build effects for their specific guitars. If you’re looking for a more digital solution, though, we’ve seen some impressive effects built using other tools unavailable to guitarists in days of yore, such as MIDI and the Raspberry Pi.

Opening Up ASIC Design

The odds are that if you’ve heard about application-specific integrated circuits (ASICs) at all, it’s in the context of cryptocurrency mining. For some currencies, the only way to efficiently mine them anymore is to build computers so single-purposed they can’t do anything else. But an ASIC is a handy tool to develop for plenty of embedded applications where efficiency is a key design goal. Building integrated circuits isn’t particularly straightforward or open, though, so you’ll need some tools to develop them such as OpenRAM.

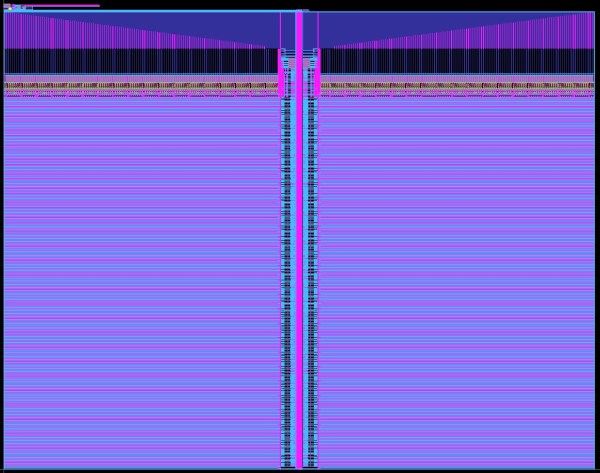
Designing the working memory of a purpose-built computing system is a surprisingly complex task which OpenRAM seeks to demystify a bit. Built in Python, it can help a designer handle routing models, power modeling, timing, and plenty of other considerations when building static RAM modules within integrated circuits. Other tools for taking care of this step of IC design are proprietary, so this is one step on the way to a completely open toolchain that anyone can use to start building their own ASIC.

This tool is relatively new and while we mentioned it briefly in an article back in February, it’s worth taking a look at for anyone who needs more than something like an FPGA might offer and who also wants to use an open-source tool. Be sure to take a look at the project’s GitHub page for more detailed information as well. There are open-source toolchains if you plan on sticking with your FPGA of choice, though.