The Dreamcast was a proud moment for Sega, at least initially, being the first console to launch of a new generation. Unfortunately this didn’t translate into massive sales, and the plug was pulled far earlier than expected. The console retains a dedicated fanbase to this day however, who continue to tinker with the hardware. [DreamcastChannel] is one of them, and put together a nifty plug-and-play hard drive mod.
The mod is based on earlier work, which consisted of manually soldering the 44 lines of an IDE cable on to the main Dreamcast motherboard. This allowed an IDE hard drive to be neatly mounted inside the shell, but [DreamcastChannel] knew it was possible to do better.
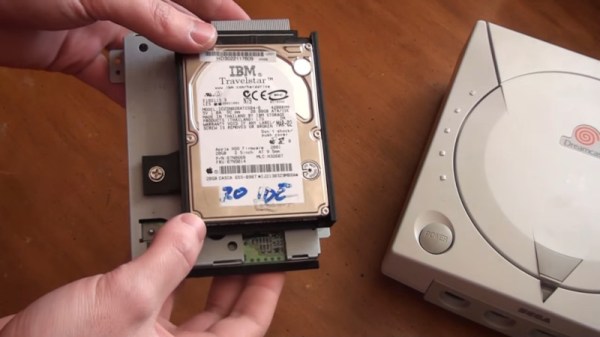
Starting from scratch, the GDROM optical drive assembly is gutted, leaving just its metal case and PCB. The IDE cable for the hard disk is then soldered to the pads on the PCB. A 3D printed mount is used to fix the hard drive to the metal case. This allows the entire assembly to slot neatly into the Dreamcast, using the GDROM’s original connector.
It’s a hack that makes putting a hard drive into the Dreamcast neat and tidy. Combined with a hacked BIOS and Dreamshell, it makes playing backup games a breeze. We’ve seen plenty of Dreamcast hacks before, too – the VMU is often a key candidate for attention. Video after the break.
Continue reading “Dreamcast Gets A Plug-n-Play Hard Drive Mod”