3D Printed Sorter Separates Spare Hex Nuts With A Shake

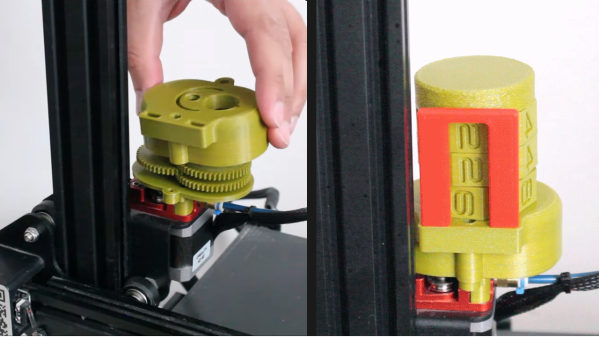
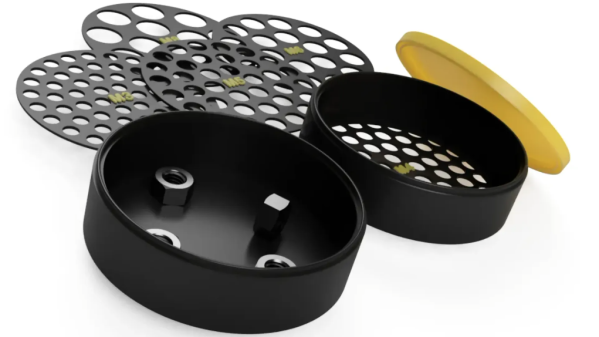
Got a pile of mixed hex nuts? Sort them in no time by printing [jonafriendj]’s nut sorter, which has options for pretty much any nut size you’d be after (it’s labeled metric, but actually includes Imperial sizes as well.)

Something to admire about the design is the handy little raised labels on each of the sieves, and the fact that all the parts print entirely without supports. Designing a part to play to a manufacturing method’s strengths (and avoid its weaknesses) is good DFM, or Design for Manufacturing.

With 3D printing being the boon that it is to workshops and hobbyists everywhere, it certainly pays to strive for good DFM, especially for designs meant to be shared with others. Sometimes good DFM takes a page from other manufacturing methods like injection molding, and we end up with things like using crush ribs on printed parts.

Want to see a demonstration of [jonafriendj]’s nut sorting design? Check out the short video embedded below the page break. If that leaves you wanting, take a look at a motorized, automated DIY solution.

Continue reading “3D Printed Sorter Separates Spare Hex Nuts With A Shake”

DIy Arduino FM radio enclosure with the lid off, showing the electronics inside

DIY Arduino Due TEA5767 FM Radio

Older hackers will remember that a crystal set radio receiver was often one of the first projects attempted.  Times have changed, but there’s still something magical about gathering invisible signals from the air and listening to the radio on a homemade receiver. [mircemk] has brought the idea right up to date by building an FM radio with an OLED display, controlled with a rotary encoder.

The design is fairly straightforward, based as it is on another project that [mircemk] found on another site, but the build looks very slick and would take pride of place on any hacker’s workbench. An Arduino Due forms the heart of the project, controlling a TEA5767 module, an SH1106 128×64 pixel OLED display and a rotary encoder. The sound signal is passed through an LM4811 headphone amplifier for private listening, and a PAM8403 Class D audio amplifier for the built-in loudspeaker. The enclosure is made from PVC panels, and accented with colored adhesive tape for style.

It’s easier than ever before to quickly put together projects like this by connecting pre-built modules and downloading code from the Internet, but that doesn’t mean it’s not a worthwhile way to improve your skills and make some useful devices like this one. There are so many resources available to us these days and standing on the shoulders of giants has always been a great way to see farther.

We’ve shown some other radio projects using Arduinos and the TEA5767 IC in the past, such as this one on a tidy custom PCB, and this one built into an old radio case.

Continue reading “DIY Arduino Due TEA5767 FM Radio”

The Filamentmeter: For When You Absolutely Want To Count Every Meter Used

[ArduinoNmore] took an interesting approach to designing a counter intended to accurately display how many meters of filament a 3D printer has used. The Filamentmeter looks a little bit like a 3D printed handheld tally counter (or lap counter) but instead of a button to advance each digit, the readout represents how many meters of filament have gone through the extruder.

Driving the digit rotation from the extruder motor itself means that even retractions are accounted for.

At first glance it may look like there is a motor hidden inside, or that the device is somehow sensing the filament directly. But it’s actually the movement of the extruder motor that drives the device. A small spur gear attached to the printer’s extruder drives a series of gears that advance the digits. This means that retractions  — small reverses of the extruder motor during printing — are properly accounted for in the total, which is a nice touch.

[ArduinoNmore] designed this for the Ender 3, and the Filamentmeter relies on a specific extruder design and orientation to work properly. Of course, since it’s 3D printed, modifying the design for your own purposes should be pretty straightforward.

Curious? The design is being sold for a few bucks, and there is a free test piece one can print and use to confirm whether the design will work before mashing the buy button. Non-free printable 3D models can be a world of buyer beware, but test pieces and solid documentation are good ways to give buyers confidence in your work.

The insides of the unit are really quite intricate, with a clockwork-type elegance to them. You can see it all in the short video, embedded below.

Continue reading “The Filamentmeter: For When You Absolutely Want To Count Every Meter Used”

Touch Tone MIDI Phone And Vocoder Covers Daft Punk

[poprhythm]’s Touch Tone MIDI Phone is a fantastic conversion of an old touch tone phone into a MIDI instrument complete with intact microphone, but this project isn’t just about showing off the result. [poprhythm] details everything about how he interfaced to the keypad, how he used that with an Arduino to create a working MIDI interface, and exactly how he decided — musically speaking — what each button should do. The LEDs on the phone are even repurposed to blink happily depending on what is going on, which is a nice touch.

Of course, it doesn’t end there. [poprhythm] also makes use of the microphone in the phone’s handset. Since the phone is now a MIDI instrument with both a microphone and note inputs, it’s possible to use them together as the inputs to vocoder software, which he demonstrates by covering Around the World by Daft Punk (video).

We love how [poprhythm] explains how he interfaced to everything because hardware work is all about such details, and finding the right resources. Here’s the GitHub repository for the Arduino code and a few links to other resources.

We have seen MIDI phone projects before, and each one is always unique in its own way: here’s a different approach to converting a keypad phone to MIDI, and this rotary pulse-dial phone went in a completely different direction with the phone itself completely unmodified, using only external interfacing.

You can admire [poprhythm]’s Touch Tone MIDI Phone in action in the short videos embedded below, with each one showing off a different aspect of the build. It’s great work!

Continue reading “Touch Tone MIDI Phone And Vocoder Covers Daft Punk”

DIY LED Bulb Lacks Correct Lugs, So M3 Bolts To The Rescue

[Damo] has an interesting LED bulb project with a neat twist: he converted some outdoor lighting to 12 V LED lighting with some self-designed bulb replacements and decided to reuse the existing GU10 sockets and wiring. That meant putting GU10 lugs onto his custom PCBs, but he ran into a snag.

These GU10 bulb lugs are tough to buy in small quantities. Luckily, M3 socket head bolts are a near-perfect match.

Those distinctive lugs that twist into GU10 sockets? [Damo] simply couldn’t find anywhere offering to sell them in small quantities. So he did what any enterprising hacker would do and found a substitute that was both accessible and economical: M3 bolts. Apparently, socket-headed M3 bolts are pretty much identical in size to GU10 lugs. Who’d have thought?

[Damo]’s retrofit worked great, and thanks to M3 bolts he was able to re-use the existing weatherproof wiring and sockets in his yard. His design files are here on GitHub.

We do love using things for other than their intended purpose, but as [Damo] points out, GU10 sockets are normally connected to mains power. So if you decide to use his design (or use GU10 sockets for your own purposes), be aware that you’ll have hardware that looks interchangeable with other (mains-connected) sockets, but isn’t. Be mindful of that, and take appropriate precautions. Avoiding electrical oopsies is always worth putting effort into, after all.

Want To Use A Classic Mac Mouse On A Modern Computer? No? Here’s How To Do It Anyway

Need to hook a classic Mac mouse up to your modern machine with the help of a DIY USB adapter? [John Floren] has you covered. [John]’s solution uses a board with an ATmega32U4 microcontroller on it to connect to the Mac mouse on one end, and emulate a USB HID (Human Interface Device) on the other. A modern machine therefore recognizes it like it would any other USB input device.

Why is this necessary? The connector on the classic Mac mouse may look like a familiar DE-9 connector, but it is not an RS-232 device and wouldn’t work if it were plugged into a 9-pin serial port. The classic Mac mouse uses a different pinout, and doesn’t have much for brains on the inside. It relies on the host computer to read its encoders and button states directly.

This project is actually a bit of an update to a piece of earlier work [John] did in making a vintage Depraz mouse work with modern systems. He suspected that it wouldn’t take much to have it also work with a classic Mac mouse, and he was right — all it took was updating the pin connections and adding some pull-up resistors. The source code and design files are on GitHub.

Even if one does not particularly want to use a classic Mac mouse for daily work, there’s definitely value in this kind of thing for those who deal in vintage hardware: it allows one to function-check old peripherals without having to fire up a vintage machine.

Continue reading “Want To Use A Classic Mac Mouse On A Modern Computer? No? Here’s How To Do It Anyway”

Digital “Toy” Camera, Made For Tilt-Shift And Other Analog-Like Experimenting

Like many others, [volzo] loves playing with photography in a playful and experimental way. Oddball lenses, vintage elements, and building from kits is what that world looks like. But that kind of stuff is really the domain of film cameras, or at least it was until [volzo] created his Digital Toy Camera design. The result? A self-built, lomography-friendly digital camera that allows for all kinds of weird and wonderful attachments and photo shenanigans.

3D-printed mounts and magnetic attachment makes swapping parts a breeze.

To make a DIY digital camera that allowed that kind of play, the first problem [volzo] had to solve was deciding on an image sensor. It turns out that sourcing image sensors as an individual is a pretty cumbersome process, and even if successful, one still needs to write a driver and create things from the ground up. So, the guts of [volzo]’s creations use the Raspberry Pi and camera sensor ecosystem and M12 lenses, a decision that allows him to focus on the rest of the camera.

3D printing, a bit of CNC machining, and some clever design yields a “toy” camera: simple, inexpensive, and enabling one to take a playful and experimental approach to photography. The design files are available on GitHub, and there are some neat elements to the design. Magnetic mounts allow for easy swapping of lens assemblies, and a M12 x 0.75 tap cuts perfect threads into 3D-printed pieces for M12 lenses.

Heat-set inserts also provide robust fastening that can hold up to disassembly and re-assembly (and don’t miss that our own [Joshua Vasquez] has shared how best to design for and use heat-set inserts.)

[volzo] has a fantastic video to accompany his project; give it a watch (embedded below, under the page break) and see if you don’t come away with some inspiration of your own.

Continue reading “Digital “Toy” Camera, Made For Tilt-Shift And Other Analog-Like Experimenting”