There’s something magical about a laser light show. Watching that intense beam of light flit back and forth to make shapes and patterns, some of them even animated, is pretty neat. It leaves those of us with a technical bent wondering just exactly how the beam is manipulated that fast.
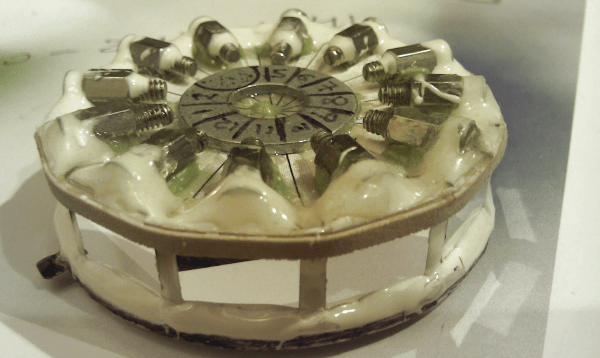
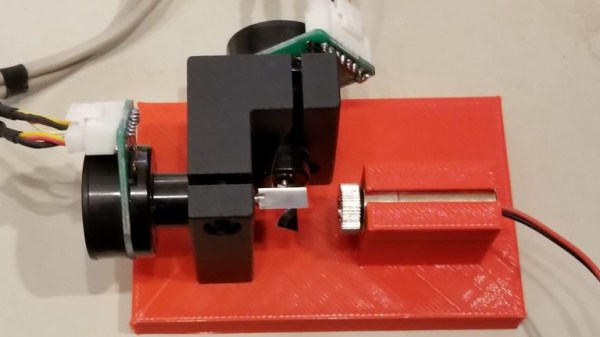
Wonder no more as [Zenodilodon], a working concert laser tech with a deep junk bin, dives into the innards of closed-loop galvanometers, which lie at the heart of laser light shows. Galvos are closely related to moving-coil analog meters, which use the magnetic field of a coil to deflect a needle against spring force to measure current. Laser galvos, on the other hand, are optimized to move a lightweight mirror back and forth, by tiny amounts but very rapidly, to achieve the deflection needed to trace out shapes.
As [Zeno] explains in his teardown of some galvos that have seen better days, this means using a very low-mass permanent magnet armature surrounded by coils. The armature is connected to the mirror on one end, and a sensor on the other to provide positional feedback. We found this part fascinating; it hadn’t occurred to us that laser galvos would benefit from closed-loop control. And the fact that a tiny wiggling vane can modulate light from an IR LED enough to generate a control signal is pretty cool too.
The video below may be a bit long, but it’s an interesting glimpse into the day-to-day life of a lighting tech. It puts a little perspective on some of the laser projection projects we’ve seen, like this giant Asteroids game.
Laser projectors like those popular in clubs or laser shows often use mirror galvanometers to reflect the laser and draw in 2D. Without galvos, and on a tight budget, [Vitaliy Mosesov] decided that instead of downgrading the quality, he would seek an entirely different solution: a spinning mirror drum.
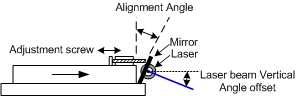
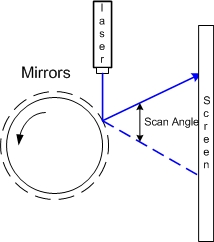
He fires a laser at a rotating drum with twelve mirror faces, each at a different adjustable vertical angle. The laser will hit a higher or lower point on the projection surface depending on which mirror it’s reflecting off – this creates resolution in the Y direction.
Timing the pulsing of the laser so that it reflects off the mirror at a certain horizontal angle provides the X resolution.
As you can already tell, speed and timing is critical for this to work. So much so that [Vitaliy] decided he wanted to overclock his Arduino – from 16 MHz to 24.576 MHz. Since this changes the baud rate, an AVR ISP II was used for programming after the modification, and the ‘duino’s hardware serial initialization had to be hacked too.
For the laser itself, [Vitaliy] designed some nifty driver circuitry, which can respond quickly to the required >50 kHz modulation, supply high current, and filter out voltage transients on the power supply (semiconductor lasers have no protection from current spikes).
On the motor side of things, closed loop control is essential. A photo-interrupter was added to the drum for exact speed detection, as well as a differentiator to clean up the signal. Oh, and did we mention the motor is from a floppy disk drive?
Mirror galvanometers (‘galvos’ for short) are the worky bits in a laser projector; they are capable of twisting a mirror extremely quickly and accurately. With two of them, a laser beam may be steered in X and Y to form patterns. [bdring] had purchased some laser galvos and decided to roll his own control system with the goal of driving the galvos with the DAC (digital to analog) output of a microcontroller. After that, all that was needed to make it draw some shapes was a laser and a 3D printed fixture to hold everything in the right alignment.
The galvos came with drivers to take care of the low-level interfacing, and [bdring]’s job was to make an interface to translate the 0 V – 5 V output range of his microcontroller’s DAC into the 10 V differential range the driver expects. He succeeded, and a brief video of some test patterns is embedded below.
We’re suckers for any project that’s nicely packaged, but an added bonus is when most of the components can be sourced cheaply and locally. Such is the case for this little laser light show, housed in electrical boxes from the local home center and built with stuff you probably have in your junk bin.
When we first came across [replayreb]’s write-up and saw that he used hard drives in its construction, we assumed he used head galvanometers to drive the mirrors. As it turns out, he used that approach in an earlier project, but this time around, the hard drive only donated its platters for use as low mass, first surface mirrors. And rather than driving the mirrors with galvos, he chose plain old brushed DC motors. These have the significant advantage of being cheap and a perfect fit for 3/4″ EMT set-screw connectors, designed to connect thin-wall conduit, also known as electromechanical tubing, to electrical boxes and panels. The motors are mounted to the back and side of the box so their axes are 90° from each other, and the mirrors are constrained by small cable ties and set at 45°. The motors are driven directly by the left and right channels of a small audio amp, wiggling enough to create a decent light show from the laser module.
We especially like the fact that these boxes are cheap enough that you can build three with different color lasers. In that case, an obvious next step would be bandpass filters to split the signal into bass, midrange, and treble for that retro-modern light organ effect. Or maybe figuring out what audio signals you’d need to make this box into a laser sky display would be a good idea too.
For all its simplicity, the arcade classic Asteroids was engaging in the extreme, with the ping of the laser, the rumble of the rocket, the crash of crumbling space rocks, and that crazy warble when the damn flying saucers made an appearance. Atari estimates that the game has earned operators in excess of $500 million since it was released in 1979. That’s two billion quarters, and we’ll guess a fair percentage of those coins came from the pockets of Hackaday’s readers and staff alike.
One iconic part of Asteroids was the vector display. Each item on the field was drawn as a unit by the CRT’s electron beam dancing across the phosphor rather than raster-scanned like TV was at the time. The simple graphics were actually pretty hard to create, and with that in mind, [standupmaths] decided to take a close look at the vector display of Asteroids and try to recreate it using a laser.
To be fair, [Seb Lee-Delisle] does all the heavy lifting here, with [standupmaths] providing context on the history and mathematics of the original vector display. [Seb] is a digital artist by trade, and has at the ready a 4-watt RGB laser projector for light shows and displays. Using the laser as a replacement for the CRT’s electron beam, [Seb] was able to code a reasonably playable vector-graphic version of Asteroids on a large projections screen. Even the audio is faithful to the original. The real treat comes when the laser is slowed and a little smoke added to show us how each item is traced out in order.
All [Seb]’s code is posted on GitHub, so if you have a laser projector handy, by all means go for it. Or just whip up a custom vector display for your own tabletop version of Asteroids.
Motors are everywhere; DC motors, AC motors, steppers, and a host of others. In this article, I’m going to look beyond these common devices and search out more esoteric and unusual electronic actuators that might just find a place in one of your projects. In any case, their mechanisms are interesting in their own right! Join me after the break for a survey of piezo, magnetostrictive, magnetorheological, voice coils, galvonometers, and other devices. I’d love to hear about your favorite actuators and motors too, so please comment below!
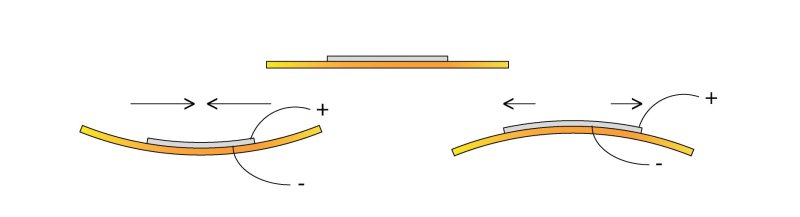
Piezoelectric materials sometimes seem magic. Apply a voltage to a piezoelectric material and it will move, as simple as that. The catch of course is that it doesn’t move very much. The piezoelectric device you’re probably most familiar with is the humble buzzer. You’d usually drive these with less than 10 volts. While a buzzer will produce a clearly audible sound you can’t really see it flexing (as it does shown above).
To gauge the motion of a buzzer I recently attempted to drive one with a 150 volt piezo driver, this resulted in a total deflection of around 0.1mm. Not very much by normal standards!
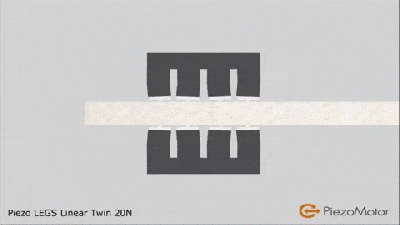
The PiezoMotor LEGS actuator “walks” along a rod, pushing it as it goes.
For some applications however resolution is of primary interest rather than range of travel. It is here that piezo actuators really shine. The poster-boy application of piezo actuators is perhaps the scanning probe microscope. These often require sub-nanometer accuracy (less than 1000th of 1000th of 1 millimeter) in order to visualize individual atoms. Piezo stacks are ideal here (though hackers have also used cheap buzzers!).
Sometimes though you need high precision over a larger range of travel. There are a number of piezo configurations that allow this. Notably Inchworm, “LEGS”, and slip-stick actuators.
The PiezoMotor LEGS actuator is shown to the above. As noted, Piezos only produce small (generally sub-millimeter) motion. Rather than using this motion directly, LEGS uses this motion to “walk” along a rod, pushing it back and forth. The rod is therefore moved, in tiny nanometer steps. However, piezos can move quickly (flexing thousands of times a second). And the LEGS (and similar Inchworm actuator) allows relatively quick, high force, and high resolution motion.
The tablecloth trick (yes this one’s fake, the kid is ok don’t worry. :))
Another type of long travel piezo actuator uses the “stick-slip phenomenon”. This is much like the tablecloth magic trick shown above. If you pull the cloth slowly there will be significant friction between the cloth and this crockery and they will be dragged along with the cloth. Pull it quickly and there will be less friction and the crockery will remain in place.
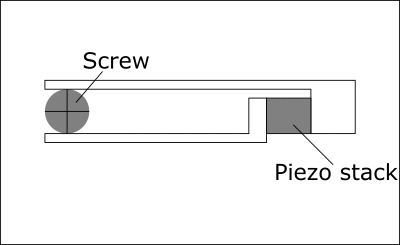
This difference between static and dynamic friction is exploited in stick-slip actuators. The basic mechanism is shown in the figure below.
Motion caused by a stick-slip motor
When extending slowing a jaw rotates a screw, but if the piezo stack is compressed quickly the screw will not return. The screw can therefore be made to rotate. By inverting the process (extending quickly, then compressing slowly) the process is reversed and the screw is turned in the opposite direction. The neat thing about this configuration is that it retains much of the piezo’s original precision. Picomotors have resolutions of around 30 nanometer over a huge range of travel, typically 25mm, they’re typically used for optical focusing and alignment and can be picked up on eBay for 100 dollars or so. Oh and they can also be used to make music. Favorites include Stairway to Heaven, and not 1 but 2 versions of Still Alive (from Portal). Obligatory Imperial March demonstration is embedded here:
There are numerous other piezo configurations, but typically they are used to provide high force, high precision motion. I document a few more over on my blog.
Magnetostrictive actuators
Magnetostriction is the tendency of a material to change shape under a magnetic field. We’ve been talking about magnetostriction quite a lot lately. However much like piezos it can also be used for high precision motion. Unlike piezos they require relatively low voltages for operation and have found niche applications.
Magnetorheological motion
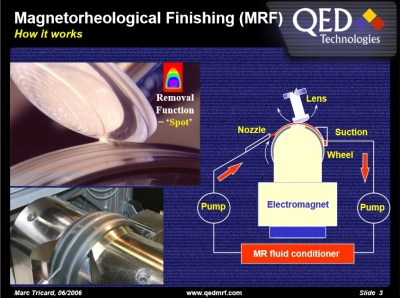
Magnetorheological (MR) fluids are pretty awesome! Much like ferrofluids, MR fluids respond to changes in magnetic field strength. However, unlike ferrofluids it’s their viscosity that changes.
This novel characteristic has found applications in a number of areas. In particularly the finishing of precise mirrors and lens used in semiconductor and astronomical applications. This method uses an electromagnet to change the viscosity of the slurry used to polish mirrors, removing imperfections. The Hubble telescope’s highly accurate mirrors were apparently finished using this technique (though hopefully not that mirror). You can purchase MR fluid in small quantities for a few hundred dollars.
Electrostatic motors
While magnetic motors operate through the attraction and repulsion of magnetic fields, electrostatic motors exploit the attraction and repulsion of electric change to produce motion. Electrostatic forces are orders or magnitude smaller that magnetic ones. However they do have niche applications. One such application is MEMS motors, tiny (often less than 0.01mm) sized nanofabricated motors. At these scales electromagnetic coils would be too large and specific power (power per unit volume) is more important than the magnitude of the overall force.
Voice coils and Galvanometers
The voice coil is your basic electromagnet. They’re commonly used in speakers, where an electromagnet in the cone reacts against a fixed magnet to produce motion. However voice coil like configurations are used for precise motion control elsewhere (for example to focus the lens of an optical drive, or position the read head of a hard disc drive). One of the cooler applications however is the mirror galvanometer. As the name implies the device was originally used to measure small currents. A current through a coil moved a rod to which a mirror was attached. A beam of light reflect off the mirror and on to a wall effectively created a very long pointer, amplifying the signal.
These days ammeters are far more sensitive of course, but the mirror galvanometer has found more entertaining applications:
High speed laser “galvos” are used to position a laser beam producing awesome light shows. Modern systems can position a laser beam at kilohertz speeds, rendering startling images. These systems are effectively high speed vector graphic like line drawing systems, resulting in a number of interesting algorithmic challenges. Marcan’s OpenLase framework provides a host of tools for solving these challenges effectively, and is well worth checking out.
In this article I’ve tried to highlight some interesting and lesser known techniques for creating motion in electronic systems. Most of these have niche scientific, industrial or artistic applications. But I hope they also also offer inspiration as you work on your own hacks! If you have a favorite, lesser known actuator or motor please comment below!
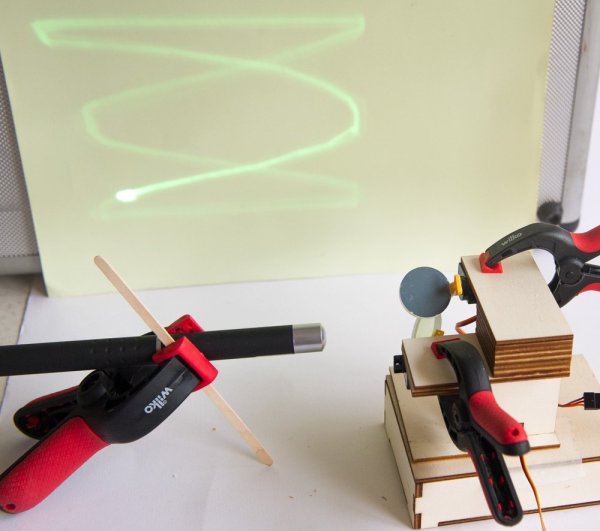
Mirror galvanometers were originally developed in the 17th century to precisely measure very small changes in current. Unlike other instruments of the day, a mirror galvanometer could clearly show minute current variations by translating tiny movements of the mirror into large movements of the light reflected off of the mirror. Before clean electrical amplification became possible, this was the best means of measuring tiny differences in current. True mirror galvanometers are very sensitive instruments, but hobby servos can be used as a low-fidelity alternative, like with this project on Hackaday.io created by [robives].
Using a mirror galvanometer is by far the most common technique for laser projection shows – it’s really the only way to move the laser’s beam quickly enough to create the visual illusion of a solid line in real time. A mirror galvanometer works by using coils to attract magnets attached to the mirror, allowing the angle of the mirror to change when current is applied to the coils. This movement is extremely small, but is amplified by the distance to the projection surface, meaning the laser’s beam can move huge distances in an instance. If you’ve ever seen a laser show, it almost certainly used this technique. But driving galvos requires a beefy DAC, so we can’t blame [robives] for wanting to keep it digital.
[robives’s] project side-steps the need for galvanometers by using glow-in-the-dark vinyl and a UV laser. The result is a laser beam trail which lasts much longer, which means that solid lines are visible without the need for high-speed galvos. A build like this lets you experiment with laser projections without dealing with sensitive mirror galvos, and instead use components that you probably already have sitting on your workbench.


 This novel characteristic has found applications in a number of areas. In particularly the finishing of precise mirrors and lens used in semiconductor and astronomical applications. This method uses an electromagnet to change the viscosity of the slurry used to polish mirrors, removing imperfections. The Hubble telescope’s highly accurate mirrors were apparently finished using this technique (though hopefully not