Given how long humans have been warming themselves up, you’d think we would have worked out all the kinks by now. But even with central heating, and indeed sometimes because of it, some places we frequent just aren’t that cozy. In such cases, it often pays to heat the person, not the room, but that can be awkward, to say the least.
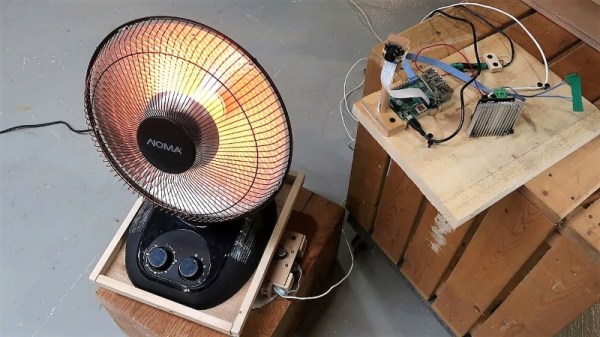
Hacking polymath [Matthias Wandel] worked out a solution to his cold shop with this target-tracking infrared heater. The heater is one of those radiant deals with the parabolic dish, and as anyone who’s walked past one on demo in Costco knows, they throw a lot of heat in a very narrow beam. [Matthias] leveraged a previous project that he whipped up for offline surveillance as the core of the project. Running on a Raspberry Pi with a camera, the custom software analyzes images and locates motion across the width of a frame. That drives a stepper that swivels a platform for the heater. The video below shows the build and the successful tests; however, fans of [Matthias] should prepare themselves for a shock as he very nearly purchases a lazy susan to serve as the base for the heater rather than building one.
We’re never disappointed by [Matthias]’ videos, and we’re always impressed by his range as a hacker. From DIY power tools to wooden logic circuits to his recent Lego chocolate engraver, he always finds ways to make things interesting.
Continue reading “Raspberry Pi Tracks Humans, Blasts Them With Heat Rays”


![This Herald is in much better condition than my 12/50 was. Philafrenzy [CC BY-SA 4.0]](https://hackaday.com/wp-content/uploads/2017/03/triumph_herald_southgate_london.jpg)