Location Sharing With Google Home

With Google’s near-monopoly on the internet, it can be difficult to get around in cyberspace without encountering at least some aspect of this monolithic, data-gathering giant. It usually takes a concerted effort, but it is technically possible to do. While [Mat] is still using some Google products, he has at least figured out a way to get Google Home to work with location data without actually sharing that data with Google, which is a step in the right direction.

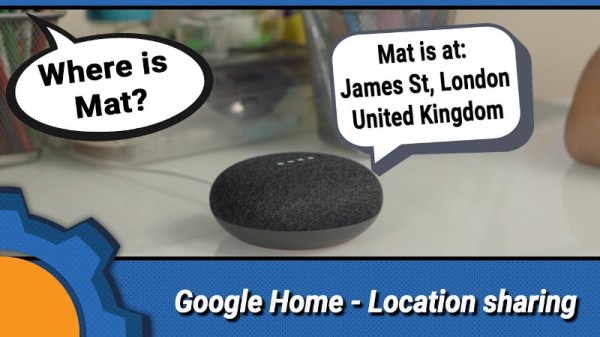
[Mat]’s goal was to use Google’s location sharing features through Google Home, but without the creepiness factor of Google knowing everything about his life, and also without the hassle of having to use Google Maps. He’s using a few things to pull this off, including a NodeRED server running on a Raspberry Pi Zero, a free account from If This Then That (IFTTT), Tasker with AutoRemote plugin, and the Google Maps API key. With all of that put together, and some configuration of IFTTT he can ask his Google assistant (or Google Home) for location data, all without sharing that data with Google.

This project is a great implementation of Google’s tools and a powerful use of IFTTT. And, as a bonus, it gets around some of the creepiness factor that Google tends to incorporate in their quest to know all the data.

Continue reading “Location Sharing With Google Home”

Simple Decoder Serves As Solo Ham’s Test Buddy

For a hobby that’s ostensibly all about reaching out to touch someone, ham radio can often be a lonely activity. Lots of hams build and experiment with radio gear much more than they’re actually on the air, improving their equipment iteratively. The build-test-tweak-repeat cycle can get a little tedious, though, especially when you’re trying to assess signal strength and range and can’t find anyone to give you a report.

To close the loop on field testing, [WhiskeyTangoHotel] threw together a simple ham radio field confirmation unit that’s pretty slick. It relies on the fact that almost every ham radio designed for field use incorporates a DTMF encoder in the microphone or in the transceiver itself. Hams have used Touch Tones for in-band signaling control of their repeaters for decades, and even as newer digital control methods have been introduced, good old analog DTMF hangs in there. The device consists of a DTMF decoder attached to the headphone jack of a cheap handy talkie. When a DTMF tone is received, a NodeMCU connected to the decoder calls an IFTTT job to echo the key to [WTH]’s phone as an SMS message. That makes it easy to drive around and test whether his mobile rig is getting out. And since the receiver side is so portable, there’s a lot of flexibility in how tests can be arranged.

On the fence about ham as a hobby? We don’t blame you. But fun projects like this are the perfect excuse to go get licensed and start experimenting.

Continue reading “Simple Decoder Serves As Solo Ham’s Test Buddy”

Teaching Alexa To 3D Print

Sometimes a gadget like Alexa or Google Home is a solution looking for a problem. Then the problem you’ve been looking for hits you square in the face. I’ve confessed before that I have an oscilloscope problem. I also have a microcontroller development board habit. It appears now I have too many 3D printers. I recently finished building my latest one, an Anet A8 I picked up on Black Friday. While calibrating it, I found myself juggling a screwdriver, a pair of pliers, and trying to operate the thing all at one time. I realized I had to come up with a better way.

I don’t know if it qualifies as an addiction yet, but I also have an Alexa in every room (although I call it “Computer” because I’m a Star Trek fan) and a Google Home device almost everywhere. Why can’t I get one of these assistants to operate my printer for me? What are assistants for, after all, other than telling Dad jokes?

You’d think adding voice control to a 3D printer would a bit difficult. With the right tools, it is actually pretty easy. Luckily those tools aren’t anything special… if you want a set up like mine, where Alexa controls your 3D printer, read on.

Continue reading “Teaching Alexa To 3D Print”

Cat Feeder Has Steampunk Flair And A GMail Account

While it is often said that “necessity is the mother of invention”, we can’t say that’s always been our experience here at Hackaday. You won’t need to search too long before you find a project or hack on this site that definitely falls out of the realm of strict necessity. But that’s part of the fun, there’s a reason this site isn’t called AppropriateUseOfTime.com

But when [Sam Storino] couldn’t seem to stop his cats from howling for their supper at 3:00 AM, he had the perfect opportunity to fulfill that age-old wisdom. Not only did he manage to turn a trip to the plumbing isle of his local home improvement store into a very Steampunk-looking automatic cat feeder, but he also found the time to write up an exceptionally detailed series of blog posts on what he learned during the process.

The heart of the machine is everyone’s favorite Linux board, the Raspberry Pi. You might be thinking the Pi is overkill for a simple timer, and you’d be right. Rather than just dump the food out on a set schedule, [Sam] decided to get a little fancy and come up with some Python scripts that will monitor a GMail inbox and activate the feeder hardware when it receives an email with the title “feed cats”. He then uses IFTTT to send the appropriately named email to the GMail account of his cat feeder on a specific schedule. Hey, nobody said necessity was the mother of straightforward invention.

In the final post of the series, [Sam] goes over the hardware side of the device. Copper pipe makes up the frame, which holds a commercial off-the-shelf dry food dispenser. The feeder was designed for manual operation, but by attaching a continuous rotation servo [Sam] can spin it up and dump a pre-measured amount of food via the Pi’s GPIO pins. The addition of some PVC pipe and fittings takes the food and (at least in theory) divides it equally between the two cat bowls below.

If you think [Sam] may have put a bit more thought than was necessary into something as simple as feeding his pets, keep in mind that he’s in exceptionally good company. Paging through the archives, it seems the intersection of felines and hackers is littered with gloriously complex contraptions.

Old Intercom Gets Googled With Raspberry Pi And AIY Hat

Old Radio Shack intercom; brand new Google Voice interface for a Raspberry Pi. One of these things is not like the other, but they ended up together in this retro-look Google Voice interface, and the results are pretty slick.

The recipient of the Google hive-mind transplant was one of three wireless FM intercoms [MisterM] scored for a measly £4. Looking much as they did when they were the must-have office tool or home accessory for your modern mid-80s lifestyle, the intercom case was the perfect host for the Pi and the Google AIY hat. Only the case was used — not even the original speaker made it into the finished product. The case got a good scrubbing, a fresh coat of paint to perk up the gone-green plastic, and an accent strip of Google’s logo colors over the now-deprecated station selector switch. [MisterM] provided a white LED behind the speaker grille for subtle feedback. A tap of the original talk bar gets Google’s attention for answers to quick questions, and integration into the family’s existing home automation platform turns the lights on and off. See it in action after the break.

[MisterM] was lucky enough to score an AIY hat for free, and as far as we know they’re still hard to come by. If you’re itching to try out the board, fear not — turns out you can roll your own.

Continue reading “Old Intercom Gets Googled With Raspberry Pi And AIY Hat”

See The Weather At A Glance With This WiFi Wall Mounted Display

Whether you’re lodged in an apartment with a poor view of the sky like [Becky Stern] or are looking for an at-a-glance report of the current weather, you might consider this minimalist weather display instead of checking your computer or your phone every time you’re headed out the door.

The first order of business was to set up her Feather Huzzah ESP8266 module. [Becky] started with a blink test to ensure it was working properly. Once that was out of the way, she moved on to installing a few libraries. Temperature data fetched by an IFTTT feed is displayed on a seven-segment display, while additional feeds separately retrieve information for each basic weather type: sunny, overcast, rain, snow.

All it took to create the sleek display effect was a few pieces of cardboard inside a shadow box frame, a sheet of paper as a diffuser, and twelve Neopixel RGB LEDs hidden inside. Trimming and securing everything in place as well as notching out the back of the frame for the power cable finished the assembly. Check out the build video after the break.

Continue reading “See The Weather At A Glance With This WiFi Wall Mounted Display”

Garage Door Opener Logs To Google Drive

A garage door opener is a pretty classic hack around these parts. IR, Bluetooth, WiFi, smartphone controlled, web interfaces — we’ve seen it all.  But if you want to keep track of people going in and out, you need some way of logging what’s happening. You could go ahead and roll up your own SQL based solution, tied into a custom web page. But there’s an easier way; you can build a garage door opener that logs events to Google Drive.

[WhiskeyTangoHotel] was looking for an ESP8266 project, and a garage door opener seemed just the ticket. It’s simple enough to code up, and control over WiFi comes in handy. Interfacing with the garage door was simple enough — the existing opener uses a simple push button, which is easily controlled by wiring up a relay to do the job. Logging is as simple as having the ESP8266 send requests to IFTTT which is set up to make posts to a Google Sheet with status updates.

The project is fairly basic, but there’s room for expansion. By using separate Maker Channel triggers on IFTTT, different users of the garage door could be tracked. It would also be easy to add some limit switches or other sensors to detect the door’s position, so it can be determined whether the door was opened or closed.

There’s always another take on the garage door opener — check out this hack that opens the garage door in response to flashing headlights.