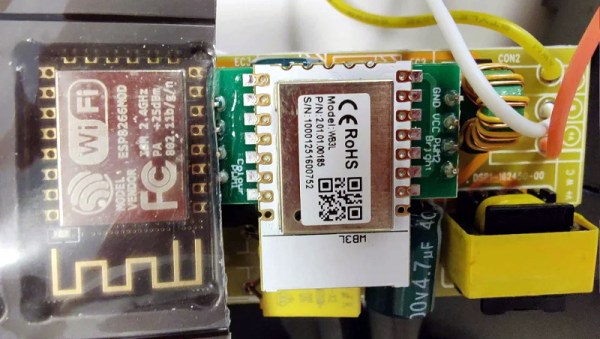
The first time [konbaasiang] ordered some ceiling LED lights from Tuya, he was pleased to find they contained an ESP-12F that could easily be flashed with a different firmware. So when he ordered 30 more of them at a cost of nearly $900 USD, you can understand his frustration to find that the popular WiFi-enabled microcontroller had been swapped out for a pin-compatible clone that Tuya developed called the WB3L.
Some people would have just chalked this one up to bad luck and used the Tuya-supplied software to control their new lights, but not [konbaasiang]. Since the new chip was outwardly identical to the ESP8266, he decided to take the nuclear option and replace them with the genuine article. With a comfortable spot to work from and a nice microscope, he started on his desoldering journey.
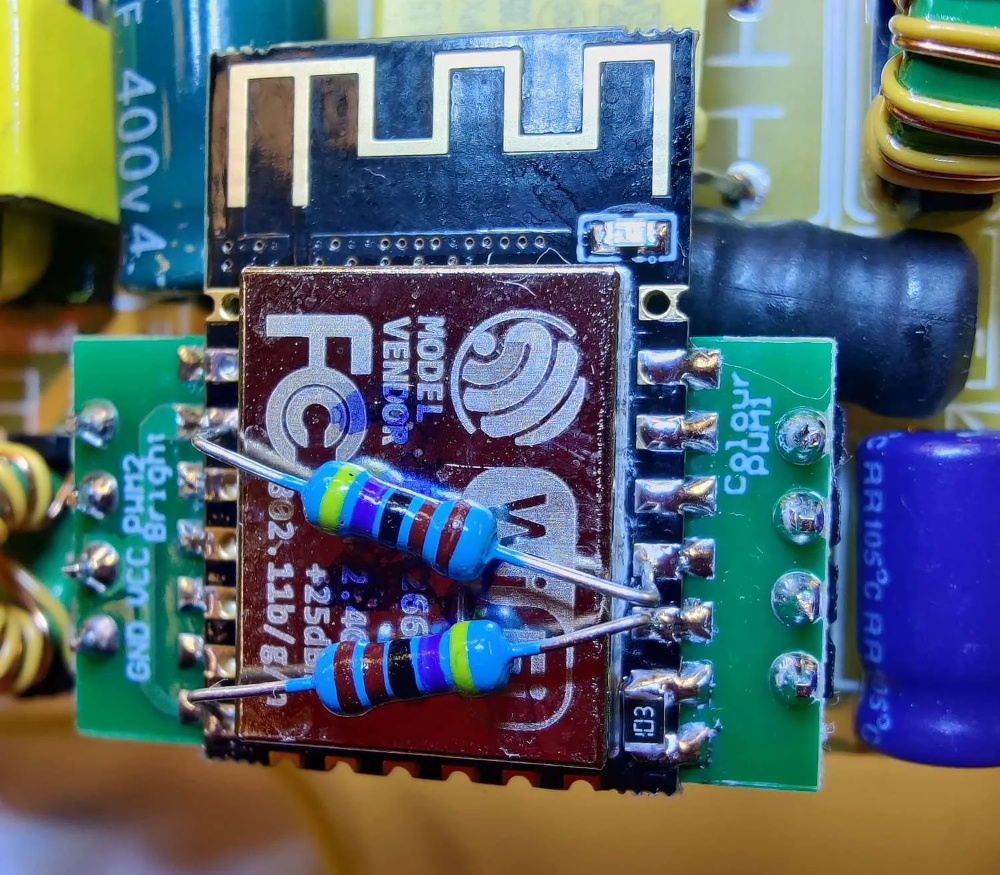
Now it would have been nice if he could have just dropped in a real ESP-12F and called it a day, but naturally, it ended up being a bit more complex than that. The WB3L apparently doesn’t need external pull up and pull down resistors, but [konbaasiang] needed them for the swap to work. He could have come up with some kind of custom adapter PCB, but to keep things simple he decided to run a pair of through hole resistors across the top of the ESP-12F for GPIO 1/2, and use a gingerly placed SMD resistor to hold down GPIO 15.
Bad news, Martian helicopter fans: Ingenuity, the autonomous helicopter that Perseverance birthed onto the Martian surface a few days ago, will not be taking the first powered, controlled flight on another planet today as planned. We’re working on a full story so we’ll leave the gory details for that, but the short version is that while the helicopter was undergoing a full-speed rotor test, a watchdog timer monitoring the transition between pre-flight and flight modes in the controller tripped. The Ingenuity operations team is going over the full telemetry and will reschedule the rotor test; as a result, the first flight will occur no earlier than Wednesday, April 14. We’ll be sure to keep you posted.
Anyone who has ever been near a refinery or even a sewage treatment plant will have no doubt spotted flares of waste gas being burned off. It can be pretty spectacular, like an Olympic torch, but it also always struck us as spectacularly wasteful. Aside from the emissions, it always seemed like you could at least try to harness some of the energy in the waste gasses. But apparently the numbers just never work out in favor of tapping this source of energy, or at least that was the case until the proper buzzword concentration in the effluent was reached. With the soaring value of Bitcoin, and the fact that the network now consumes something like 80-TWh a year, building portable mining rigs into shipping containers that can be plugged into gas flaring stacks at refineries is now being looked at seriously. While we like the idea of not wasting a resource, we have our doubts about this; if it’s not profitable to tap into the waste gas stream to produce electricity now, what does tapping it to directly mine Bitcoin really add to the equation?
What would you do if you discovered that your new clothes dryer was responsible for a gigabyte or more of traffic on your internet connection every day? We suppose in this IoT world, such things are to be expected, but a gig a day seems overly chatty for a dryer. The user who reported this over on the r/smarthome subreddit blocked the dryer at the router, which was probably about the only realistic option short of taking a Dremel to the WiFi section of the dryer’s control board. The owner is in contact with manufacturer LG to see if this perhaps represents an error condition; we’d actually love to see a Wireshark dump of the data to see what the garrulous appliance is on about.
As often happens in our wanderings of the interwebz to find the very freshest of hacks for you, we fell down yet another rabbit hole that we thought we’d share. It’s not exactly a secret that there’s a large number of “Star Trek” fans in this community, and that for some of us, the way the various manifestations of the series brought the science and technology of space travel to life kick-started our hardware hacking lives. So when we found this article about a company building replica Tricorders from the original series, we followed along with great interest. What we found fascinating was not so much the potential to buy an exact replica of the TOS Tricorder — although that’s pretty cool — but the deep dive into how they captured data from one of the few remaining screen-used props, as well as how the Tricorder came to be.
And finally, what do you do if you have 3,281 drones lying around? Obviously, you create a light show to advertise the launch of a luxury car brand in China. At least that’s what Genesis, the luxury brand of carmaker Hyundai, did last week. The display, which looks like it consisted mostly of the brand’s logo whizzing about over a cityscape, is pretty impressive, and apparently set the world record for such things, beating out the previous attempt of 3,051 UAVs. Of course, all the coverage we can find on these displays concentrates on the eye-candy and the blaring horns of the soundtrack and gives short shrift to the technical aspects, which would really be interesting to dive into. How are these drones networked? How do they deal with latency? Are they just creating a volumetric display with the drones and turning lights on and off, or are they actually moving drones around to animate the displays? If anyone knows how these things work, we’d love to learn more, and perhaps even do a feature article.
If you have a Hello Sense sleep tracking device lying around somewhere in your drawer of discards, it can be brought back to life in a new avatar. Just follow [Alexander Gee]’s instructions to resurrect the Hello Sense as an IoT air quality data-logger.
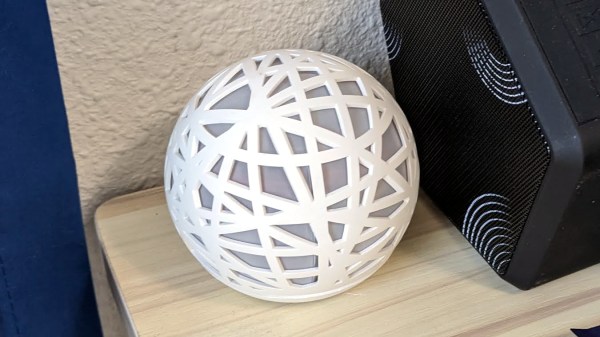
In 2014, startup “Hello” introduced the Sense, an IoT sleep tracking device with a host of embedded sensors, all wrapped up in a slick, injection molded spherical enclosure. The device was quite nice, and by 2015, they had managed to raise $21M in funding. But their business model didn’t seem sustainable, and in 2017, Hello shut shop. Leaving all the Sense devices orphaned, sitting dormant in beautifully designed enclosures with no home to dial back to.
The original Sense included six sensors: illumination, humidity, temperature, sound, dust / particulate matter on the main device, and motion sensing via a separate Bluetooth dongle called the Pill. [Alexander] was interested in air quality measurements, so only needed to get data from the humidity/temperature and dust sensors. Thankfully for [Alexander], a detailed Hello Sense Teardown by [Lindsay Williams] was useful in getting started.
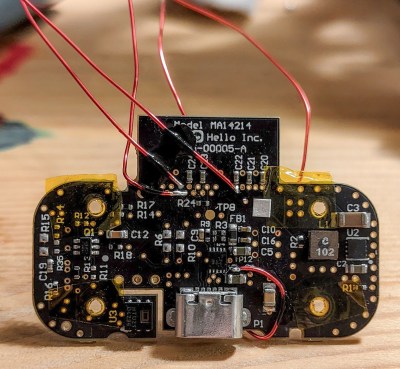
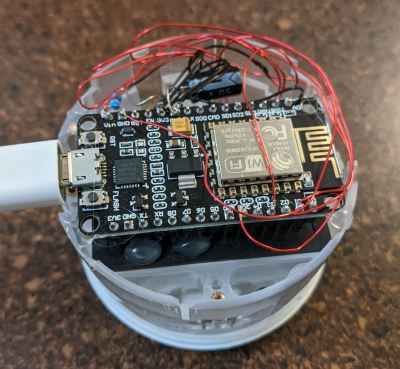
The hardware consisted of four separate PCB’s — power conditioning, LED ring, processor, and sensor board. This ensured that everything could be fit inside the orb shaped enclosure. Getting rid of the LED ring and processor board made space for a new NodeMCU ESP8266 brain which could be hooked up to the sensors. Connecting the NodeMCU to the I2C interface of the humidity/temperature sensor required some bodge wire artistry. Interfacing the PM sensor was a bit more easier since it already had a dedicated cable connected to the original processor board which could be reconnected to the new processor board. The NodeMCU board runs a simple Arduino sketch, available on his Git repo, to gather data and push it online.
Sensor board bodge
NodeMCU
For the online data display dashboard, [Alexander] found a nice solution by [Nilhcem] for home monitoring using MQTT, InfluxDB, and Grafana. It could be deployed via a docker compose file and have it up and running quickly. Unfortunately, such projects don’t usually succeed without causing some heartburn, so [Alexander] has got you covered with a bunch of troubleshooting tips and suggestions should you get entangled.
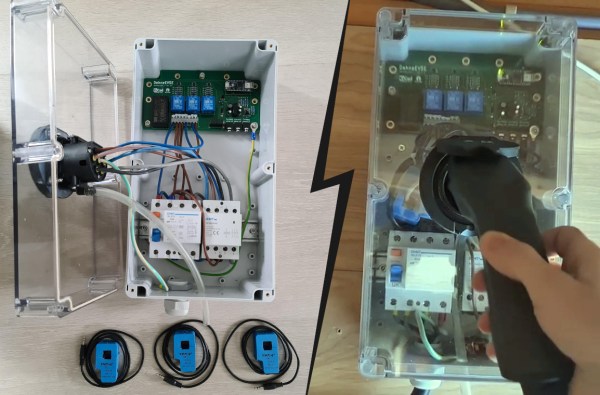
Electric vehicles are becoming more and more common on the road, but when they’re parked in the driveway or garage there are still some kinks to work out when getting them charged up. Sure, there are plenty of charging stations on the market, but they all have different features, capabilities, and even ports, so to really make sure that full control is maintained over charging a car’s batteries it might be necessary to reach into the parts bin and pull out a trusty Arduino.
This project comes to us from [Sebastian] who needed this level of control over charging his Leaf, and who also has the skills to implement it from the large high voltage switching contactors to the software running its network connectivity and web app. This charging station has every available feature, too. It can tell the car to charge at different rates, and can restrict it to charging at different times (if energy is cheaper at night, for example). It is able to monitor the car’s charge state and other information over the communications bus to the vehicle, and even has a front-end web app for monitoring and controlling the device.
The project is based around an Arduino Nano 33 IoT with all of the code available on the project’s GitHub page. While we would advise using extreme caution when dealing with mains voltage and when interfacing with a high-ticket item like an EV, at first blush the build looks like it has crossed all its Ts and might even make a good prototype for a production unit in the future. If you don’t need all of the features that this charging station has, though, you can always hack the car itself to add some more advanced charging features.
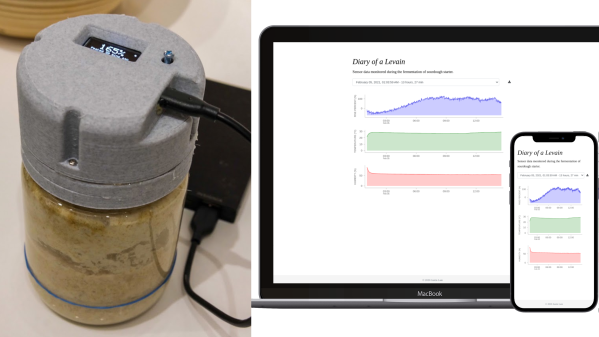
[Justin Lam] created a wonderfully-detailed writeup of his Smart Sourdough Lid project, which was created out of a desire to get better data on the progress and health of his sourdough starters, and to do so more efficiently. The result is a tidy, one-piece lid that constantly measures temperature, humidity, and height of the starter in the jar. Data is sent wirelessly for analysis, but there is also a handy OLED display on the top of the lid that shows immediately useful data like how much the starter has peaked, and how much time has passed since it did so.
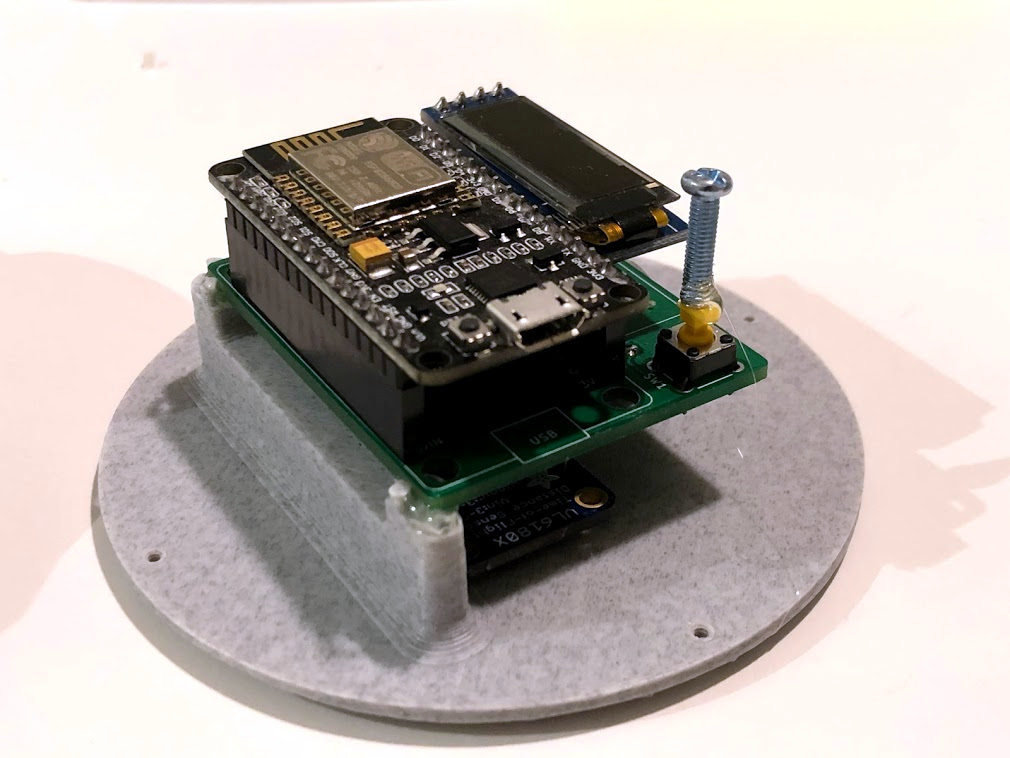
The PCB was optimized for size, and not designed with mounting in mind, so a hot-glued machine screw serves as a “button extender”. Issues like this can happen when enclosures are designed after the fact; it’s something to which we can all relate.
We really like how focused the design is, and the level of detail [Justin] goes into to explain his design decisions and describe how well they worked out. This isn’t [Justin]’s first kick at the can when it comes to getting data on his sourdough, after all. We remember his earlier work using computer vision to analyze sourdough starters, and he used what he learned to inform this new design; the smart lid is easier to use and handles data much more efficiently.
The project’s GitHub repository has all the information needed to build your own. The lid is ESP8266-based and integrates a VL6180X time-of-flight (ToF) distance sensor, DHT22 to sense temperature and humidity, and a small SSD1306 OLED display for data. A small custom PCB keeps the modules tidy, and a 3D-printed custom enclosure makes it one tidy package.
[Justin] also analyzes the results he obtained and talks about what they mean in the last part of his writeup, so if you’re into baking and interested in his findings, be sure to give that a look.
Smart switches are fun, letting you control lights and appliances in your home over the web or even by voice if you’re so inclined. However, they can make day-to-day living more frustrating if they’re not set up properly with regards to your existing light switches. Thankfully, with some simple wiring, it’s possible to make everything play nice.
The method is demonstrated here by [MyHomeThings], in which an ESP8266 is used with a relay to create a basic smart switch. However, it’s wired up with a regular light switch in a typical “traveller” multiway switching scheme – just like when you have two traditional light switches controlling the same light at home. To make this work with the ESP8266, though, the microcontroller needs to be able to know the current state of the light. This is done by using a 240V to 3.3V power supply wired up in parallel with the light. When the light is on, the 3.3V supply is on. This supply feeds into a GPIO pin on the ESP8266, letting it know the light’s current state, and allowing it to set its output relay to the correct position as necessary.
Measuring the usage of domestic utilities such as water, gas or electricity usually boils down to measuring a repetitive pulse signal with respect to time. To make things easy, most modern utility meters have a pulsed LED output, which can be used to monitor the consumption by using an external optical sensor. But what do you do if your meter isn’t so cooperative?
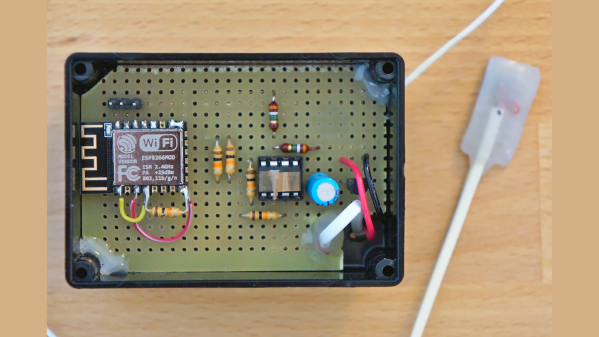
That’s exactly what [Francesco] had to figure out while developing the non-invasive gas tracking system he calls ESPmeter. His meter might not have an LED, but it did have a magnet attached to the counter disk which activated an internal hall sensor. With some hacking, he was able to attach an external Hall-effect sensor to pick up this magnet and use the signal to monitor his daily gas consumption.
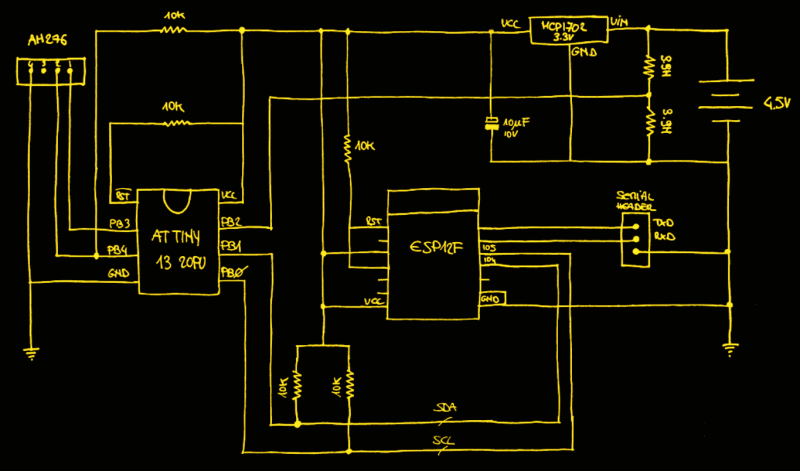
A big stumbling block in such projects is the issue of powering the device for an extended period, and remembering when it’s time to change the batteries. With the clever use of commonly available parts, he was able to reduce power consumption allowing three AA batteries to last about a year between changes. For one thing, he uses an ATtiny13 to actually read the sensor values. The chip doesn’t run continuously, its watchdog is set at 1 Hz, ensuring that the device is woken up often enough so that it has time to power up the sensor and detect the presence of the magnet. Battery voltage is also measured via a voltage divider connected to the chip’s ADC pin.
At regular intervals throughout the day, the ESP8266 polls the ATtiny13 to pull the stored sensor pulses and voltage measurement. Then at midnight, the ESP transmits all the collected data to a remote server. Overall, this whole scheme allows [Francesco] to reliably gather his gas consumption data while not having to worry about batteries until he gets the low voltage notification. Since the data visualization requirements are pretty basic, he is keeping things simple by using Plotly to display his time series data.
 Now it would have been nice if he could have just dropped in a real ESP-12F and called it a day, but naturally, it ended up being a bit more complex than that. The WB3L apparently doesn’t need external pull up and pull down resistors, but [konbaasiang] needed them for the swap to work. He could have come up with some kind of custom adapter PCB, but to keep things simple he decided to run a pair of through hole resistors across the top of the ESP-12F for GPIO 1/2, and use a gingerly placed SMD resistor to hold down GPIO 15.