That didn’t take long at all! We covered a pretty cool lamp with a novel magnetic switch mechanism, and [msraynsford] has his version laser cut, veneered, a video posted on YouTube (embedded below), and an Instructable written up before we’d even caught our breath.
For those who missed it, the original Heng lamp is a beautiful design with a unique take on a magnetic switch. As with the original, the secret sauce is a switch inside that’s physically held closed by the two magnets. It’s a pretty clever mechanism that looks magical to boot.
[msraynsford]’s version replaces the floating spheres with floating cylinders, which are easier to fabricate in layers on a laser cutter, but otherwise the copy is fairly true to the aesthetics of the original. Pretty sweet! Continue reading “Well, That Was Quick: Heng Lamp Duplicated”→
A laser cutter is a great tool to have in the shop, but like other CNC machines it can make a lousy neighbor. Vaporizing your stock means you end up breathing stuff you might rather not. If you’re going to be around these fumes all day, you’ll want good fume extraction, and you might just consider a DIY fume and particulate filter to polish the exhausted air.
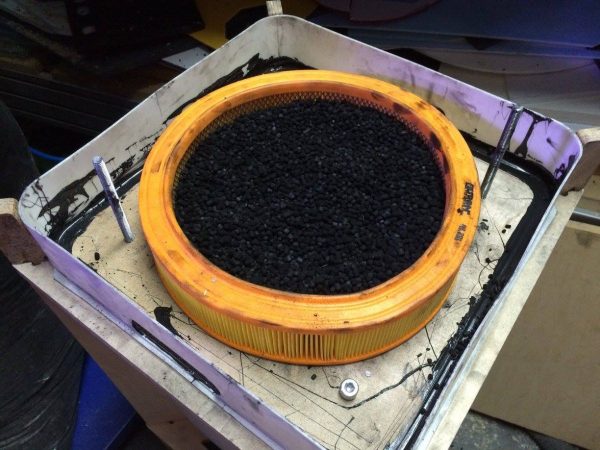
While there’s no build log per se, [ZbLab]’s Facebook page has a gallery of photos that show the design and build in enough detail to get the gist. The main element of the filter is 25 kg of activated charcoal to trap the volatile organic compounds in the laser exhaust. The charcoal is packed into an IKEA garbage can around a prefilter made from a canister-style automotive air cleaner – [ZbLab] uses a Filtron filter that crosses to the more commonly available Fram CA3281. Another air cleaner element (Fram CA3333) makes sure no loose charcoal dust is expelled from the filter. The frame is built of birch ply and the plumbing is simple PVC. With a 125mm inlet it looks like this filter can really breathe, and it would easily scale up or down in size according to your needs.
No laser cutter in your shop to justify this filter, you say? Why not build one? Or, if you do any soldering, this downdraft fume extractor is a good way to clear the air.
Few of us document the progression of our side projects. For those who do, those docs have the chance at becoming a tome of insight, a spaceman’s “mission log” found on a faraway planet that can tell us how to tame an otherwise cruel and hostile world. With the arrival of the RDWorks Learning Lab Series, Chinese laser cutters have finally received the treatment of a thorough in-depth guide to bringing them into professional working order.
In two series, totalling just over 90 videos (and counting!) retired sheet-metal machinist [Russ] takes us on a grand tour of retrofitting, characterizing, and getting the most out of your recent Chinese laser cutter purchase.
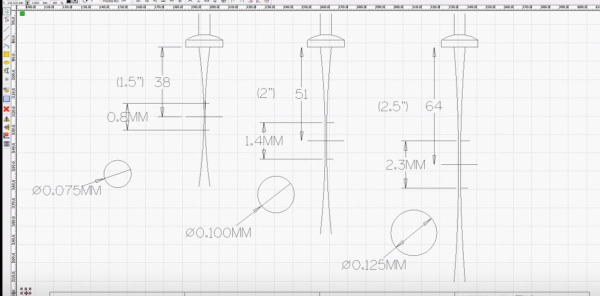
Curious about laser physics? Look no further than part 2. Wonder how lens size affects power output? Have a go at part 39. Need a supplemental video for beam alignment? Check out part 31. For every undocumented quirk about these machines, [Russ] approaches each problem with the analytic discipline of a data-driven scientist, measuring and characterizing each quirk with his suite of tools and then engineering a solution to that quirk. In some cases, these are just minor screw adjustments. In other cases, [Russ] shows us his mechanical wizardry with a custom hardware solution (also usually laser cut). [Russ] also brings us the technical insight of a seasoned machinist, implementing classic machinist solutions like a pin table to produce parts that have a clean edge that doesn’t suffer from scatter laser marks from cutting parts on a conventional honeycomb bed.
Solid build logs are gems that are hard to come by, and [Russ’s] Chinese laser cutter introduction shines out as a reference that will stand the test of time. Don’t have the space for a laser cutter? For the micromachinists, have a look at The Guerrilla Guide to CNC Machining, Mold Making, and Resin Casting.
If you have a laser printer, you’ve got your Christmas presents sorted out. At least if your family likes jigsaw puzzles. The idea is very simple, laminate a photograph onto some laser-cuttable board, and then run the laser over the outline of the pieces. Bam! Instant puzzle.
The trick is generating the puzzle outline, and of course there’s an online application for that. It’s got options that let you customize the piece count and shapes, and then download the result as an SVG image.
Unfortunately, it’s closed-source and makes the pieces a little bit too uniform for our liking — many of the pieces have exactly the same shape as each other. Are you up to the challenge of writing a better one? We’d love to see it, because the idea of a simple puzzle overlay for laser cutters is too good. Help us get started with some brainstorming in the comments below. How do you go about generating meaningfully unique jigsaw edges algorithmically?
Once you’ve got the puzzle cut out, you can seal up the surface nicely, toss it in a box, and then you’ve got a personalized present. To put it together, we suggest an accompanying DIY pick-and-place tool. (And kudos to [Kristina] for the best headline of 2015 on that one!)
Thanks to Hackaday alum [George Graves] for the tip!
Welcome back to the final chapter in our journey exploring two-stage tentacle mechanisms. This is where we arm you with the tools and techniques to get one of these cretins alive-and-kicking in your livingroom. In this last installment, I’ll guide us through the steps of building our very own tentacle and controller identical to one we’ve been discussing in the last few weeks. As promised, this post comes with a few bonuses:
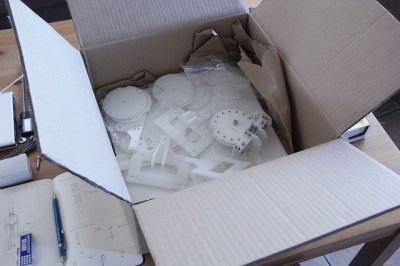
Depending on your situation, some design files may be more important than others. If you just want to get parts made, odds are good that you can simply cut the pre-offset DXFs from the right plate thicknesses and get rolling. Of course, if you need to tune the files for a laser with a slightly different beam diameter, I’ve included the original DXFs for good measure. For the heavy-hitters, I’ve also included the original files if there’s something about this design that just deserves a tweak or two. Have at it! (And, of course, let us know how you improve it!)
Ok, now that we’ve got the parts on-hand in a pile of pieces,let’s walk through the last-mile tweaks to making this puppet work: assembly and tuning. At this point, we’ve got a collection of parts, some laser-cut, some off the shelf. Now it’s time to string them together.
A few weeks back, we got a taste for two-stage tentacle mechanisms. It’s a look at how to make a seemily complicated mechanism a lot less mysterious. This week, we’ll take a close look at one (of many) methods for puppeteering these beasts by hand. Best of all, it’s a method you can assemble at home!
Without a control scheme, our homebrew tentacle can only “squirm around” about as much as an overcooked noodle. It’s pretty useless without some sort of control mechanism to keep all the cables in check at proper tension. Since the tentacle’s motion is driven by nothing more than four cable pairs, it’s not too difficult to start imagining a few hobby servos and pulleys doing the job. To get us started, though, I’ve opted for hand controllers just like the puppeteers of the film industry.
Enter Manual Control
Hand controllers? Of all the possibilities offered by electronics, why select such an electronics-devoid caveman approach? Fear not. Hand controllers offer us a unique set of opportunities that aren’t easy to achieve with most alternatives.
What’s not to love about animatronics? Just peel back any puppet’s silicone skin to uncover a cluster of mechatronic wizardry that gives it a life on the big screen. I’ve been hunting online for a good intro to these beasts, but I’ve only turned up one detailed resource–albeit a pretty good one–from the Stan Winston Tutorials series. Only 30 seconds into the intro video, I could feel those tentacles waking up my lowest and most gutteral urge to create physical things. Like it or not, I was hooked; I just had to build one… or a few. This is how you built a very real animatronic tentacle.
I built this. And you can too!
If you’re getting started in this realm, I’ll be honest: the Stan Winston Tutorial is actually a great place to start. In about two hours, instructor Richard Landon covers the mindset, the set of go-to components, and the techniques for fabricating a tentacle mechanism with a set of garage tools–not to mention giving us tons of real-film examples along the way [1].
We also get a sneak peek into how we might build more complicated devices from the same basic techniques. I’d like to pick up exactly where he left off: 4-way two-stage tentacles. And, of course, if you’ve picked up on just how much I like a certain laser-cuttable plastic at this point, I’m going to put a modern twist on Landon’s design. These design tweaks should enable you to build your own tentacle and controller with nothing more but a few off-the-shelf parts, some Delrin, and a laser cutter… Ok, fine, a couple 3D printed parts managed to creep their way in too.
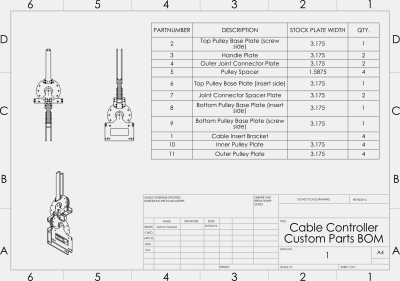
In a good-ol’ engineers-for-engineers fashion, I’m doing something a little different for this post: I’m finishing off this series with a set of assembly videos, a BOM, and the original CAD files to make that beast on the front page come to life. As for why, I figured: why not? Even though these mechanisms have lived in the robotics community and film industry for years, they’re still lacking the treatment of a solid, open design. This is my first shot at closing that gap. Get yourself a cup of coffee. I’m about to give you every bleeding detail on the-how-and-why behind these beasts.


 In a good-ol’ engineers-for-engineers fashion, I’m doing something a little different for this post: I’m finishing off this series with a set of assembly videos, a BOM, and the original CAD files to make that beast on the front page come to life. As for why, I figured: why not? Even though these mechanisms have lived in the robotics community and film industry for years, they’re still lacking the treatment of a solid, open design. This is my first shot at closing that gap. Get yourself a cup of coffee. I’m about to give you every bleeding detail on the-how-and-why behind these beasts.


