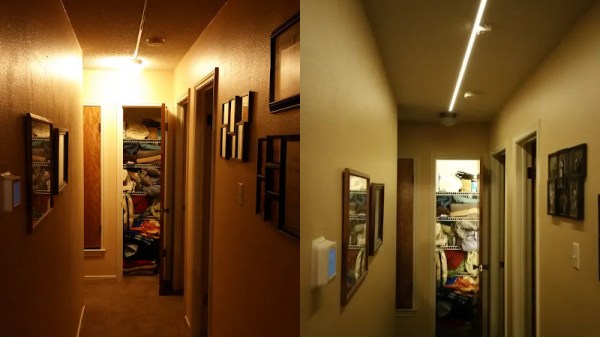
Lighting Tech Dives Into The Guts Of Laser Galvanometers

There’s something magical about a laser light show. Watching that intense beam of light flit back and forth to make shapes and patterns, some of them even animated, is pretty neat. It leaves those of us with a technical bent wondering just exactly how the beam is manipulated that fast.

Wonder no more as [Zenodilodon], a working concert laser tech with a deep junk bin, dives into the innards of closed-loop galvanometers, which lie at the heart of laser light shows. Galvos are closely related to moving-coil analog meters, which use the magnetic field of a coil to deflect a needle against spring force to measure current. Laser galvos, on the other hand, are optimized to move a lightweight mirror back and forth, by tiny amounts but very rapidly, to achieve the deflection needed to trace out shapes.

As [Zeno] explains in his teardown of some galvos that have seen better days, this means using a very low-mass permanent magnet armature surrounded by coils. The armature is connected to the mirror on one end, and a sensor on the other to provide positional feedback. We found this part fascinating; it hadn’t occurred to us that laser galvos would benefit from closed-loop control. And the fact that a tiny wiggling vane can modulate light from an IR LED enough to generate a control signal is pretty cool too.

The video below may be a bit long, but it’s an interesting glimpse into the day-to-day life of a lighting tech. It puts a little perspective on some of the laser projection projects we’ve seen, like this giant Asteroids game.

Continue reading “Lighting Tech Dives Into The Guts Of Laser Galvanometers”

A Work Light For Hacker Events

If you’ve ever attended a hacker camp, you’ll know the problem of a field of tents lit only by the glow of laser illumination through the haze and set to the distant thump of electronic dance music. You need to complete that project, but the sun’s gone down and you didn’t have space in your pack to bring a floodlight.

In Days of Yore you might have stuck a flickering candle in an empty Club-Mate bottle and carried on, but this is the 21st century. [Jana Marie] has the solution for you, and instead of a candle, her Club-Mate bottle is topped a stack of LED-adorned PCBs with a lithium-ion battery providing a high intensity downlight. It’s more than just a simple light though, it features variable brightness and colour temperature through touch controls on the top surface, as well as the ability to charge extra 18650 cells. At its heart is an STM32F334 microcontroller with a nifty use of its onboard timer to drive a boost converter, and power input is via USB-C.

We first saw an early take on this project providing illumination for a bit of after-dark Hacky Racer fettling at last year’s EMF 2018 hacker camp, since then it has seen some revisions. It’s all open-source so you can give it a go yourself if you like it.


Teardown Of A Luxury Bluetooth Nightlight

If you had asked us yesterday what peak nightlight technology looked like, we might have said one of those LED panels that you stick in the outlet. At least it beats one of those little wimpy light bulbs behind the seashell, anyway. But after looking at a detailed teardown of the “Glow Light” from Casper, we’ve learned a lot about the modern nightlight. Such as the fact that there are adults who not only sleep with nightlights, but are willing to pay $89 USD for one.

But more importantly, as [Tyler Mincey] demonstrates in his excellent look inside one of these high-end nightlights, they are gorgeous pieces of engineering. Even if a nightlight next to the bed has long since gone the way of pajamas with feet on them for you personally, we think you’ll be impressed just how much technology has gone into these softly glowing gadgets.

On the outside they might look like marshmallows, but the insides look far more like what you’d expect from an expensive piece of consumer gear. It’s based on the Nordic nRF52832 Bluetooth SoC which is becoming an increasingly common sight in consumer gadgets, and uses an inertial measurement unit (IMU) to detect when it’s moved or twisted and adjusts the light output accordingly. If you’ve got the disposable income for two of these things, they’ll even synchronize so that twisting one will dim its counterpart.

The teardown that [Tyler] did on the Glow Light is quite frankly one of the best we’ve ever seen, and while it might be a bit light on the gritty technical details, it more than makes up for that with the fantastic pictures that are about as close to actual hardware porn as you can get. The only question we have now is, how long until a hacker replicates this design with a 3D printed enclosure and an ESP?

[Thanks to Adrian for the tip.]

Hexagonal Lamp Is A Stylish Application Of Plywood

Lamps are useful things, and can be a great way to add style and lighting options to a room. Where overhead lights have to provide enough illumination for all manner of tasks, a subtle table lamp can add a nice moody glow to a room when it’s time to kick back and relax. Oftentimes, a stylish lamp can be let down by having a run of the mill plastic switch hanging off the power lead, but it doesn’t always have to be the case. [Emiel] designed this hexagonal lamp with a hidden switch, which works remarkably well.

[Emiel] starts by laying out hexagonal paper templates on plywood and perspex sheet. The plywood is cut on the bandsaw, while the interior cuts on the perspex are made on a scroll saw to avoid unsightly cut entry lines. The outer half of the lamp slides up and down on a pair of steel rods. Springs hold the outer half up, and it can be pressed down to activate a switch inside to turn the lamp on and off.

The build has a clean and attractive aesthetic, with the LEDs hidden inside, glowing through the perspex slices built into the body. It looks like something you’d find in the rooms at the Tranquility Base Hotel & Casino. If regular lamps aren’t enough for you, however, you could always consider building something interactive. Video after the break.

Continue reading “Hexagonal Lamp Is A Stylish Application Of Plywood”

This 3D Printed LED Softbox Really Shines

Generally speaking, objects made on desktop 3D printers are pretty small. This is of course no surprise, as filament based printers are fairly slow and most don’t have very large beds to begin with. Most people don’t want to wait days for their project to complete, so they use 3D printed parts where it makes sense and supplement them with more traditional components such as aluminum extrusion wherever possible. But not always…

This 3D printed photography softbox created by [Nicholas Sherlock] doesn’t take the easy way out for anything. With the exception of the LEDs and the electronics to drive them, everything in the design has been printed on his Prusa i3. It wasn’t the easiest or fastest way to do it, but it’s hard to argue with the end result. Perhaps even more impressive than the final product is what it took to get there: he actually had to develop a completely new style of part infill he’s calling “Scattered Rectilinear” to pull it off.

Overall the design of the light itself isn’t that complex, ultimately it’s just a box with some LEDs mounted at the back and a pretty simple circuit to control their intensity. The critics will say he could have just used a cardboard box, or maybe wood if he wanted something a little bit stronger. But the point of this project was never the box itself, or the LEDs inside it. It’s all about the diffuser.

[Nicholas] forked Prusa’s version of Slic3r to add in his “Scattered Rectilinear” infill pattern, which is specifically designed to avoid the standard “ribs” inside of a 3D printed object. This is accomplished with randomized straight infill passes, rather than the traditionally overlapped ones. The inside of the print looks very reminiscent of fiberglass mat, which is perhaps the best way to conceptualize its construction. In terms of the final part strength, this infill is abysmal. But on the plus side, the light from the LEDs passing through it emerges with a soft pleasing look that completely obscures the individual points of light.

Anyone with a big enough 3D printer can run off their own copy of his light, as [Nicholas] has released not only his forked version of Slic3r but all of the STL files for the individual components. He’s also put together an exceptionally well documented Thingiverse page that has instructions and detailed build photos, something that’s unfortunately very rare for that platform.

If you’re in the market for a DIY softbox and don’t have a 3D printer handy, fear not. We’ve covered a few that you can build with more traditional methods, as well as several tips and tricks which you can use to get the most out of your photos and videos.

WiFi Controlled Finger

WiFi Controlled Finger Dims Lights Over UDP

While WiFi controlled lights are readily available, replacing your lighting fixtures or switches isn’t always an option. [Thomas] ran into this issue with his office lights. For the developers in the office, these lights always seemed to run a little too bright. The solution? A 3D printed, WiFi controlled finger to poke the dimmer switch.

This little hack consists of a servo, a 3D printed arm and finger assembly, and a Wemos D1 Mini development board. The Wemos is a low cost, Arduino compatible development board based on the ESP8266. We’ve seen it used for a wide variety of hacks here on Hackaday.

For this device, the Wemos is used to listen for UDP packets on the company’s WiFi network. When it receives a packet, it tells the servo to push the dimming button for a specified amount of time. [Thomas] wrote a Slack bot to automatically send these packets. Now, when the lights are too bright, a simple message to the bot allows anyone to dim the lights without ever leaving the comfort of their desk. Sure, it’s not the most secure or reliable method of controlling lights, but if something goes wrong, the user can always get up and flip the switch the old fashioned way.

Experiment With Lumia, The Cheap And Easy Way

Light is a wonderful medium for art, and there’s all manner of ways to approach it. We’ve always been huge fans of all that blinks and glows, but there’s a whole wide world of other methods and techniques in the lighting arena. Lumia is one that does not always get a lot of mainstream attention, and so [Adam Raugh] has created this video, sharing both the history of the effect, and various ways to create it yourself. 

Lumia was once used to refer to a broad swathe of artistic lighting, but these days, more commonly refers to effects that create an aurora-like appearance, as one would see near the poles of our fine Earth. [Adam] first covers the history of the effect, as pioneered by Thomas Wilfred with the Clavilux in the early part of the 20th Century.

The video then covers the basics of creating lumia effects using DIY methods. The key is to combine slow rotation with an organically deformed refractive medium. [Adam]’s rig of choice is a basic laser projector, rotating at just 1/3 of a rotation per minute. This is then combined with a variety of homebrewed refractive media – torture tubes made from glass, acrylic sheets coated with muddled epoxy, and even a crumpled water bottle.

It’s an excellent primer on how to get started with lumia, and [Adam] covers a wide variety of tips and tricks as well as potential pitfalls to avoid.

We see plenty of great lighting projects around these parts – check out the Kinetic Chandelier. Video after the break.

Continue reading “Experiment With Lumia, The Cheap And Easy Way”