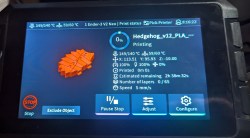
Art of 3D printer in the middle of printing a Hackaday Jolly Wrencher logo

3D Printering: Switch And Klip(per)

Last time I tried to convince you that, if you haven’t already, you should try running your 3D printer with Klipper. There are several ways to actually make it work.

The first thing you need is something to run the Klipper host. Most people use a Raspberry Pi and if you already have one that runs OctoPrint, for example, you might well use it. Just tuck your SD card away in case you give up and install a fresh Linux system on a new card.

The Creality Sonic Pad has issues, but it does work.

However, a Pi isn’t your only option. You should be able to make it work on nearly anything that runs Linux. We’ve even seen it running on Windows under WSL. If you have an old laptop that can run Linux, that would work, too. We’ve even heard it works on a Chromebook.

The other option is to get a “pad.” Several vendors make touchscreens with some Linux single-board computer bundled together with Klipper preinstalled. For example, there is the Creality Sonic Pad, along with similar devices from other 3D printing companies.

If you decide to go that route, you might want to make sure it is easy to install your own software easily. Some pads, like the Creality unit, are notorious for having so much customization that they don’t lend themselves to upgrades unless they come from the manufacturer. In some cases, you can wipe out the stock firmware and install a normal operating system, but at that point, you could probably just buy a Pi and a touchscreen, right?

Continue reading “3D Printering: Switch And Klip(per)”

Putting Some Numbers On Your NEMAs

It’s official: [Engineer Bo] wins the internet with a video titled “Finding NEMA 17,” wherein he builds a dynamometer to find the best stepper motor in the popular NEMA 17 frame size.

Like a lot of subjective questions, the only correct answer to which stepper is best is, “It depends,” and [Bo] certainly has that in mind while gathering the data needed to construct torque-speed curves for five samples of NEMA 17 motors using his homebrew dyno. The dyno itself is pretty cool, with a bicycle disc brake to provide drag, a load cell to measure braking force, and an optical encoder to measure the rotation of the motor under test. The selected motors represent a cross-section of what’s commonly available today, some of which appear in big-name 3D printers and other common applications.

[Bo] tested each motor with two different drivers: the TMC2209 silent driver to start with, and because he released the Magic Smoke from those, the higher current TB6600 module. The difference between the two drivers was striking, with lower torque and top speeds for the same settings on each motor using the TB6600, as well as more variability in the data. Motors did better across the board with the TBC6600 at 24 volts, showing improved torque at higher speeds, and slightly higher top speeds. He also tested the effect of microstepping on torque using the TBC6600 and found that using full steps resulted in higher torque across a greater speed range.

At the end of the day, it seems as if these tests say more about the driver than they do about any of the motors tested. Perhaps the lesson here is to match the motor to the driver in light of what the application will be. Regardless, it’s a nice piece of work, and we really appreciate the dyno design to boot — reminds us of a scaled-down version of the one [Jeremey Fielding] demonstrated a few years back.

Continue reading “Putting Some Numbers On Your NEMAs”

Microstepping A PCB Motor

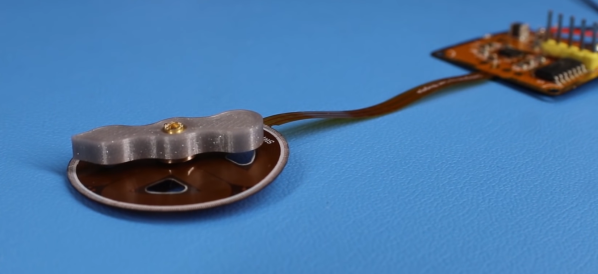
Over the last 2 years [Carl Bujega] has made a name for himself with his PCB motor designs. His latest adventure is to turn it into a stepper motor by adding position control with microstepping.

The NEMA stepper motors most of us know are synchronous stepper motors, while [Carl]’s design is a permanent magnet design. It uses four coils on the stator, and two permanent magnets on the rotor/dial. By varying the current through each of the four poles with a stepper driver (microstepping), the position of the rotor should theoretically be controllable with good resolution. Unfortunately, this was easier said than done. He achieved position control, but it kept skipping steps in certain positions.

The motor and controller consist of a single flexible PCB, to reduce the layer spacing and increase the coils’ magnetic field strength. However, this created other problems, since the motor shaft didn’t have a solid mounting point, and the PCB flexed as the stator coils were energized. Soldering the controller was also a problem, as the through-hole headers ripped out easily and the PCB bulged while reflowing on a hot plate, in one case even popping off components. [Carl] eventually mounted one of the PCB motors inside a 3D printed frame to rigidly constrain all the motor components, but it still suffered from missed steps. Any suggestions for fixing the problem? Drop them in the comments below.

Like his other PCB motors, the torque is very low, but should be suitable for gauges or clocks. A PCB clock with an integrated motor would be pretty cool to have on the workshop wall.

The TMC2300 stepper driver [Carl] used belongs to the same family of drivers that enable silent stepping for 3D printers. We’ve covered a few of [Carl]’s PCB actuator adventures, from his original design to linear actuators and a flexible POV display.

Continue reading “Microstepping A PCB Motor”

Tarot Machine Flips Through Fate’s Rolodex

Were tarot card readers deemed non-essential in your part of the world (and do you think they saw it coming?) More than ever, we all need diversions that are for entertainment purposes only. And what better basis for entertainment than a mystical fortune-telling robot that can read your tarot cards?

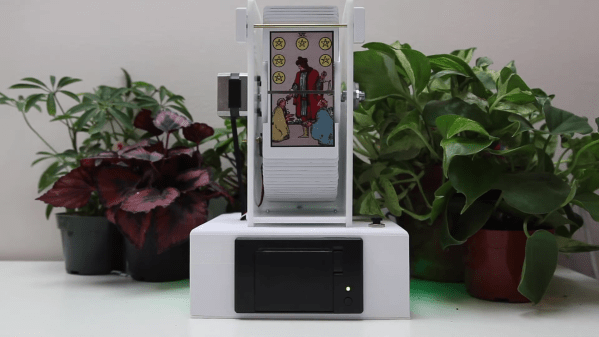
This fantastic-looking ‘bot stands on the shoulders of [Scott Bezak]’s trailblazing method for easy DIY split-flap displays. Push the rather inviting-looking button on the top, and the flaps start flipping around to find your fortune. Once the fates have aligned, a thermal printer on the front spits out an image of your card along with an interpretation.

It’s obvious that [i_mozy] put quite a lot of effort into this slick machine, and we think the stickers look especially great. All the details of physical tarot card readings are accounted for, including a random number to decide the card’s position, and LEDs to represent the card’s element. Suspend your disbelief and check out the demo/promo video after the break.

Split-flap displays are a great choice no matter what you want to show. We’ve seen them used to display everything from the weather to the current Spotify track.

Continue reading “Tarot Machine Flips Through Fate’s Rolodex”

Motorized Stage Finesses The Microscopic World

No matter how fine your fine motor skills may be, it’s really hard to manipulate anything on the stage of a microscope with any kind of accuracy. One jitter or caffeine-induced tremor means the feature of interest on the sample you’re looking at shoots off out of the field of view, and getting back to where you were is a tedious matter of trial and error.

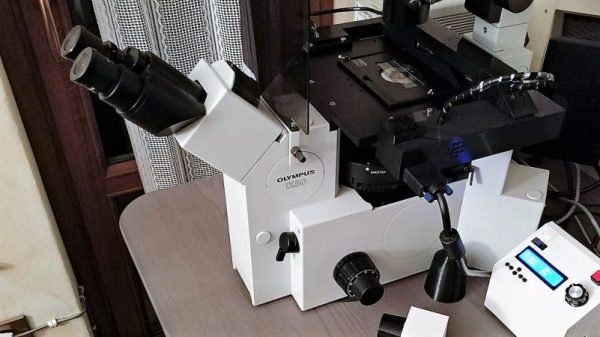
Mechanical help on the microscope stage is nice, and electromechanical help is even better, but a DIY fully motorized microscope stage with complete motion control is the way to go for the serious microscopist on a budget. Granted, not too many people are in [fabiorinaldus]’ position of having a swell microscope like the Olympus IX50, and those that do probably work for an outfit that can afford all the bells and whistles. But this home-brew stage ticks off all the boxes on design and execution. The slide is moved across the stage in two dimensions with small NEMA-8 steppers and microstepping controllers connected to two linear drives that are almost completely 3D-printed. The final resolution on the drives is an insane 0.000027344 mm. An Arduino lives in the custom-built control box and a control pad with joystick, buttons, and an OLED display allow the stage to return to set positions of interest. It’s really quite a build.

We’ve featured a lot of microscope hacks before, most of them concerning the reflective inspection scopes we all seem to covet for SMD work. But that doesn’t mean we haven’t shown love for optical scopes before, and electron microscopes have popped up a time or two as well.

Continue reading “Motorized Stage Finesses The Microscopic World”

3D Printering: Trinamic TMC2130 Stepper Motor Drivers

Adjust the phase current, crank up the microstepping, and forget about it — that’s what most people want out of a stepper motor driver IC. Although they power most of our CNC machines and 3D printers, as monolithic solutions to “make it spin”, we don’t often pay much attention to them.

In this article, I’ll be looking at the Trinamic TMC2130 stepper motor driver, one that comes with more bells and whistles than you might ever need. On the one hand, this driver can be configured through its SPI interface to suit virtually any application that employs a stepper motor. On the other hand, you can also write directly to the coil current registers and expand the scope of applicability far beyond motors.

Continue reading “3D Printering: Trinamic TMC2130 Stepper Motor Drivers”

How Accurate Is Microstepping Really?

Stepper motors divide a full rotation into hundreds of discrete steps, which makes them ideal to precisely control movements, be it in cars, robots, 3D printers or CNC machines. Most stepper motors you’ll encounter in DIY projects, 3D printers, and small CNC machines are bi-polar, 2-phase hybrid stepper motors, either with 200 or — in the high-res variant — with 400 steps per revolution. This results in a step angle of 1.8 °, respectively 0.9 °.

Can you increase the resolution of this stepper motor?

In a way, steps are the pixels of motion, and oftentimes, the given, physical resolution isn’t enough. Hard-switching a stepper motor’s coils in full-step mode (wave-drive) causes the motor to jump from one step position to the next, resulting in overshoot, torque ripple, and vibrations. Also, we want to increase the resolution of a stepper motor for more accurate positioning. Modern stepper motor drivers feature microstepping, a driving technique that squeezes arbitrary numbers of microsteps into every single full-step of a stepper motor, which noticeably reduces vibrations and (supposedly) increases the stepper motor’s resolution and accuracy.

On the one hand, microsteps are really steps that a stepper motor can physically execute, even under load. On the other hand, they usually don’t add to the stepper motor’s positioning accuracy. Microstepping is bound to cause confusion. This article is dedicated to clearing that up a bit and — since it’s a very driver dependent matter — I’ll also compare the microstepping capabilities of the commonly used A4988, DRV8825 and TB6560AHQ motor drivers.

Continue reading “How Accurate Is Microstepping Really?”