Art of 3D printer in the middle of printing a Hackaday Jolly Wrencher logo

Make Better 3D Printed Molds, For Thermoforming Plastics

Thermoforming — which includes vacuum-forming — has its place in a well-rounded workshop, and Mayku (makers of desktop thermoforming machines) have a short list of tips for getting the best results when 3D printing molds on filament-based printers.

A mold is put into direct, prolonged contact with a hot sheet of semi-molten plastic. If one needs a mold to work more than once, there are a few considerations to take into account. The good news is that a few simple guidelines will help get excellent results. Here are the biggest ones:

  1. The smoother the vertical surfaces, the better. Since thermoforming sucks (or pushes) plastic onto and into a mold like a second skin, keeping layer heights between 0.1 mm and 0.2 mm will make de-molding considerably easier.
  2. Generous draft angles. Aim for a 5 degree draft angle. Draft angles of 1-2 degrees are common in injection molding, but a more aggressive one is appropriate due to layer lines giving FDM prints an inherently non-smooth surface.
  3. Thick perimeters and top layers for added strength. The outside of a mold is in contact with the most heat for the longest time. Mayku suggests walls and top layer between 3 mm to 5 mm thick. Don’t forget vent holes!
  4. Use a high infill to better resist stress. Molds need to stand up to mechanical stress as well as heat. Aim for a 50% or higher infill to make a robust part that helps resist deformation.
  5. Ensure your printer can do the job. 3D printing big pieces with high infill can sometimes lift or warp during printing. Use enclosures or draft shields as needed, depending on your printer and material.
  6. Make the mold out of the right material. Mayku recommends that production molds be printed in nylon, which stands up best to the heat and stress a thermoforming mold will be put under. That being said, other materials will work for prototyping. In my experience, even a PLA mold (which deforms readily under thermoforming heat) is good for at least one molding.

Thermoforming open doors for an enterprising hacker, and 3D printing molds is a great complement. If you’re happy being limited to small parts, small “dental” formers like the one pictured here are available from every discount overseas retailer.  And of course, thermoforming is great for costumes and props. If you want to get more unusual with your application, how about forming your very own custom-shaped mirrors by thermoforming laminated polystyrene?

Cart Cruises Abandoned California Rail

Southern California is known for its nearly perfect year-round climate, excellent surf, and extremely high cost of living, but once you get away from the coast things are radically different. Rural California has huge tracts of land run by the Bureau of Land Management (BLM), which is publicly accessible to anyone willing to venture into the deserts. There’s not much in the way of infrastructure out there, but [Ryan] does have a unique way of traveling through it using abandoned railroad lines and this custom rail cart.

The frame of this cart is simple enough, it’s little more than 2×3 framing with a plywood deck. Some extra support is added for the motor mount and for the seating location. It uses slightly longer go-kart axles to accommodate the width of the railroad, and a small six horsepower gas engine with a single gear to power the rear axle. There are no brakes other than the riders’ shoes, and while this all seems straightforward enough the real hack here is [Ryan]’s custom wheels. He found that steel or cast wheels were not particularly comfortable on long journeys so after a few attempts he has come up with a home-built polyurethane wheel which is cast in a mold around a steel go-cart wheel and then trimmed on a lathe.

For pure exploration, there’s almost no better place to go than the American west thanks to all the public BLM land available. In this cart, you can explore long distances using an extremely low-cost method of transportation. We’ve added another video of [Ryan] exploring this area below the break to show the cart being used, too, but if you’d like a more multipurpose vehicle to use on abandoned rail near you, take a look at this bicycle which is converted to operate on the railroad.

Continue reading “Cart Cruises Abandoned California Rail”

Casting Metal With A Microwave And Vacuum Cleaner

Metalworking might conjure images of large furnaces powered by coal, wood, or electricity, with molten metal sloshing around and visible in its crucible. But metalworking from home doesn’t need to use anything more fancy than a microwave, at least according to [Denny] a.k.a. [Shake the Future]. He has a number of metalworking tools designed to melt metal using a microwave, and in this video he uses them to make a usable aluminum pencil with a graphite core.

Before getting to the microwave kiln, the pencil mold needs to be prepared. A 3D-printed pencil is first created with the graphite core, and then [Denny] uses a plaster of Paris mixture to create the mold for the pencil. The 3D printed plastic is left inside the mold and placed in the first microwave kiln, which is turned on just enough to melt the plastic out of the mold, leaving behind the graphite core. From there a second kiln goes into the microwave to melt the aluminum.

Once the molten aluminum is ready, it is removed from the kiln and poured in the still-warm pencil mold. This is where [Denny] has another trick up his sleeve. He’s using a household vacuum cleaner to suck the metal into place before it cools, creating a rudimentary but effective vacuum forming machine. The result is a working pencil, at least after he wears down a few razor blades attempting to sharpen the metal pencil. For more information about how [Denny] makes these microwave kilns, take a look at some of his earlier projects.

Continue reading “Casting Metal With A Microwave And Vacuum Cleaner”

A Rotocasting Machine Sized For The Home Shop

If you’ve ever wondered how large, hollow plastic structures like tanks and drums are formed, you’re in luck: [Andy] not only fills us in on the details of rotational casting and molding, but he also built this sweet little rotational casting machine to help him with his DIY projects.

Granted, [Andy]’s build won’t be making anything too large, like a car fuel tank or a kayak. Not only is it sized more for smallish parts, but those structures are generally made with the related process of rotational molding. Both processes use an enclosed multipart mold that’s partially filled with plastic resin, and then rotate the mold around two axes to distribute a thin layer of resin around the inside of the mold. The difference is that roto-molding uses a thermoplastic resin, whereas roto-casting uses resins like polyurethane and silicone that set at room temperature.

The machine looks simple, but only because he took great pains to optimize it. The videos below cover the build in detail — feel free to skip to the 11:38 mark of the second video if you just want to see it in action. Though you’ll be missing some juicy tidbits, like welding a perfect 90° joint in square tubing. There’s also the custom tool [Andy] built to splice the beaded chain he used to drive the spinning of the mold, which was pure genius.

Using the machine and a complex nine-piece mold, [Andy] was able to create remarkably detailed tires for RC cars from polyurethane resin. We’d love to see what else this rig is good for — almost as much as we want to see details on how the mold was made. We’ve seen other rotational casting machines before, but this one takes the cake for fit and finish.

Continue reading “A Rotocasting Machine Sized For The Home Shop”

Used Facemasks Turned Into Rapid Antigen Tests With Injection Molding

Here’s a little eye-opener for you: next time you’re taking a walk, cast your eyes to the ground for a bit and see how far you can go without spotting a carelessly discarded face mask. In our experience, it’s no more than a block or two, especially if you live near a school. Masks and other disposal artifacts of the COVID-19 pandemic have turned into a menace, and uncounted billions of the things will be clogging up landfills, waterways, and byways for decades to come.

Unless they can be recycled into something useful, of course, like the plastic cases used for rapid antigen tests. This comes to us by way of [Ric Real] from the Design and Manufacturing Futures lab at the University of Bristol in the UK. If any of this sounds or looks familiar, refer back to October when the same team presented a method for turning old masks into 3D printer filament. The current work is an extension of that, but feeds the polypropylene pellets recovered from the old masks into a desktop injection molding machine.

The injection molding machine is fitted with 3D-printed molds for the shells of lateral flow devices (LFD) used for COVID-19 rapid antigen testing. The mold tooling was designed in Fusion 360 and printed on an Elegoo Mars MSLA printer using a high-strength, temperature-resistant resin. The molds stood up to the manual injection molding process pretty well, making good-quality parts in the familiar blue and white colors of the starting material. It’s obviously a proof of concept, but it’s good to see someone putting some thought into what we can do with the megatonnes of plastic waste generated by the pandemic response.

Dog Bowls Show The Versatility Of Ceramic Slip Casting

Here at Hackaday, we feature projects that are built of just about every material imaginable. Silicon-spangled fiber-reinforced epoxy resin is our primary medium, but we see plastic, wood, steel, aluminum, and even textiles from time to time. It’s not often we see slip-cast ceramic molding, though, and when it pops up, it’s always good to take a look at this versatile manufacturing method.

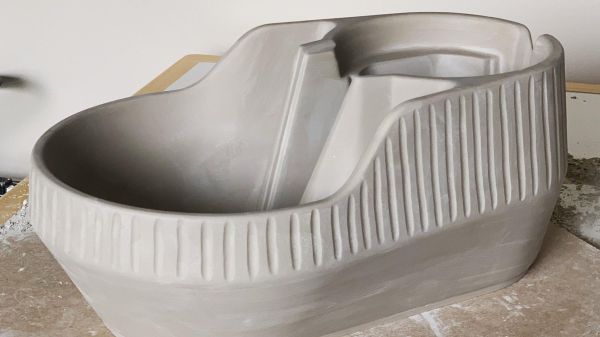
The back-story on this one is that [thoughtfulocean], a mechanical engineer idled by COVID lockdowns, wanted custom water bowls for his dogs, one of whom is clearly a grumpy Ewok. The design started with a 3D-print of the final vessel, printed in sections and glued together. These were used to create a two-piece plaster mold into which a watery slurry of clay, or slip, was poured. The plaster mold dehydrates the slip, leaving behind a semi-solid layer of clay of the desired thickness once the excess slip is poured off. The resulting casting is then fired in a kiln and glazed.

Of course, [thoughtfulocean] ran into a few problems along the way. The first mold was warped thanks to the mold box bowing under pressure from the plaster, so the whole molding process had to be revamped. The finished bowl also shrunk less than expected after firing, which led to some more revisions. But the finished bowl look really nice, and the included pump and filter keeps the Ewok’s water free from the yuck a dog’s face can introduce. As a bonus, it sounds like [thoughtfulocean] might have created a marketable product from all this. Take that, COVID!

Slip-casting ceramic may not be all that common around here, but ceramic as a material isn’t exactly a stranger. And who says slip casting is limited to ceramic? After all, we’ve seen a similar method used with plastic resin.

[via r/engineering]

Mixing Up Your Own Supersized Sidewalk Chalk

When folks started quarantining, chalk art spilled onto driveways and sidewalks to remind us that there’s still beauty and creative people doing what they always do. Now it’s time to strut your stuff and show your neighbors that things are greener on your slab of concrete. [friedpotatoes] has shared their giant sidewalk recipe with the world so you can paint the town red. With chalk.

Name brand sidewalk chalk is expensive considering how easy it is to make. What Big Chalk doesn’t want you to know is that the ingredients are just water, plaster of Paris, and tempera paint; meaning this project should be safe enough for the junior hackers to get some hands-on time. Some folks use food coloring instead of paint, but we know what happens to clothing when kids get their mitts on food coloring. [friedpotatoes] also includes extensive repurposing of recyclables, which is commendable.

The instructions suggest filling potato chip (crisp) tubes through a milk jug funnel to make giant pieces, but you can use any mold you like. If you have a CNC machine, it should be no trouble to make stamp-like pieces of chalk for tagging on the go, or shapes like arrows when you have to direct a miniature parade.

For permanent and precise sidewalk decorations, you can check out a graffiti paint machine and for totally temporary messages there is a water-dispensing writer.