Recycling A Laptop Screen Into A Portable Folding Monitor

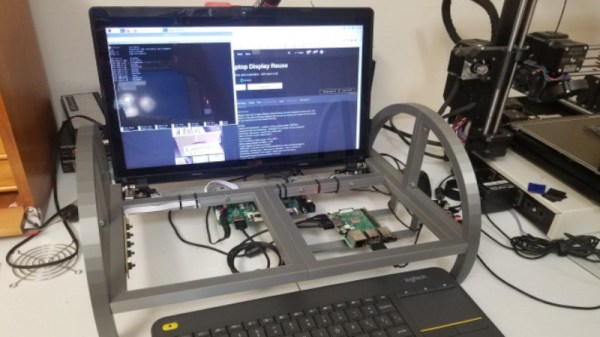
There’s plenty of times we’ve seen a laptop fail, break, or just become too slow for purpose despite the fact that it’s still packing some useful components. With all the single-board computers and other experiments lurking about the average hacker workshop, it’s often useful to have a spare screen on hand, and an old laptop is a great way to get one. This recycled display build from [Gregory Sanders] is a great example of how to reuse old hardware.

The build doesn’t simply package a laptop monitor in the same way as a regular desktop unit. Instead, [Gregory] designed a custom 3D printed frame with an arch design. The laptop screen is installed onto the frame using its original hinges, and [Gregory] designed in standoffs for an laptop LCD driver board to run the display as well as a generic frame where single-board computers can be installed.

The result is a portable monitor that can be folded up for easy transport, which is also self-supporting with its nice large base. It can also be used with other hardware, as it has a full complement of DVI, HDMI and VGA inputs on board. Of course, while you’re tinkering with laptop displays, you might also consider building yourself a dual-screen laptop as well.

Commodore 64 Mini Man Makes Matching Mini Monitor

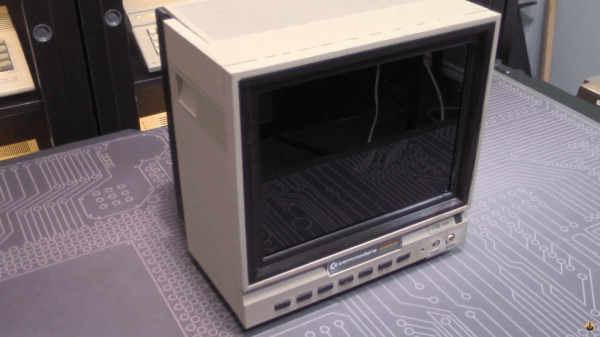
While putting together a retro computer is a great project and can teach a lot about the inner workings of electronics, hooking that 70s- or 80s-era machine up to a modern 144 Hz 1440p display tends to be a little bit anticlimactic. To really recreate the true 8-bit experience it’s important to get a CRT display of some sort, but those are in short supply now as most are in a landfill somewhere now. [Tony] decided to create a hybrid solution of sorts by 3D printing his own Commodore replica monitor for that true nostalgia feel.

This build is a matching mini scale replica of the Commodore 1702 monitor, a color monitor produced by Commodore specifically for their machines. At the time it was top-of-the-line and even included an early predecessor of the S-Video method of video signalling. This monitor was modeled in Fusion 360 and then sent to the 3D printer for assembly, then populated with a screen with a period-correct 4:3 aspect ratio, required electronics for handling the Commodore’s video signal, and even includes an upgrade over the original monitor: stereo speakers instead of the single-channel speaker that was featured in the 80s.

While this monitor doesn’t use a CRT, it’s an impressive replica nonetheless, right down to the Commodore serial number sticker on the back. If you need a Commodore 64 to go along with it, there are plenty of possibilities available to consider like this emulated C64 on a Raspberry Pi or these refurbished OEM Commodores.

Continue reading “Commodore 64 Mini Man Makes Matching Mini Monitor”

Exposing Computer Monitor Side-Channel Vulnerabilities With TempestSDR

Having been endlessly regaled with tales of side-channel attacks and remote exploits, most of us by now realize that almost every piece of gear leaks data like a sieve. Everything from routers to TVs to the power supplies and cooling fans of computers can be made to give up their secrets. It’s scary stuff, but it also sounds like a heck of a lot of fun, and with an SDR and a little software, you too can get in on the side-channel action.

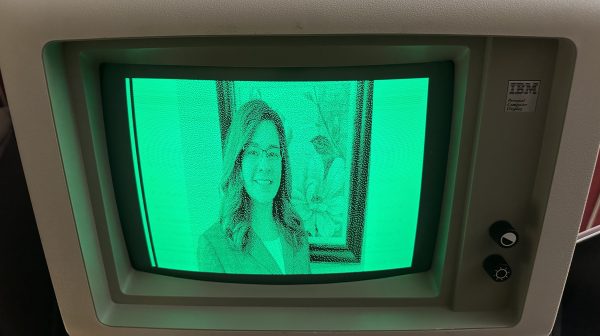
Coming to us via software-defined radio buff [Tech Minds], the video below gives a quick tour of how to snoop in on what’s being displayed on a monitor for almost no effort or expense. The software that makes it possible is TempestSDR, which was designed specifically for the job. With nothing but an AirSpy Mini and a rubber duck antenna, [Tech Minds] was able to reconstruct a readable black and white image of his screen at a range of a few inches; a better antenna and some fiddling might improve that range to several meters. He also shares a trick for getting TempestSDR set up for all the popular SDRs, including SPRplay, HackRF, and RTL-SDR.

Learning what’s possible with side-channel attacks is the key to avoiding them, so hats off to [Tech Minds] for putting together this simple, easy-to-replicate demo. To learn even more, listen to what [Samy Kamkar] has to say about the subject, or check out where power supplies, cryptocurrency wallets, and mixed-signal microcontrollers are all vulnerable.

Continue reading “Exposing Computer Monitor Side-Channel Vulnerabilities With TempestSDR”

Dumpster Finds Combined Into 4K Desktop Monitor

Dumpster diving is a time honored tradition in the hacking community. You can find all sorts of interesting hardware in the trash, and sometimes it’s even fully functional. But even the broken gadgets are worth taking back to your lair to strip for parts. If you’re as lucky as [Jamz], you might be able to mash a few devices together and turn them into something usable.

In this case, [Jamz] scored a LG 27UK650 monitor with a cracked display and a Dell OptiPlex 7440 “All-in-One” computer that was DOA. Separately these two pieces of gear were little more than a pile of spare parts waiting to be liberated. But if the control board could be salvaged from the monitor, and the working LCD pulled from the Dell…

After taking everything apart, [Jamz] made a frame for this new Frankenstein monitor using pieces of aluminum channel from the hardware store and 3D printed side panels. With the Dell LCD mounted in the skeletal frame, the control board from the LG monitor was bolted to the back and wired in. Finally the center section of the LG monitor’s back panel was cut out and mounted to the new hybrid display with a 3D printed frame.

Admittedly, these were some pretty solid finds as far as trash goes. You won’t always be so lucky. But if you can keep an open mind, the curb is littered with possibilities. How about some impressive home lighting that started life as a cracked flat screen TV?

Monochrome CRT And Liquid Crystal Shutter Team Up For Color Video

If you were tasked with designing a color video monitor, it’s pretty clear how you’d go about it. But what if you’d been asked to do so 20 years ago? Would it have been a cut and dried from an engineering standpoint? Apparently not, as this hybrid LCD-CRT video monitor demonstrates.

We’d honestly never heard of this particular design, dubbed “LCCS”, or liquid crystal color shutter, until [Technology Connections]’ partial teardown of the JVC monitor and explanation of its operation. The idea is simple and hearkens back to the earliest days of color TV in the United States, when broadcasters were busy trying to bring color to a monochrome world in a way that would maximize profits. One scheme involved rotating a color wheel in front of the black-and-white CRT and synchronizing the two, which is essentially what’s happening in the LCCS system. The liquid crystal panel cycles between red, blue, and green tints in time with the CRT’s images behind it, creating a full-color picture. “But wait!” you cry. “Surely there were small color CRTs back in the year 2000!” Of course there were, but they kind of sucked. Just look at the comparison of a color CRT and the LCCS in the video below and you’ll see why this system carved out a niche in the pro video market, especially for video assist monitors in the days before digital cinematography. A similar system was used by Tektronix for color oscilloscopes, too.

As usual, [Technology Connections] has managed to dig up an interesting bit of the technological fossil record and present it in a fascinating way. From video on vinyl to 1980s copy protection to the innards of a toaster, we enjoy the look under the hood of forgotten tech.

Continue reading “Monochrome CRT And Liquid Crystal Shutter Team Up For Color Video”

Toilet Seat Could Save Your Ass

Our morning routine could be appended to something like “breakfast, stretching, sit on a medical examiner, shower, then commute.” If we are speaking seriously, we don’t always get to our morning stretches, but a quick medical exam could be on the morning agenda. We would wager that a portion of our readers are poised for that exam as they read this article. The examiner could come in the form of a toilet seat. This IoT throne is the next device you didn’t know you needed because it can take measurements to detect signs of heart failure every time you take a load off.

Tracking heart failure is not just one test, it is a buttload of tests. Continuous monitoring is difficult although tools exist for each test. It is unreasonable to expect all the at-risk people to sit at a blood pressure machine, inside a ballistocardiograph, with an oximeter on their fingers three times per day. Getting people to browse Hackaday on their phones after lunch is less of a struggle. When the robots overthrow us, this will definitely be held against us.

We are not sure if this particular hardware will be open-source, probably not, but there is a lesson here about putting sensors where people will use them. Despite the low rank on the glamorous scale, from a UX point of view, it is ingenious. How can we flush out our own projects to make them usable? After all, if you build a badass morning alarm, but it tries to kill you, it will need some work and if you make a gorgeous clock with the numbers all messed up…okay, we dig that particular one for different reasons.

Via IEEE Spectrum.

Eyes On The Prize Of Glucose Monitoring

People with diabetes have to monitor their blood regularly, and this should not be a shock to anyone, but unless you are in the trenches you may not have an appreciation for exactly what that entails and how awful it can be. To give a quick idea, some diabetics risk entering a coma or shock because drawing blood is painful or impractical at the moment. The holy grail of current research is to create a continuous monitor which doesn’t break the skin and can be used at home. Unaided monitoring is also needed to control automatic insulin pumps.

Alphabet, the parent company of Google, gave up where Noviosense, a Netherlands company owned by [Dr. Christopher Wilson], may gain some footing. Instead of contact lenses which can alter the flow of fluids across the eye, Noviosense places their sensor below the lower eyelid. Fluids here flow regardless of emotion or pain, so the readings correspond to the current glucose level. Traditionally, glucose levels are taken through blood or interstitial fluid, aka tissue fluid. Blood readings are the most accurate but the interstitial fluid is solid enough to gauge the need for insulin injection, and the initial trial under the eyelid showed readings on par with the interstitial measurements.

Hackers are not taking diabetes lying down, some are developing their own insulin and others are building an electronic pancreas.

Via IEEE Spectrum.