Toilet Seat Could Save Your Ass

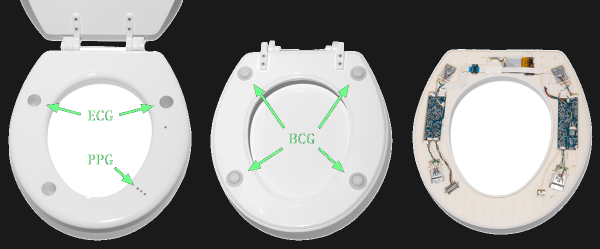
Our morning routine could be appended to something like “breakfast, stretching, sit on a medical examiner, shower, then commute.” If we are speaking seriously, we don’t always get to our morning stretches, but a quick medical exam could be on the morning agenda. We would wager that a portion of our readers are poised for that exam as they read this article. The examiner could come in the form of a toilet seat. This IoT throne is the next device you didn’t know you needed because it can take measurements to detect signs of heart failure every time you take a load off.

Tracking heart failure is not just one test, it is a buttload of tests. Continuous monitoring is difficult although tools exist for each test. It is unreasonable to expect all the at-risk people to sit at a blood pressure machine, inside a ballistocardiograph, with an oximeter on their fingers three times per day. Getting people to browse Hackaday on their phones after lunch is less of a struggle. When the robots overthrow us, this will definitely be held against us.

We are not sure if this particular hardware will be open-source, probably not, but there is a lesson here about putting sensors where people will use them. Despite the low rank on the glamorous scale, from a UX point of view, it is ingenious. How can we flush out our own projects to make them usable? After all, if you build a badass morning alarm, but it tries to kill you, it will need some work and if you make a gorgeous clock with the numbers all messed up…okay, we dig that particular one for different reasons.

Via IEEE Spectrum.

Eyes On The Prize Of Glucose Monitoring

People with diabetes have to monitor their blood regularly, and this should not be a shock to anyone, but unless you are in the trenches you may not have an appreciation for exactly what that entails and how awful it can be. To give a quick idea, some diabetics risk entering a coma or shock because drawing blood is painful or impractical at the moment. The holy grail of current research is to create a continuous monitor which doesn’t break the skin and can be used at home. Unaided monitoring is also needed to control automatic insulin pumps.

Alphabet, the parent company of Google, gave up where Noviosense, a Netherlands company owned by [Dr. Christopher Wilson], may gain some footing. Instead of contact lenses which can alter the flow of fluids across the eye, Noviosense places their sensor below the lower eyelid. Fluids here flow regardless of emotion or pain, so the readings correspond to the current glucose level. Traditionally, glucose levels are taken through blood or interstitial fluid, aka tissue fluid. Blood readings are the most accurate but the interstitial fluid is solid enough to gauge the need for insulin injection, and the initial trial under the eyelid showed readings on par with the interstitial measurements.

Hackers are not taking diabetes lying down, some are developing their own insulin and others are building an electronic pancreas.

Via IEEE Spectrum.

ESP8266 Monitor Keeps An Eye On OctoPrint

At this point, you’ve almost certainly heard of OctoPrint. The web-based control interface for 3D printers is especially popular for those who’s primary computers run on an operating system that has a penchant for occasionally imploding. Even if you aren’t laboring under that common software handicap, OctoPrint offers a wide away of compelling features. Perhaps chief among them the ability to monitor your printer over the network, and if you insist, over the Internet. But while OctoPrint provides the server side for getting your printer on the net, you’re on your own for the client.

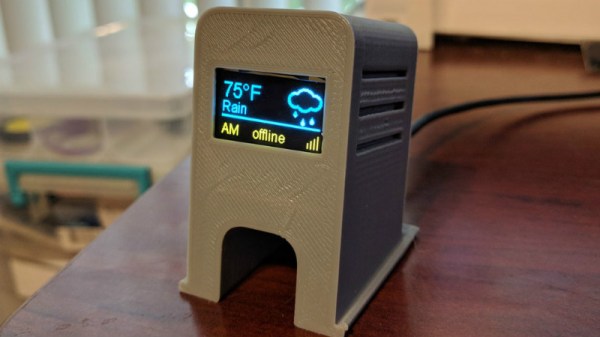
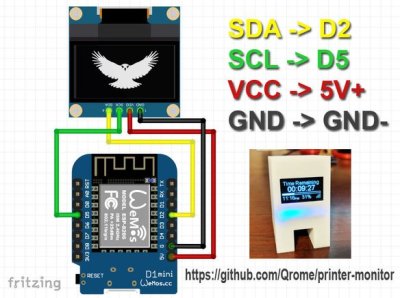
Rather than using a web browser like some kind of peon, [David Payne] has come up with a very slick desktop OctoPrint monitor using the WeMos D1 Mini ESP8266 board. With an exceptionally low part count and housed in a (what else) 3D printed enclosure, this is a cheap and easy OctoPrint accessory that we suspect will be decorating many a hacker’s desk before too long.

The electronics are simple to the extreme, just hook the 4 wires of an 128×64 OLED I2C display to the appropriate pins of the ESP8266 board, and you’re ready to upload the Arduino code [David] has come up with.

His code is very polished, from using WiFiManager for initial network setup to providing its own web-based configuration menus to get the device linked up to your OctoPrint instance, [David] clearly wanted this to be as smooth an experience as possible for the end user. When the 3D printer isn’t working on a job, the monitor will even switch over to showing you the time and weather. We’ve seen commercial products that weren’t this user-friendly.

We also love the case design on this little gadget. While the aesthetics are perhaps debatable (sort of reminds us of the little fellows from Darwinia), we appreciate any functional print that doesn’t require supports. You’ll need to provide a couple of little screws to keep the back panel on, but other than that everything snaps into place.

Of course, you could always just use your smartphone to keep an eye on OctoPrint, and even if the remote management capabilities don’t grab your interest, there’s plenty of interesting plugins to keep you occupied.

Continue reading “ESP8266 Monitor Keeps An Eye On OctoPrint”

A Custom Built FPV Monitor To Keep The Fans Happy

If you’re going to be flying around a FPV-capable aircraft, be it a quadcopter or a fixed-wing plane, you shouldn’t be surprised if bystanders want to take a turn wearing your googles. Of course we hope that you’re good enough flying line of sight that you don’t need to be wearing the googles to stay airborne, but it does make it harder to pull off the sort of tricks and maneuvers that your audience wants to see. So if you want to put on a good show, the audience really needs their own display.

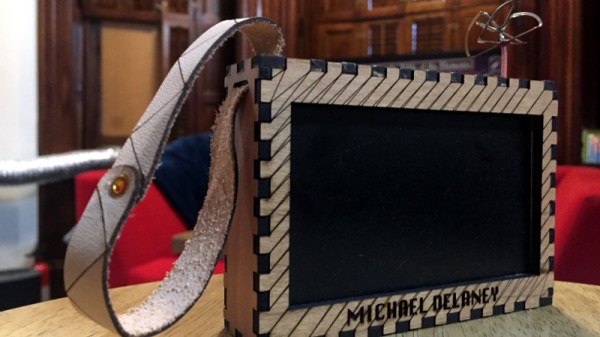
Unfortunately, as avid FPV flier [Michael Delaney] discovered, even the “cheap” ones will run you at least $100 USD. So he did what any self-respecting hacker would do, he set out to build his own. Using a collection of off the shelf components he was able to build a very impressive monitor that lets the viewer see through the eyes of his quadcopter at less than half the cost of commercially available offerings. Though even if he hadn’t manged to beat the cost of a turn-key monitor, we think it would have been more than worth it for this piece of highly customized gear.

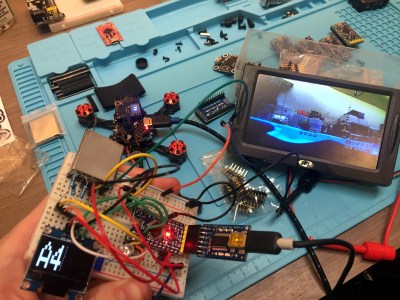
At the heart of the monitor is a Boscam RX5808 5.8 GHz receiver, which is controlled by an Arduino Pro Mini. The video output from the receiver is sent to a 4.2″ TFT screen intended for the Raspberry Pi, and on the backside of the laser-cut wooden enclosure there’s a 128 x 64 I2C OLED to display the currently selected channel and diagnostic information.

An especially nice touch for this project is the custom PCB used to tie all the components together. [Michael] could have taken the easy route and sent the design out for fabrication, but instead went with the traditional method of etching his own board in acid. Though he did modernize the process a bit by using a laser and pre-sensitized copper clad board, a method that seems to be gaining in popularity as laser engravers become a more common component of the hacker’s arsenal.

We’ve previously covered using the RX5808 and Arduino combo to create a spectrum analyzer, in case you want to do more than just watch your friends do powerloops.

3D Printer Guardian Watches For Worst-case Failures

Some devices have one job to do, but that job can have many facets. To [jmcservv], an example of this is the job of protecting against worst-case failures in a 3D printer, and it led him to develop the 3D Printer Watchdog Guardian. When it comes to fire, secondary protection is the name of the game because it’s one thing to detect thermal runaway and turn off a heater, but what if that isn’t enough? The MOSFET controlling the heater could have failed closed and can no longer be turned off in a normal sense. In such cases, some kind of backup is needed. Of course, a protection system should also notify an operator of any serious problem, but what’s the best way to do that? These are the kinds of issues that [jmcservv] is working to address with his watchdog, which not only keeps a careful eye on any heating elements in the system, but can take a variety of actions as a result.

Some outcomes (like fire) are bad enough that it’s worth the extra work and cost of additional protection, and that’s the thinking that has led [jmcservv] to submit his watchdog system for The Hackaday Prize.

Trashed Vector Game Console Revived With Vintage IBM Monitor

We’ve all had the heartbreak of ordering something online, only to have it arrive in less than mint condition. Such are the risks of plying the global marketplace, only more so for used gear, which seems to be a special target for the wrath of sadistic custom agents and package handlers all along the supply chain.

This cruel fate befell a vintage Vectrex game console ordered by [Senile Data Systems]; the case was cracked and the CRT was an imploded mass of shards. Disappointing, to say the least, but not fatal, as he was able to make a working console from the remains of the Vectrex and an old IBM monitor. The Google translation is a little rough, but from what we can gather, the Vectrex, a vector-graphics console from the early 80s with such hits as MineStorm, Star Castle, and Clean Sweep, was in decent shape apart from the CRT. So with an old IBM 5151 green phosphor monitor, complete with a burned-in menu bar, was recruited to stand in for the damaged components. The Vectrex guts, including the long-gone CRT’s deflection yoke assembly, were transplanted to the new case. A little room was made for the original game cartridges, a new controller was fashioned from a Nintendo candy tin, and pretty soon those classic games were streaking and smearing across the long-persistence phosphors. We have to admit the video below looks pretty trippy.

If arcade restorations are your thing, display replacements like this are probably part of the fun. Here’s a post about replacing an arcade display with a trash bin CRT TV, an important skill to have is this business.

Continue reading “Trashed Vector Game Console Revived With Vintage IBM Monitor”

Convert A Curbside CRT TV Into An Arcade Monitor

While an old CRT TV may work well enough on a MAME cabinet project, the real arcade purists are quick to point out that a proper arcade monitor and a TV aren’t the same thing. A real arcade board uses RGB to connect to the monitor, that is, direct control over the red, green, and blue signals. Conversely video over coax or composite, what most people associate with old CRT TVs, combine all the video information down into an analog signal. Put simply, RGB allows for a much cleaner image than composite.

Many in the arcade restoration scene say that trying to convert a bog standard CRT TV into a RGB monitor isn’t possible, but [Arcade Jason] had his doubts. Over on his YouTube channel, he’s recently posted a tutorial on how to go from a trashed CRT TV to a monitor worthy of proper arcade gaming with relatively little work. As real arcade monitors are becoming increasingly rare, these kind of modifications are likely to get more common as coin-op gamers look to keep the old ways alive.

Now obviously every TV is going to do be different inside. All CRT TVs contain high voltages, and on some the circuit boards aren’t even mains-isolated, so take care if you try this. [Jason] certainly doesn’t claim that the method he demonstrates will work on whatever old TV you happen to have kicking around. But the general idea and some of the techniques he shows off are applicable to most modern TVs, and can help you tailor the method to your particular piece of gear. It all starts with a wet finger. Seriously.

[Jason] demonstrates a rather unique way of determining which pins on the TV’s control chip are responsible for the individual color signals by wetting his finger and sliding it over the pins. When a change in color is seen on the displayed image, you know you’re getting close. We can’t say it’s the most scientific or even the safest method, but it worked for him.

He then follows up with a jumper wire and resistor to find the precise pins which are responsible for each color, and solders up his actual RGB connection for the arcade board. In addition to the three color wires, a sync signal is also needed. This is the same sync signal used in composite video, so all that’s needed is to solder to the pad for the original composite video jack. Add a ground signal, and you’ve got yourself a proper RGB monitor.

Interestingly, this one has come full circle, as [Jason] says his attempt was inspired by an old post on Hackaday. It’s the Circle of Hacker Life.

[Thanks to Seebach for the tip]

Continue reading “Convert A Curbside CRT TV Into An Arcade Monitor”