Scan Your Film The 3D Printed Way

Everyone has a box or two at home somewhere full of family photographs and slides from decades past. That holiday with Uncle Joe in Florida perhaps, or an unwelcome reminder of 1987’s Christmas jumper. It’s fair to say that some memories deserve to be left to gather dust, but what about the others in a world of digital images?

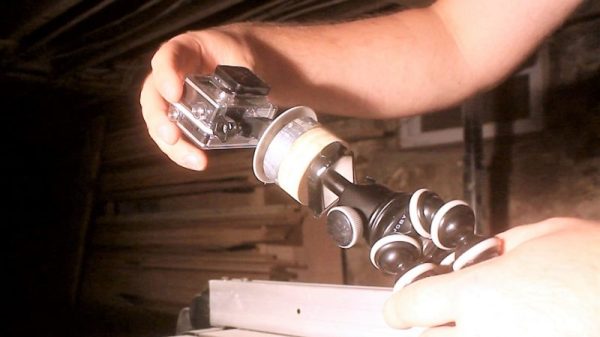
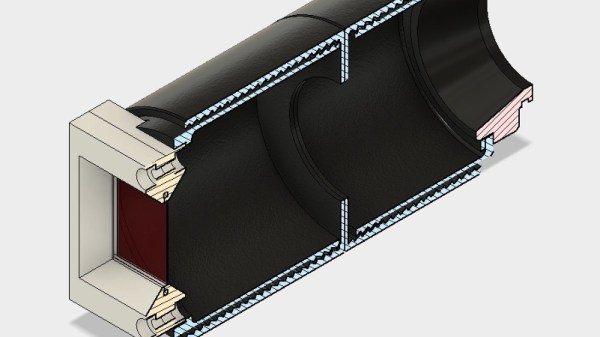
You could of course buy a film scanner to digitize Uncle Joe on the beach, but aside from the dubious quality of so many of them where’s the fun in that? Instead, how about 3D printing one? That’s what [Alexander Gee] did, in the form of an adapter to fit the lens mount of his Sony camera that contains both a 50mm enlarger lens and a mount for the slide. It’s a simple enough print, but he’s made enough parts parametric for users to be able to adjust it to their own camera’s mount.

Sometimes builds do not have to be complex, push boundaries, or contain more computing power than took us to the Moon. This one is simple and well-executed, and for anyone prepared to experiment could deliver results with a variety of cameras and lenses. Of course, you have to have some film to scan before you can use it, so perhaps you’d like to try a bit of home developing.

Photograph Of Single Atom Captured With A Plain Old Camera

The Engineering and Physical Sciences Research Council awarded a remarkable photograph its overall prize in science photography. The subject of the photograph? A single atom visible to the naked eye. Well, perhaps not exactly the naked eye, but without a microscope. In the picture above (click here to enlarge), the atom is that pale blue dot between the two needle-like structures.

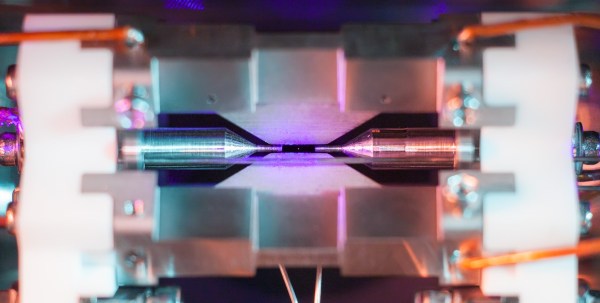
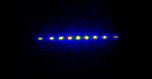
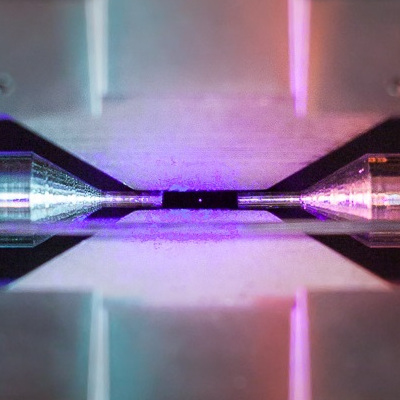
You probably learned in school that you couldn’t see a single atom, and that’s usually true. But [David Nadlinger] from the University of Oxford, trapped a positively charged strontium atom in an ion trap and then irradiated it with a blue-violet laser. The atom absorbs and reemits the light, and a camera can pick up the light, creating a one-of-a-kind photograph. The camera was a Canon 5D Mk II with a 50mm f/1.8 lens — a nice camera, but nothing too exotic.

The ion trap keeps the single atom balanced between two small needle points about 2 millimeters apart. [Nadlinger] did some math that convinced him the photograph could be possible and made it a reality on a Sunday afternoon. The pale dot isn’t especially spectacular by itself, but when you realize that it is the visual effect of a single atom, it is mind-blowing. Turns out, the lab has taken some similar photographs in the past. They don’t remember who took it, but they have a picture of 9 calcium-43 ions trapped, that you can seen below. The ions are 10 microns apart and at an effective temperature of 0.001 degrees Kelvin.

Other winning photographs included patterns on a soap bubble, an EEG headset in use, and microbubbles used to deliver drugs. There’s also an underwater robot, a machine for molecular beam epitaxy that looks like a James Bond villain’s torture device, and lattices made with selective laser melting 3D printing.

If you want to look at atoms from the comfort of your own home, maybe you should build an STM. You might even try NIST’s improved atom probe while you are at it. Just remember you can’t trust atoms. They make up everything.

Photo credit: David Nadlinger

Plastic Model Emulates The First Untethered Spacewalk

Here’s something really wonderful. [Dave Akerman] wrote up the results of his attempt to use a high-altitude balloon to try to re-create a famous image of NASA’s Bruce McCandless floating freely in space with the Earth in the background. [Dave] did this in celebration of the 34th anniversary of the first untethered spacewalk, even going so far as to launch on the same day as the original event in 1984. He had excellent results, with plenty of video and images recorded by his payload.

80’s “Astronaut with MMU” model kit.

Adhering to the actual day of the spacewalk wasn’t the only hurdle [Dave] jumped to make this happen. He tracked down an old and rare “Astronaut with MMU” (Mobile Maneuvering Unit) plastic model kit made by Revell USA and proceeded to build it and arrange for it to remain in view of the cameras. Raspberry Pi Zero Ws with cameras, LoRA hardware, action cameras, and a UBlox GPS unit all make an appearance in the balloon’s payload.

Sadly, [Bruce McCandless] passed away in late 2017, but this project is a wonderful reminder of that first untethered spacewalk. Details on the build and the payload, as well as the tracking system, are covered here on [Dave]’s blog. Videos of the launch and the inevitable balloon burst are embedded below, but more is available in the summary write-up.

Continue reading “Plastic Model Emulates The First Untethered Spacewalk”

Immersive VR With A 200-Degree Stereoscopic Camera

VR is in vogue, but getting on board requires a steep upfront cost. Hackaday.io user [Colin Pate] felt that $800 was a bit much for even the cheapest commercial 360-degree 3D camera, so he thought: ‘why not make my own for half that price?’

[Pate] knew he’d need a lot of bandwidth and many GPIO ports for the camera array, so he searched out the Altera Cyclone V SOC FPGA and a Terasic DE10-Nano development board to host it. At present, he has four Uctronics OV5642 cameras on his rig, chosen for their extensive documentation and support. The camera mount itself is a 3D-printed octagon so eight of the OC5642 can capture a full 360-degree photo.

Next: producing an image!

Continue reading “Immersive VR With A 200-Degree Stereoscopic Camera”

A Thoughtful Variety Of Projects And Failures

Our friends at [The Thought Emporium] have been bringing us delightful projects but not all of them warrant a full-fledged video. What does anyone with a bevy of small but worthy projects do? They put them all together like so many mismatched LEGO blocks. Grab Bag #1 is the start of a semi-monthly video series which presents the smaller projects happening behind the scenes of [The Thought Emporium]’s usual video presentations.

Solar eclipse? There are two because the first was only enough to whet [The Thought Emporium]’s appetite. Ionic lifters? Learn about the favorite transformer around the shop and see what happens when high voltage wires get too close. TEA lasers? Use that transformer to make a legitimate laser with stuff around your house. Bismuth casting? Pet supply stores may have what you need to step up your casting game and it’s a total hack. Failures? We got them too.

We first covered ionocraft (lifters) awhile back. TEA lasers have been covered before. Casting is no stranger to hackaday but [The Thought Emporium] went outside the mold with their technique.

Continue reading “A Thoughtful Variety Of Projects And Failures”

Take A Time-Lapse Or Bake A Cake With This Kitchen Timer Panning Rig

Seems like the first thing the new GoPro owner wants to do is a time-lapse sequence. And with good reason – time-lapses are cool. But they can be a bit bland without a little camera motion, like that provided by a dirt-cheap all-mechanical panning rig.

Let’s hope [JackmanWorks]’ time-lapse shots are under an hour, since he based his build on a simple wind-up kitchen timer, the likes of which can be had for a buck or two at just about any store. The timer’s guts were liberated from the case and a simple wooden disc base with a 1/4″-20 threaded insert for a tripod screw was added. The knob, wisely left intact so the amount of time left in the shot is evident, has a matching bolt for the camera’s tripod socket. Set up the shot, wind up the timer, and let it rip at 1/60 of an RPM. Some sample time-lapse shots are in the video below.

Turning this into a super-simple powered slider for dollying during a time-lapse wouldn’t be too tough — if you’ve already got a nice pantograph slide rig built.

Continue reading “Take A Time-Lapse Or Bake A Cake With This Kitchen Timer Panning Rig”

How To Take Pictures Of PCBs

While we’ve covered light box builds and other DIY photography solutions, general picture-snapping tips and tricks are a bit out of the purview of what we normally write about. Nevertheless, [Alain] just put up a great tutorial for taking pictures of PCBs. This is a great skill to have — no one cares about what you’ve built unless you have a picture of it — and the same techniques can be applied to other small bits and bobs of electronic equipment.

As with all matters of photography, light is important. [Alain] built a DIY light box using two cheap outdoor square LED panels and some scrap wood. There’s really nothing to this build: just build a box that holds soft, diffused light.

A camera is a little more complicated than a box, and here [Alain] is using an entry-level DSLR with a kit lens. The takeaway here is to set the aperture to the highest number (or smallest hole) possible while still keeping a reasonable shutter speed. This increases the depth of field and produces a picture where the board and the tops of components are in focus.

There are a few more tips for getting the best PCB pics possible including shooting in RAW for Aperture or Lightroom, getting a macro lens, and using a tripod. Like all things, there’s a law of diminishing returns, and even with a smartphone camera and a DIY light box, you can produce some fantastic pics of PCBs.