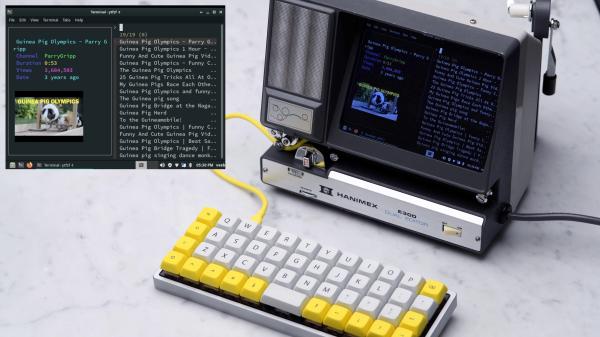
We love hacks that give new life to old gadgets, and [edwardianpug]’s YouTube Terminal certainly fits the bill by putting new hardware inside a Super 8 film editor.
[edwardianpug] could have relegated this classy-looking piece of A/V history to a shelf for display, but instead she decided to refresh its components so it could display any YouTube video instead of just one strip of film at a time. The Boost-Box keeps the retrofuturistic theme going by using the terminal to search for and play videos via Ytfzf.
The original screen has been replaced by an 800×600 LCD, and the yellow USB cord gives a nice splash of color to connect the ortholinear keyboard to the device. Lest you think that this “ruined” a working piece of retro-tech, [edwardianpug] says that 20 minutes would get this device back to watching old movies.
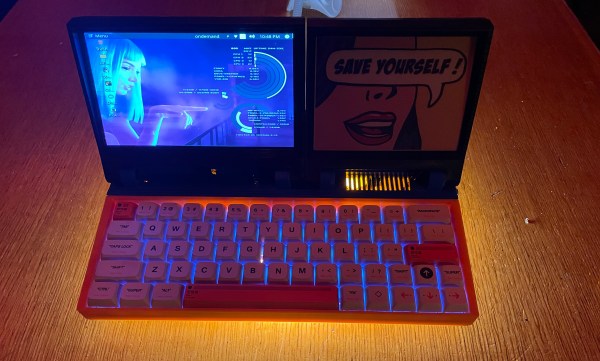
As we’ve gushed previously in these pages, we saw an incredible turnout for our first-ever cyberdeck contest — so many cool ‘decks rolled in that it made judging them all quite the feat, and we would be remiss if we didn’t feature the favorites that, for whatever reason, didn’t make the cut. One of these is the aptly-named Gibson Rev 001 from [Gadjet].
This cyberdeck may be on the pocket-sized side of things, but don’t let that fool you, because it’s loaded with I/O and sensors galore. A Pimoroni Breakout Garden provides particle/smoke and pulse oximetry, temperature/pressure/altitude, an air quality sensor, and a UVA/UVB light sensor — plenty of feelers for judging conditions on the fly. As you might expect, the brains of the operation is a Raspi 4, which is running Twister OS.
We love the dual-display thing going on with the 7″ touchscreen and the color e-ink display — really gives it a cobbled-together-yet-polished, futuristic feel. May the rest of the post-apocalypse gadgetry have such clean lines and cheerful colors (if that’s what you’re into).
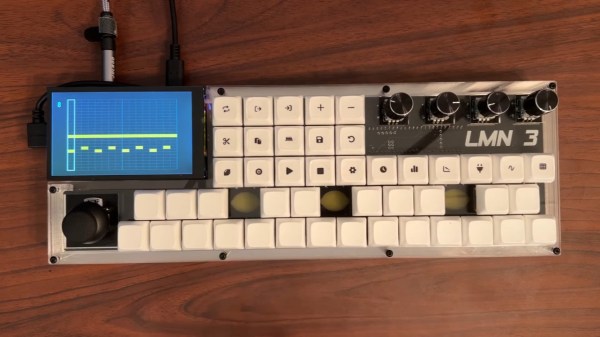
Some projects you come across simply leave you in awe when you look at the thought and the resulting amount of work that went into it, not only for the actual implementation, but everything around it. Even more so when it’s a single-developer open source project. [Stone Preston]’s synth / sampler / sequencer / DAW-in-a-box LMN-3 absolutely fits the description here, and it seems like he has set his heart on making sure everyone can built one for themselves, by providing all the design files from case down to the keycaps.
The LMN-3 (LMN as in “lemon”, not “comes before the OP“) is intended as a standalone, portable digital audio workstation, and is built around a Raspberry Pi 4 with a HyperPixel display for the user interface. The UI itself, and with it the core part of the software, was created using the Tracktion Engine, which itself uses the JUCE framework and combines your typical synthesizer, sequencer, and sampler features with the DAW part to handle recording, editing, and mixing. The remaining hardware is a custom-designed PCB with a set of function and keyboard buttons, along with a pitch bend joystick and four rotary encoders with push buttons that serve as main input handlers. Oh yes, and a Teensy board.
The UI is actually entirely controlled via MIDI commands, and custom firmware on the Teensy is translating the input events from buttons, encoders, and joystick accordingly. This essentially decouples the hardware from the software, and using a cross-platform framework underneath, you can also run the UI standalone on your computer and use any 3rd-party MIDI controller you like. Or then, as [Stone] thought really about everything, use a hardware emulator he created in addition. You could even leave out the Raspberry Pi and software altogether and turn this into a pure MIDI controller. If that sounds tempting, but you’re looking for something with more knobs and sliders instead of buttons, check out the Traktorino. And if you actually prefer a mouse as input device, there’s always something running in a browser.
[Rene Strange] has graced these fair pages a short while ago with a sweet Raspberry Pi software based poly synth, with a tantalising reference to it being a bare metal application. So now, we’ll look into circle, the bare metal programming environment that it is based upon. The platform consists of a large set of C++ classes to access the hardware as well as perform tasks such as task creation and scheduling in the cooperative multitasking, multicore environment. Supporting all Raspberry Pi boards from version 2 onwards (not including the Pico!) in both 32-bit and 64-bit flavours, the environment is pretty complete. Classes are provided for USB, networking, FatFS, as well as more mundane tasks such as dealing with interrupts. On top of these classes there are a pile of application-specific libraries, covering functions such as display interfacing, GUIs using a variety of frameworks, and some more esoteric applications such as interfacing to a Pico, and even sending the system log to a remote web browser!
Classes and libraries however, don’t always help by themselves, which is where the 42 (yes, we know) code examples come in very handy. They’ve provided example applications for some fun stuff like drawing Mandelbrot fractals to the display, as well as some more mundane tasks that we have to deal with such as getting that pesky DMA controller to play nice with the SPI hardware. All-in-all, this looks like a great set of tools for taking full advantage of some fairly beefy hardware for your next embedded project that needs plenty of resources, but not all that unnecessary operating system stuff.
You probably know what a cyberdeck is by now, but you’ll find that people’s definitions differ. Some use the term rather loosely, applying it to things that are luggable at best. But we think you’ll agree that the “Chonky Palmtop” created by [Daniel Norris] AKA [a8ksh4] is without a doubt, quite cyberdeckian.
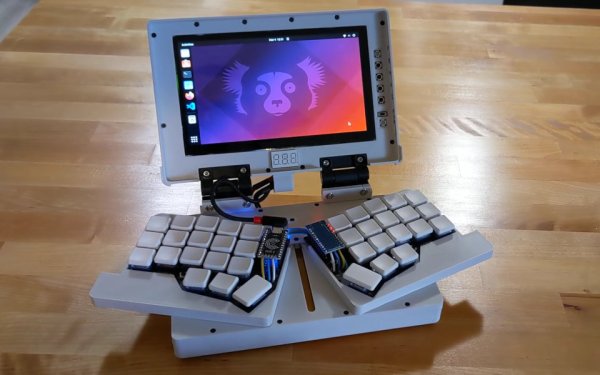
One of the hallmarks of a cyberdeck is that it folds up, often like a laptop in the screen-over-keyboard sense. Not only does chonky palmtop do that, but the split keyboard (more on that later) has this impressive pivot geometry and really satisfying slider mechanism thing going on. The whole thing folds up into a little brick, which [Daniel] says is about the size of an old Asus EEE laptop. (Remember those bad boys? Those were the days.)
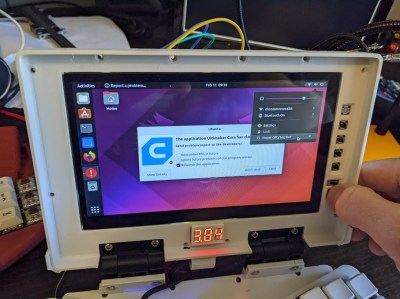
Inside the brick is some stuff you might expect, like a Raspberry Pi 4 and a 7″ touchscreen. [a8ksh4] also packed in an AmpRipper 3000 LiPo charger, which is especially good for high voltage projects. Speaking of, there is a voltage button to check the battery level, which is then displayed on a trio of 7-segment displays that are smack dab in the middle below the screen.
Now about that split keyboard — that’s a Corne, which is kind of a happy medium between a lot of keys and too few, and 42 is probably enough keys for most people. Considering the overall size, we think that is a great amount of keys.
Not that you can tell by the keycaps on those Chocs, but [a8ksh4] is rocking the Miryoku layout and firmware. Slide past the break to watch chonky palmtop unfurl, boot into Ubuntu, and close back up in a brief demo video.
Vizy is a Linux-based “AI camera” based on the Raspberry Pi 4 that uses machine learning and machine vision to pull off some neat tricks, and has a design centered around hackability. I found it ridiculously simple to get up and running, and it was just as easy to make changes of my own, and start getting ideas.
I was running pre-installed examples written in Python within minutes, and editing that very same code in about 30 seconds more. Even better, I did it all without installing a development environment, or even leaving my web browser, for that matter. I have to say, it made for a very hacker-friendly experience.
Vizy comes from the folks at Charmed Labs; this isn’t their first stab at smart cameras, and it shows. They also created the Pixy and Pixy 2 cameras, of which I happen to own several. I have always devoured anything that makes machine vision more accessible and easier to integrate into projects, so when Charmed Labs kindly offered to send me one of their newest devices, I was eager to see what was new.
I found Vizy to be a highly-polished platform with a number of truly useful hardware and software features, and a focus on accessibility and ease of use that I really hope to see more of in future embedded products. Let’s take a closer look.
Robotic mowers are becoming a common sight in some places, enabled by the cost of motors and the needed control electronics being much lower, thanks to the pace of modern engineering. But, in many cases, they still appear to be really rather dumb, little more than a jacked up bump-and-go with a spinning blade. [Clemens Elflein] has taken a cheap, dumb mower and given it a brain transplant based around a Raspberry Pi 4 paired up with a Raspberry Pi Pico for the real time control side of things. [Clemens] is calling this OpenMower, with the motivation to create an open source robot mower controller with support for GPS navigation, using RTK for extra precision.
The donor robot was a YardForce Classic 500, and after inspection of the control PCB, it looks like many other robot mower models are likely to use the same controller and thus be compatible with the openmower platform. A custom mainboard houses the Pi 4 and Pico, an ArduSimple RTK GPS module (giving a reported navigational accuracy of 1 cm,) as well as three BLDC motor drivers for the wheels and rotor. Everything is based on modules, plugging into the mainboard, reducing the complexity of the project significantly. For a cheap mower platform, the Yardforce unit has a good build quality, with connectors everywhere, making OpenMower a plug and play solution. Even the user interface on top of the mower was usable, with a custom PCB below presenting some push buttons at the appropriate positions.
Motor control is courtesy of the xESC project, which provides FOC motor control for low cost, interfacing with the host controller via a serial link. This is worth looking into in its own right! On the software side of things, [Clemens] is using ROS, which implements the low level robot control, path planning (using code taken from Slic3r) as well a kinematics constraints for object avoidance. The video below, shows how simple the machine is to operate — just drive it around the perimeter of lawn with a handheld controller, and show it where obstacles such as trees are, and then set it going. The mower is even capable of mowing multiple lawns, making the journey between them automatically!