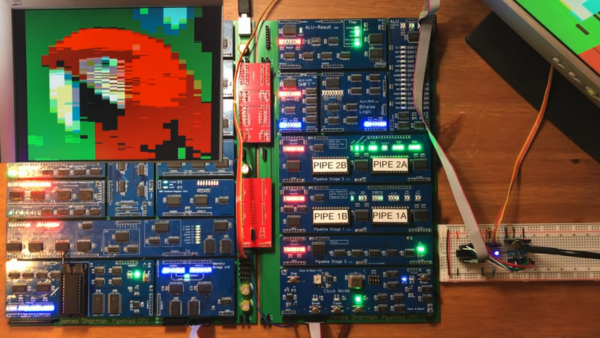
Simple MicroPython Game Is A 30 Minute Game Dev Course

Sometimes, it’s really useful to watch a project’s parts come together one piece at a time in order to get a complete understanding and mental picture of the whole, and we found that to be the case with this simple, retro-inspired sample game from [ezContents]. (Video, embedded below.) The code is on GitHub but if you’re at all interested in what goes on behind the scenes in a game like that, don’t miss the video.

In the video, each game element and function is illustrated, showing exactly what gets done and why. This part is collision detection (click to enlarge.)

These sprite-based games are mostly about moving a small graphical object (a sprite) around a screen in response to user input, and managing what happens when collisions are detected between the player’s sprite and other sprites like enemies, projectiles, and so forth. The development process is wonderfully documented and demonstrated in a video, as each separate part of functionality gets built and explained one piece at a time.

The simple game is made using ArduPy (which is MicroPython combined with Arduino APIs) using Seeed Studios’ Wio Terminal, a small microcontroller development board with integrated screen, sensors, and button inputs including a little directional clicker that [ezContents] uses as a joystick.

The video of the whole process is embedded below; give it a watch and you’ll maybe come away with inspiration, but you’ll definitely have a much better understanding of how these types of games are developed, even if you’re not using the same hardware or development environment.

Continue reading “Simple MicroPython Game Is A 30 Minute Game Dev Course”

Retro ISA Card Means Old, Slow Computers No Longer Need Old, Heavy Monitors

One thing about vintage computers is that they depend greatly on whether or not one can plug a compatible monitor into them. That’s what’s behind [Tube Time]’s Graphics Gremlin, a modern-design retro ISA video card that uses an FPGA to act just like a vintage MDA or CGA video card on the input end, but provides a VGA port for more modern display output options. (Actually, there is also an RGBI connector and a composite video out, but the VGA is probably the most broadly useful.)

Handy silkscreen labels make everything crystal clear. Click to enlarge.

Why bother making a new device to emulate an old ISA video card when actual vintage video cards are still plentiful? Because availability of the old cards isn’t the bottleneck. The trouble is that MDA or CGA monitors just aren’t as easy to come across as they once were, and irreplaceable vintage monitors that do still exist risk getting smashed during shipping. Luckily, VGA monitors (or at least converters that accept VGA input) are far more plentiful.

The board’s design files and assembly notes are all on the project’s GitHub repository along with plenty of thoughtful detail about both assembly and troubleshooting, and the Verilog code has its own document. The Graphics Gremlin is still under development, but you can also watch for the latest on [Tube Time]’s Twitter feed.

Thanks to [NoxiousPluK] for the tip!

3D Printed Terminal Takes Computing Back In Time

It’s hard to look at today as anything but the golden age of computing. Even entry level machines have quad-core processors and a terabyte or more of storage space, to say nothing of the incredible amount of tech packed into the modern smartphone. But even so, there’s something to be said for the elegant simplicity of early desktop computers.

Looking to recreate the feeling of those bygone days, [Pigeonaut] created the Callisto II. Its entirely 3D printed case snaps together without glue or screws, making it easy to assemble, and the parts have been sized so they’ll be printable even on smaller machines like the Prusa Mini. Inside you’ll find a 1024×768 Pimoroni HDMI 8″ IPS LCD, 60% mechanical keyboard, four-port USB 3 hub, Raspberry Pi 4, and a 22 watt USB power supply to run it all.

The internal components can be easily accessed with the hatch on the rear of the case, and there’s plenty of room inside to add new hardware should you want to toss in a hard drive or even swap out the Pi for a different single-board computer.

To really drive home the faux-retro concept of the Callisto II, [Pigeonaut] has created a website for the fictional computer company behind the machine, replete with all the trappings you’d expect from the early web. There’s even a web-based “operating system” you can use to show off your freshly printed Callisto II.

Incidentally the II suffix isn’t just part of the meme, there really was a Callisto before this one. We covered the earlier machine back in 2019, and while we’re a bit sad to see that the functional 3.5 inch floppy drive has been deleted, we can’t deny the overall aesthetics have been greatly improved in the latest version.

Continue reading “3D Printed Terminal Takes Computing Back In Time”

Scanner Captures View-Master Discs As Glorious 3D Videos

The toys of the past may have been cheesy, but you can’t deny the creativity needed to build something engaging without any electronics. One stalwart toy from this category is View-Master, the little stereoscopic slide viewer that brought the world to life in seven vibrant scenes. And digitizing these miniature works of art is the purpose of this neat View-Master reel scanner project.

If you haven’t had the pleasure of using a View-Master, the gist is that a flat cardboard disc ringed with 14 color transparencies was inserted into a plastic viewer. Binocular eyepieces showed scenes from opposing pairs of slides, which were illuminated by a frosted screen and room lighting. The scenes were photographed from slightly different angles, leading to a stereoscopic image that was actually pretty good quality.

In the video below, project creator [W. Jason Altice] describes View-Master as “the YouTube of the 1950s.” We partially agree; with only seven frames to tell a story, we’d say it’s more like TikTok than YouTube. Regardless, capturing these mini-movies requires quite a bit of complexity. All the parts for the reel carousel are 3D-printed, with a small stepper to advance the reel and an optical sensor to register its position. A ring of RGB LEDs beneath the reel illuminates the slides; being able to control the color of the light helps with color balancing for slides with faded colors. An 8-megapixel camera captures each slide, and some pretty slick software helps with organizing the image pairs, tweaking their alignment, capturing the captions from the disc, and stitching everything into a video.

There’s a whole YouTube channel devoted to View-Master captures, which are best viewed with a Google Cardboard or something similar. Even without the 3D effect, it’s still pretty cool to watch [Popeye] beat up a nuke again.

Continue reading “Scanner Captures View-Master Discs As Glorious 3D Videos”

New Contest: Reinvented Retro

There are so many ways to make things look awesome by pulling inspiration from great retro hardware. And combining today’s futuristic functionality with yesterday’s lines, colors, and kitsch is the quick path to a winning combination. So why not give it a try and show us what you got? That’s the gist of Hackaday’s Reinvented Retro Contest which begins right now and runs through June.

The is a very cool Roku

This smart TV should help get you thinking in a retro-modern way. You’d never know it wasn’t stock… except when it starts streaming The Falcon and the Winter Soldier via the Roku hidden inside. Fit and finish on this one is spectacular and that woodgrain remote is a piece of artwork!

So what will it be? Keurig in a 1960’s Perculator? Desk lamp in a rotary telephone? GHz oscilloscope where a CRT used to live? Perhaps a Raspberry Pi laptop in a 1990’s form-factor? You get to decide what “Retro” means, just make sure you thoroughly show off the build!

Digi-Key is sponsoring this contest and there are $200 shopping sprees from their warehouse up for grabs for each of three top winners. Make a project page over on Hackaday.io and use the “Submit project to…” dropdown in the left side bar to enter it in the Reinventing Retro Contest.

Commodore 64 Emulator In VR Delivers A Full 80s Experience

The simulated color CRT monitor looks surprisingly convincing in VR.

One way to play with vintage hardware without owning the hardware is to use an emulator, but [omni_shaNker] announced taking it to the next level by using VR to deliver a complete Commodore 64 system, in its full glory, complete with a native 80s habitat playset! This is a pretty interesting angle for simulating vintage hardware, especially since the emulator is paired with what looks like a pretty convincing CRT monitor effect in VR, not to mention a virtual 5.25″ floppy drive that makes compellingly authentic sounds.

The project is hosted on GitHub and supports a variety of VR hardware, but for owners of Oculus headsets, the application is also available on SideQuest for maximum convenience. SideQuest is essentially an off-the-books app store for managing software that is neither approved nor distributed by Facebook. Oculus is owned by Facebook, and Facebook is keen to keep a tight grip on their hardware.

As functional as the application is, there are still improvements and optimizations to be made. To address this, [omni_shaNker] put out a call for beta testers on Reddit, so if that’s up your alley be sure to get in touch. A video demonstration and overview that is chock-full of technical details is also embedded below; be sure to give it a watch to see what the project is all about.

Continue reading “Commodore 64 Emulator In VR Delivers A Full 80s Experience”

Should Have Used A Vacuum Tube 555

“You should have used a 555” has become a bit of a meme around these parts lately, and for good reason. There seems to be little that these ubiquitous chips can’t be used for, and in a world where code often substitutes for hardware, it’s easy to point to instances where one could have just used a simple timer chip instead.

Definitely not in the meme category, though, is this overkill vacuum tube 555 timer. It comes to us via [David Lovett], aka [Usagi Electric], who has lately caught the “hollow state” electronics bug and has been experimenting with all sorts of vacuum tube recreations of circuits we’re far more used to seeing rendered in silicon than glass. The urge to replicate the venerable 555 in nothing but vacuum tubes is understandable, as it uses little more than a pair of comparators and a flip-flop, circuits [David] has already built vacuum tube versions of. The only part left was the discharge transistor; a pentode was enlisted to stand in for that vital function, making the circuit complete.

To physically implement the design, [David] built a large PCB to hold the 18 vacuum tubes and the handful of resistors and capacitors needed. Mounted on eight outsized leads made from sheet steel, the circuit pays homage to the original 8-pin DIP form of the 555. The video below shows the design and build process as well as testing of all the common modes of operation for the timer chip.

You can check out more of our coverage of [David]’s vacuum tube adventures, which started with his reverse-engineering of an old IBM logic module. And while he did a great job explaining the inner workings of the 555, you might want to take a deeper dive into how the venerable chip came to be.

Continue reading “Should Have Used A Vacuum Tube 555”