There Really Was A Sewing Machine Controlled By A Game Boy

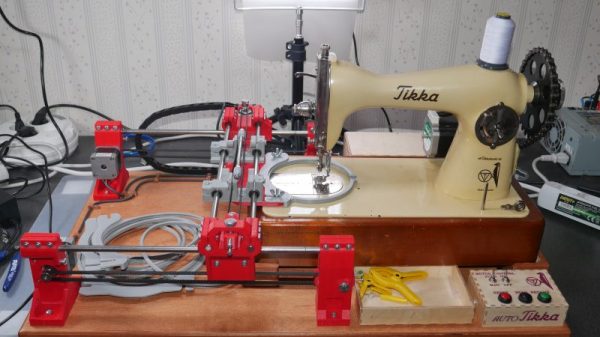
These days, high-quality displays and powerful microcontrollers are cheap and plentiful. That wasn’t the case a couple of decades ago, and so engineers sometimes had to get creative. The result of this is products like the Jaguar nu.yell sewing machine, as covered by [Kelsey Lewin].

The later nuotto model was capable of more advanced embroidery patterns. A Mario character cartridge was sold, while a later Kirby edition was scrapped before release.

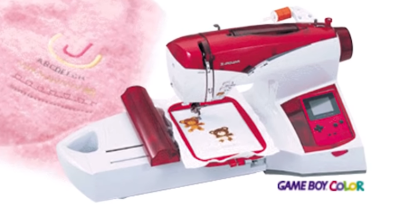
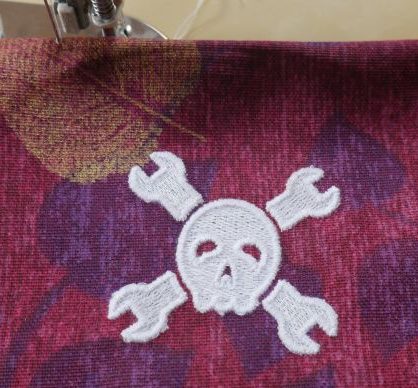
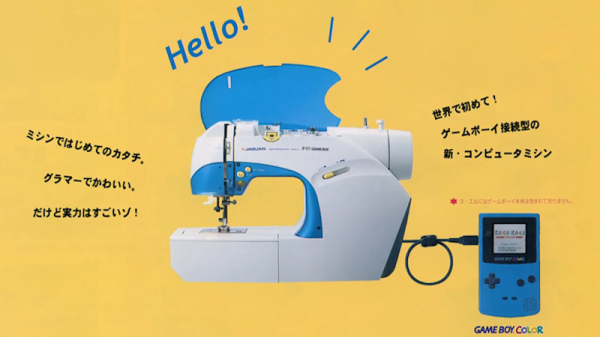
The Japanese market product eschewed the typical mechanical controls of the era, to instead interface with a Nintendo Game Boy. The sewing machine would hook up to the handheld console via the Link Port, while the user ran a special cartridge containing the control software. This would allow the user to select different stitch types, or embroider letters. Very much a product of its time, the nu yell mimics the then-cutting edge industrial design of the first-generation Apple iMac. The technology was later licensed to Singer, who brought it to the US under the name IZEK. Sales were poor, and the later Jaguar nuotto didn’t get a similar rebranding stateside.

Back in the late 90s, the Game Boy was likely an attractive package to engineers. Packing a Z80 processor, buttons, and a screen, it could act as a simple human interface in lieu of designing one from the ground up.  Aprilia even used them to diagnose motorbike ECUs, and we’ve seen Game Boy parts used in medical hardware from the era, too. Video after the break.

Continue reading “There Really Was A Sewing Machine Controlled By A Game Boy”

Fabric(ated) Drum Machine

Some folks bring out an heirloom table runner when they have company, but what if you sewed your own and made it musical? We’d never put it away! [kAi CHENG] has an Instructable about how to recreate his melodic material, and there is a link to his website, which describes his design process, not just the finished product. We have a video below showing a jam session where he exercises a basic function set.

GarageBand is his DAW of choice, which receives translated MIDI from a Lilypad. If you don’t have a Lilypad, any Arduino based on the ATmega328P chip should work seamlessly. Testing shows that conductive threads in the soft circuit results in an occasional short circuit, but copper tape makes a good conductor  at the intersections. Wide metallic strips make for tolerant landing pads beneath modular potentiometers fitted with inviting foam knobs. Each twist controls a loop in GarageBand, and there is a pressure-sensitive pad to change the soundset. Of course, since this is all over MIDI, you can customize to your heart’s content.

MIDI drums come in all shapes and sizes, from a familiar game controller to hand rakes.

Continue reading “Fabric(ated) Drum Machine”

Say What You Will, A Fursuit Is A Lot Of Work.

One thing [Dr. Cockroach]’s build log shows is that a fursuit isn’t an easy thing to make.

Furries came out of early American comics and grew into the subculture the internet just can’t leave alone today. Many people take on an avatar of their furry self when participating in this subculture, and one of the prize achievements is to design, commission, or build a fur suit. What [Dr. Cockroach]’s build shows is why some of these suits can easily fetch 10,000USD. It really is a labor of love. It’s also brings up one of his goals in this project, to discover cheaper ways to construct these suits, so other people who share his hobby have a more financially accessible process to join in.

We were fascinated at the construction process. A base was built out of soft foam around a mock head. On this base more foam was layered and carved before the shape of his avatar, Marcus, started to take form. His wife found the testing process particularly humorous, but when he was happy with the arrangement and the movable jaw he began working on the pattern.

The pattern making process is very clever. He layers the foam base with masking tape and then peels it off. It’s easy to then cut the tape strategically until it lays flat. We can definitely see ourselves using this trick to do anything from sheet metal to duplicating plastic forms.

Then comes quite a lot of difficult stitching. We’d never thought about it before, but if you’re trying to simulate fur a lot of attention has to be paid tot he direction the fur lays; further increasing the difficulty.

Wherever your opinion lies, no hacker can turn down a detailed build log, and there are tricks to be learned anywhere if enough attention is paid.

Tool Rolls, The Fabric Design Challenge That Can Tidy Up Any Workshop

You’ve designed PCBs. You’ve cut, drilled, Dremeled, and blow-torched various objects into project enclosurehood. You’ve dreamed up some object in three dimensions and marveled as the machine stacked up strings of hot plastic, making that object come to life one line of g-code at a time. But have you ever felt the near-limitless freedom of designing in fabric?

I don’t have to tell you how satisfying it is to make something with your hands, especially something that will get a lot of use. When it comes to that sweet cross between satisfaction and utility, fabric is as rewarding as any other medium. You might think that designing in fabric is difficult, but let’s just say that it is not intuitive. Fabric is just like anything else — mysterious until you start learning about it. The ability to design and implement in fabric won’t solve all your problems, but it sure is a useful tool for the box.

WoF? Fat quarter? How much is a yard of fabric, anyway?

To prove it, I’m going to take you through the process of designing something in fabric. More specifically, a tool roll. These two words may conjure images of worn, oily leather or canvas, rolled out under the open hood of a car. But the tool roll is a broad, useful concept that easily and efficiently bundles up anything from socket wrenches to BBQ utensils and from soldering irons to knitting needles. Tool rolls are the best in flexible, space-saving storage — especially when custom-designed for your need.

In this case, the tools will be pens, notebooks, and index cards. You know, writer stuff. But the same can just as easily organize your oscilloscope probes. It’s usefully and a great first foray into building things with fabric if this is your first time.

Continue reading “Tool Rolls, The Fabric Design Challenge That Can Tidy Up Any Workshop”

Quilting Desk Is An Absolute Unit

Most hobbies come with a lot of tools, and thread injecting is no different. Quilting itself may be Queen Hobby when it comes to the sheer volume of things you can buy: specialized templates, clips, thimbles, disappearing ink pens, and so on. And of course, you want it all within arm’s reach while sitting at the machine.

Ruler rack via Amazon.

Years ago, [KevsWoodworks] built an impressive custom quilting desk for his wife. He’d added on to it over the years, but it was time for a bigger one. This beautiful beast has 21 drawers and 6 large cubbyholes for plastic bins. At the wife’s request, one of the drawers is vertical. [Kev] doesn’t say what she put in there, but if it were our desk, that’s where we’d stash all our large plastic rulers that need to be kept flat (or vertical). There’s also a lift, so any sewing machine can be brought up flush with the enormous top.

Fortunately for us, [Kev] likes to teach. He documented the build in a series of videos that go nicely with his CAD drawings, which are available for download. Thread your way past the break to see those videos.

Want to do some thread injecting, but don’t want to spend hundreds on a machine? We got lucky with our entry-level injector. If yours is a piece of scrap or has limited stitch options, replace the motor, or add an Arduino.

Continue reading “Quilting Desk Is An Absolute Unit”

CNC Embroidery Machine Punches Out Designs A Stitch At A Time

It’s doubtful that the early pioneers of CNC would have been able to imagine the range of the applications the technology would be used for. Once limited to cutting metal, CNC machines can now lance through materials using lasers and high-pressure jets of water, squirt molten plastic to build up 3D objects, and apparently even use needle and thread to create embroidered designs.

It may not seem like a typical CNC application, but [James Kolme]’s CNC embroidery machine sure looks familiar. Sitting in front of one of the prettiest sewing machines we’ve ever seen is a fairly typical X-Y gantry system. The stepper-controlled gantry moves an embroidery hoop under the needle of the sewing machine, which is actually the Z-axis of the machine. With the material properly positioned, a NEMA 23 stepper attached to the sewing machine through a sprocket and drive chain makes a stitch, slowly building up a design. Translating an embroidery pattern to G-code is done through Inkstitch, and extension to Inkscape. [James]’ write-up is great, and the video below shows it in action.

We’ve seen a CNC embroidery machine or two before, but our conspicuously non-embroidered hat is off to [James] on this one for its build quality and documentation. And the embroidered Jolly Wrencher doesn’t hurt either.

Continue reading “CNC Embroidery Machine Punches Out Designs A Stitch At A Time”

Stretching My Skills: How (and Why) I Made My Own Compression Sleeves

Have you ever noticed how “one size fits all” often means “one size poorly fits all”? This became especially clear to me when I started using a compression sleeve on my arm. Like any hacker, this seemed like something I could fix, so I gave it a shot. Boy, did I learn a lot in the process.

A little over a year ago, I started dropping things. If I was holding something in my left hand, chances were good that it would suddenly be on the ground. This phenomenon was soon accompanied by pain and numbness, particularly after banging on a keyboard all day.

At best, my pinky and ring fingers were tired all the time and felt half dead. At worst, pain radiated from my armpit all the way to my fingertips. It felt like my arm had been electrocuted. Long story short, I saw a neurologist or two, and several co-pays later I had a diagnosis: cubital tunnel syndrome.

Continue reading “Stretching My Skills: How (and Why) I Made My Own Compression Sleeves”