The Surprising Tech Of A Cheap Toaster

How complicated can a toaster be? You can get a cheap one for way under $10 that is little more than a hot wire. However, there are a few little complications. First, consumer products need to be safe — lawsuits are expensive. Second, there has to be some mechanism to hold the toast down until it is done. If you can buy one for $10 you can bet it isn’t some super toast processor running Linux in there.

[Technology Connections] tore one down for you so you don’t have to. The circuitry is simple, and who knew there was a dedicated IC for toaster control? However, the real engineering is in the lowly little handle you pull down to start the toasting.

Continue reading “The Surprising Tech Of A Cheap Toaster”

A Perfectly Orderly Way To Manage Your Time

[Paul Gallagher] has spent years separating his tasks into carefully measured out blocks, a method of time management known as the Pomodoro Technique. If that’s not enough proof that he’s considerably more organized and structured than the average hacker, you only need to take a look at this gorgeous Pomodoro Timer he’s entered into the Circuit Sculpture Contest. Just don’t be surprised if you suddenly feel like your own time management skills aren’t cutting it.

While [Paul] has traditionally just kept mental note of the hour-long blocks of time he breaks his work into, he thought it was about time he put together a dedicated timer to make sure he’s running on schedule. Of course he could have used a commercially available timer or an application on his phone, but he wanted to make something that was simple and didn’t cause any distractions. A timer that was easy to start, reliable, and didn’t do anything extraneous. We’re not sure if looking like the product of a more advanced civilization was part of his official list of goals, but he managed to achieve it in any event.

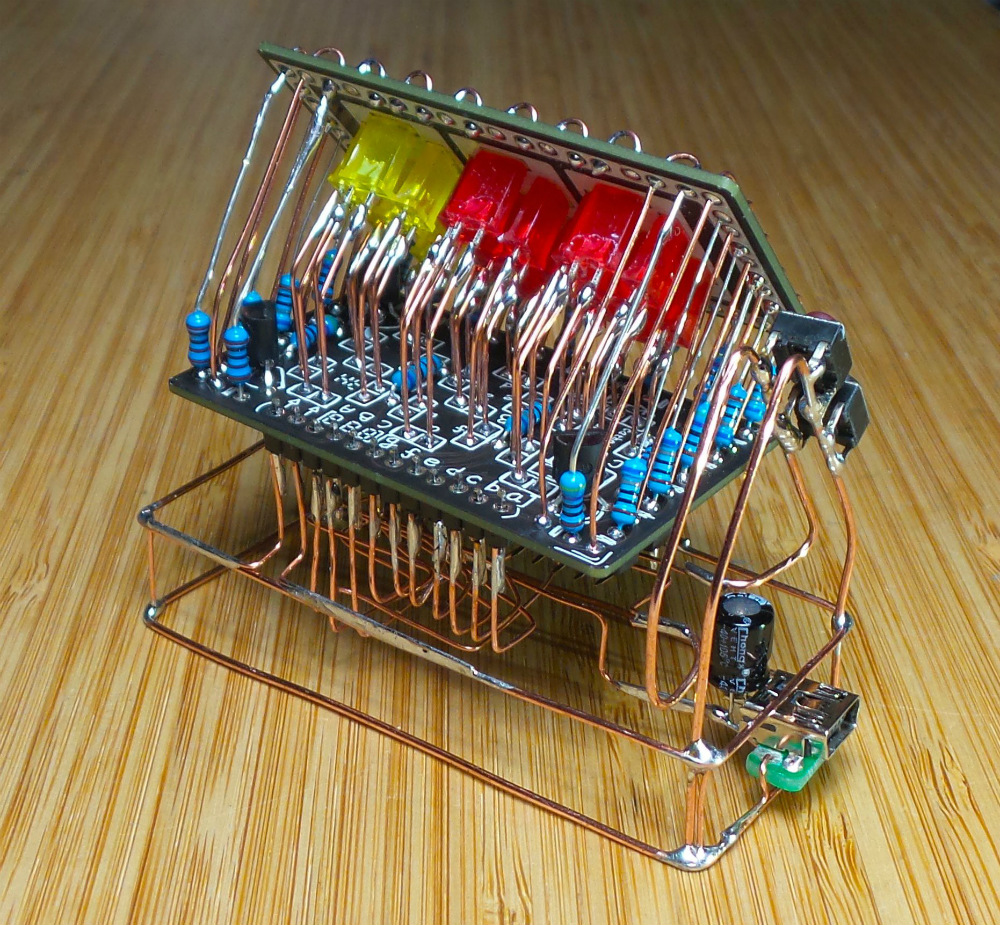
The timer is broken up into two principle parts: the lower section which has the controls, USB port, a handful of passive components, and an ATmega328 microcontroller, and the top section which makes up the three digit LED display. The two sections are connected by a header on the rear side which makes it easy for [Paul] to take the timer apart if he needs to get back into it for any reason. Notably absent in the design is a RTC; the relatively short duration of the timer (up to a maximum of 95 minutes) means the ATmega328 can be trusted to keep track of the elapsed time itself with an acceptable amount of drift.

The display side of the timer is really a sight to behold, with the legs of each LED soldered to a pair of carefully bent copper wires so they match the angle of the front panel. The associated resistors have been artfully snipped so that their bodies sit flat on the PCB while their leads reach out to the perfect length. It looks like a maintenance nightmare in there, but we love it anyway.

As we near the half-way mark of the Circuit Sculpture Contest, there’s still plenty of time to submit your own piece of functional art. If you’ve got a project that eschews the printed circuit board for a chance to bare it all, write it up on Hackaday.io and be sure to send it in before the January 8th, 2019 deadline.

Continue reading “A Perfectly Orderly Way To Manage Your Time”

The 555 And How It Got That Way

There’s a certain minimum set of stuff the typical Hackaday reader is likely to have within arm’s reach any time he or she is in the shop. Soldering station? Probably. Oscilloscope? Maybe. Multimeter? Quite likely. But there’s one thing so basic, something without which countless numbers of projects would be much more difficult to complete, that a shop without one or a dozen copies is almost unthinkable. It’s the humble 555 timer chip, a tiny chunk of black plastic with eight leads that in concert with just a few extra components can do everything from flashing an LED a couple of times a second to creating music and sound effects.

We’ve taken a look under the hood of the 555 before and featured many, many projects that show off the venerable chip’s multiple personalities quite well. But we haven’t looked at how Everyone’s First Chip came into being, and what inspired its design. Here’s the story of the 555 and how it got that way.

Continue reading “The 555 And How It Got That Way”

Minimal Blinky Project Makes The Chip The Circuit Board

We’ve got a thing for projects that have no real practical value but instead seek to answer a simple yet fundamental question: I wonder if I can do that? This dead-bug style 555 blinky light is one of those projects, undertaken just to see how small a circuit can be. Pretty small, as it turns out, and we bet it can get even smaller.

[Danko]’s minimal circuit is about as small as possible for the DIP version of the venerable 555 chip. The BOM is stripped to the bone: just the chip, three resistors, a capacitor, and an LED. All the discrete components are SMDs in 0805. The chip’s leads are bent around the package to form connections, and the SMDs bridge those “traces” to complete the circuit. [Danko] shows the build in step-by-step detail in the video below. There’s some fairly fine work here, but we can’t help wondering just how far down the scale this could be pushed. We know someone’s made a smaller blinky using a tiny microcontroller, but we’d love to see this tried with the BGA version of the chip which is only 1.4 mm on a side.

Cheers to [Danko] for trying this out and having some fun with an old chip. He seems to have a bit of a thing for the 555; check out this cute robot sculpture that’s built around the chip.

Continue reading “Minimal Blinky Project Makes The Chip The Circuit Board”

Launching Fireworks With Raspberry Pi This Fourth Of July

It’s that time of year again in the United States, and the skies will soon be alight with pyrotechnic displays, both professional and amateur. Amazing fireworks are freely available, sometimes legally, sometimes not. For the enthusiasts that put on homebrew displays, though, the choice between watching your handiwork or paying attention to what you’re doing while running the show is a tough one. This Raspberry Pi fireworks show controller aims to fix that problem.

[netmagi] claims his yearly display is a modest affair, but this controller can address 24 channels, which would be a pretty big show in any neighborhood. Living inside an old wine box is a Raspberry Pi 3B+ and three 8-channel relay boards. Half of the relays are connected directly to breakouts on the end of a long wire that connect to the electric matches used to trigger the fireworks, while the rest of the contacts are connected to a wireless controller. The front panel sports a key switch for safety and a retro analog meter for keeping tabs on the sealed lead-acid battery that powers everything. [netmagi] even set the Pi up with WiFi so he can trigger the show from his phone, letting him watch the wonder unfold overhead. A few test shots are shown in the video below.

As much as we appreciate the DIY spirit, it goes without saying that some things are best left to the pros, and pyrotechnics is probably one of those things. Ever wonder how said pros pull it off? Here’s a behind-the-scenes look.

Continue reading “Launching Fireworks With Raspberry Pi This Fourth Of July”

Battery-Powered Watering Timer Converted To Solar On The Cheap

Watering the garden or the lawn is one of those springtime chores that is way more appealing early in the season than later. As the growing season grinds along, a chore that seemed life-giving and satisfying becomes, well, just another chore, and plants often suffer for it.

Automating the watering task can be as simple as buying a little electronic timer valve that turns on the flow at the appointed times. [A1ronzo] converted his water hose timer to solar power. Most such timers are very similar, with a solenoid-operated pilot valve in line with the water supply and an electronic timer of some sort. The whole thing is quite capable of running on a pair of AA batteries, but rather than wasting money on new batteries several times a season, he slipped a LiPo pack and a charge controller into the battery case slot and connected a small solar panel to the top of the controller.

The LiPo is a nominal 3.7-volt pack, so he did a little testing to make sure the timer would be OK with the higher voltage. The solar panel sits on top of the case, and the whole thing should last for years. And bonus points for never having to replace a timer that you put away at the end of the season with batteries still in it, only to have them leak. Ask us how we know.

Like the best of hacks, this one is quick, easy and cheap — $15 in parts, aside from the timer. There are more complicated irrigation solutions, of course, one of which even won the Hackaday Prize once upon a time. But this one has us ordering parts to build our own right now.

How the 555 timer IC works

Learning The 555 From The Inside

One way to understand how the 555 timer works and how to use it is by learning what the pins mean and what to connect to them. A far more enjoyable, and arguably a more useful way to learn is by looking at what’s going on inside during each of its modes of operation. [Dejan Nedelkovski] has put together just such a video where he walks through how the 555 timer IC works from the inside.

We especially like how he immediately removes the fear factor by first showing a schematic with all the individual components but then grouping them into what they make up: two comparators, a voltage divider, a flip-flop, a discharge transistor, and an output stage. Having lifted the internals to a higher level, he then walks through examples, with external components attached, for each of the three operating modes: bistable, monostable and astable. If you’re already familiar with the 555 then you’ll enjoy the trip down memory lane. If you’re not familiar with it, then you soon will be. Check out his video below.

Continue reading “Learning The 555 From The Inside”