MouSTer Brings USB To Retro Computers

Folks who like the take the old Amiga out for the occasional Sunday drive usually do it because they have wistful memories of the simpler times. Back when you could edit documents or view spreadsheets on a machine that had RAM measured in kilobytes instead of gigabytes. But even the most ardent retro computer aficionado usually allows for a bit of modern convenience.

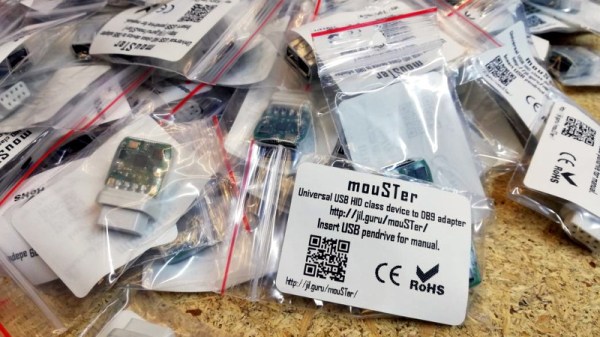
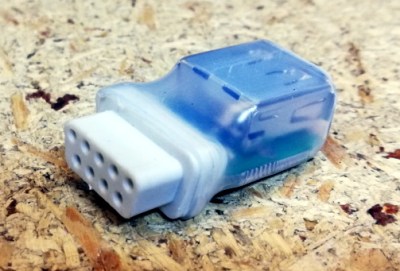
Enter the mouSTer. This tiny device converts a common USB HID mouse into something older computers can understand. It even supports using Sony’s PlayStation 4 controller as a generic game pad. While the firmware is still getting tweaked, the team has confirmed its working on several classic machines and believe it should work on many more. Considering the prices that some of these old peripherals command on the second hand market, using a USB mouse or controller on your vintage computer isn’t just more convenient, but will likely be a lot cheaper.

Confirmed retrocomputing superfan [Drygol] is a member of the team working on mouSTer, and in a recent post to hisĀ retrohax blog, he talks a bit about what’s happened since his last update over the summer. He also talks a bit about the challenges they’ve faced to get it into production. Even if you’re not into poking around on vintage computers, there are lessons to be learned here about what it takes to move from a handful of prototypes to something you can actually sell to the public.

We especially liked the details about the mouSTer enclosure, or lack thereof. Originally [Drygol] says they were going to have the cases injection molded, but despite initial interest from a few companies they talked to, nobody ended up biting because it needed to be done with relatively uncommon low pressure injection. While 3D printing is still an option, the team ended up using clear heatshrink tubing to create a simple conformal protective shell over the electronics. Personally we think it looks great like this, but it sounds like this is only a temporary solution until something a bit more robust can be implemented.

As you might imagine we’ve seen DIY projects that aimed to bring modern input devices to vintage computers like the Atari ST, but the diminutive proportions of the mouSTer and the fact that it’s a turn-key product is sure to appeal to those who want to minimize headaches when working with their classic gear.

Continue reading “MouSTer Brings USB To Retro Computers”

Raspberry Pi 4 Brings Cloud Gaming To Nintendo Switch

Companies like Google and Microsoft have been investing heavily in the concept of cloud gaming, where a player uses their computer or a mobile device to stream the video feed of a game that’s running on powerful machine tucked away in a data center somewhere. With this technology you can play the latest and greatest titles, even if the device you’re using doesn’t have the processing power to run it locally.

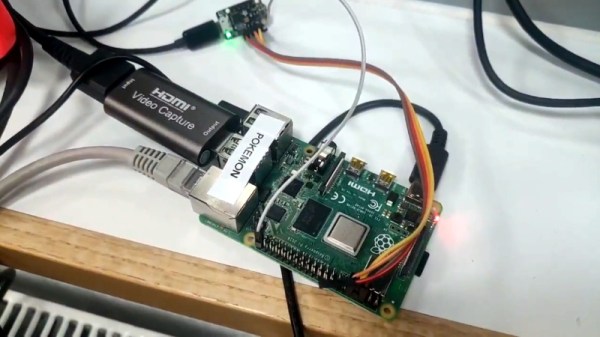
Considering the Switch is already a portable system, it’s not too surprising Nintendo doesn’t seem interested in the technology. But that didn’t stop [Stan Dmitriev] from doing a bit of experimentation on his own. With little more than a Raspberry Pi 4 and Trinket M0, he’s demonstrated that users can remotely interact with the Switch well enough to play games in real time.

The setup is fairly straightforward. A cheap HDMI capture device is used to grab the video from the Nintendo Switch dock, which is then streamed out to web with the help of the Pi’s hardware video encoder. Input from the user is sent over the Pi’s UART to the Trinket, which itself is running a firmware specifically developed for mimicking Nintendo Switch controllers. With so many elements involved, naturally some latency comes into play. The roughly 100 millisecond delay [Stan] is reporting isn’t exactly ideal for fast-paced gaming, but is certainly adequate for more relaxed titles.

On the software side of things, the project is using a SDK developed by [Stan]’s employer SurrogateTV. Right now you need to apply if you want to get your game or other interactive gadget up on the service, though he says it will be opened up to the public next year. But even without all the details, we’ve got a clear idea of how both the video capture and user input sides of the equation are being handled. For personal use, all you’d really need to do is put together a simple web interface to tie it all together.

This isn’t the first time we’ve seen a microcontroller used to interface with the Switch. Other consoles are a bit more selective about what kind of hardware they will talk to, but the Microsoft Adaptive Controller could potentially allow you to do something similar on the Xbox.

Miniature Star Wars Arcade Lets You Blow Up The Death Star On The Go

If you have fond childhood memories of afternoons spent at the local arcade, then you’ve had the occasional daydream about tracking down one of those old cabinets and putting it in the living room. But the size, cost, and rarity of these machines makes actually owning one impractical for most people.

While this fully functional 1/4th scale replica of the classic Star Wars arcade game created by [Jamie McShan] might not be a perfect replacement for the original, there’s no denying it would be easier to fit through your front door. Nearly every aspect of the iconic 1983 machine has been carefully recreated, right down to a working coin slot that accepts miniature quarters. Frankly, the build would have been impressive enough had he only put in half the detail work, but we certainly aren’t complaining that he went the extra mile.

[Jamie] leaned heavily on resin 3D printed parts for this build, and for good reason. It’s hard to imagine how he could have produced some of the tiny working parts for his cabinet using traditional manufacturing techniques. The game’s signature control yoke and the coin acceptor mechanism are really incredible feats of miniaturization, and a testament to what’s possible at the DIY level with relatively affordable tools.

The cabinet itself is cut from MDF, using plans appropriately scaled down from the real thing. Inside you’ll find a Raspberry Pi 3 Model A+ running RetroPie attached directly to the back of a 4.3 inch LCD with integrated amplified speakers. [Jamie] is using an Arduino to handle interfacing with the optical coin detector and controls, which communicates with the Pi over USB HID. He’s even added in a pair of 3,000 mAh LiPo battery packs and a dedicated charge controller so you can blow up the Death Star on the go.

Still don’t think you can fit one in your apartment? Not to worry, back in 2012 we actually saw somebody recreate this same cabinet in just 1/6th scale.

Continue reading “Miniature Star Wars Arcade Lets You Blow Up The Death Star On The Go”

Building A YouTube Remote Control Worthy Of 2020

Back in 2018, [Gryo] built a remote control specifically for watching YouTube videos on his computer. It worked perfectly, but it didn’t quite fit the expectation one has for a modern media remote — it was a bit chunky, the buttons weren’t very responsive, and it didn’t feel as nice as the remotes that ship with consumer streaming devices. Looking to improve on things, he’s recently unveiled a far more svelte version of his scratch built media streaming remote includes a scrollwheel, color feedback, and a UI for customizing how it works.

It might not look the part, but technically [Gyro] categorizes his creation as a wireless keyboard since that’s what the operating system sees it as. This makes it easy to use with whatever media playback software or service might be running on the computer, as button presses on the remote are picked up as standard keyboard events. And the software easily sets which key each button on the remote will be associated with.

Inside the 3D printed case there’s a custom PCB that pulls together the ATmega328P, NRF24L01 radio, and TP4056 charger that tops off the 500 mAh Li-Po battery via USB-C. The receiver is also a custom creation, using a second NRF24L01 chip but swapping out the microcontroller for the ATmega32U4.

[Gyro] has done a fantastic job documenting this build in the write-up, and provides everything you need should you want to spin up your own copy. As much as we liked the unique approach used in the first version of the remote, we’ve got to admit this iteration is much more likely to end up sitting on our living room table.

Continue reading “Building A YouTube Remote Control Worthy Of 2020”

Four On The Floor For Your Virtual Race Car

There was a time when building realistic simulations of vehicles was the stuff of NASA and big corporations. Today, many people have sophisticated virtual cockpits or race cars that they use with high-resolution screens or even virtual reality gear. If you think about it, a virtual car isn’t that hard to pull off. All you really need is a steering wheel, a few pedals, and a gear shifter. Sure, you can build fans to simulate the wind and put haptics in your seat, but really the input devices alone get you most of the way there. [Oli] decided he wanted a quick and easy USB gear shifter so he took a trip to the hardware store, picked up an arcade joystick, and tied it all together with an Arduino Leonardo. The finished product that you can see in the video below cost about $30 and took less than six hours to build.

The Leonardo, of course, has the ability to act like a USB human interface device (HID) so it can emulate a mouse or a keyboard or a joystick. That comes in handy for this project, as you would expect. The computer simply has to read the four joystick buttons and then decide which gear matches which buttons. For example up and to the left is first gear, while 4th gear is only the down button depressed. A custom-cut wooden shifter plate gives you the typical H pattern you expect from a stick shift.

Continue reading “Four On The Floor For Your Virtual Race Car”

Breathing New Life Into Old School ThinkPad Keyboards

The ThinkPad is generally considered the unofficial laptop of hackerdom, so it’s no surprise that we see plenty of projects focused on repairing and modifying these reliable workhorses. But while we usually see folks working on relatively modern incarnations of this iconic line of computers, this project by [Frank Adams] and [Brian Chan] shows that the hacker’s love affair with the ThinkPad stretches back farther than many might realize.

As explained on the project’s Hackaday.io page, the duo have produced an open hardware board that will allow you to take the keyboard and trackpoint from a late ’90s ThinkPad 380ED and use it as a standard USB input device on a modern computer. According to [Frank], the keyboards on these machines are notable for having full-size keys rather than the “chicklet” boards that are so common today.

Now you may be wondering why this is significant. After all, we’ve seen plenty of projects that hook up an old keyboard to a USB-equipped microcontroller to get them speaking the lingua franca. Well, the trick here is that the trackpoint on these older ThinkPads actually required additional circuitry on the motherboard to function. The keyboard features three separate FPC connections for the matrix, the trackpoint buttons, and the analog strain gauges in the trackpoint itself.

After a considerable amount of reverse engineering, [Frank] and [Brian] have developed a board that uses the Teensy 3.2 to turn this plethora of pins into something useful. In the video after the break, you can see the new composite USB device working perfectly on a modern Windows computer.

It will probably come as little surprise to find that [Frank] is no stranger to hacking ThinkPad keyboards. In 2018 we covered a similar adapter he built for the far more modern T61, which was an absolute cakewalk by comparison.

Continue reading “Breathing New Life Into Old School ThinkPad Keyboards”

Stomp Switches Let You Skip Tracks Hands-Free

You’ve (probably) got four limbs, so why are you only using half of them when you’re working on the computer? Just because your toes don’t have the dexterity to type (again, probably) doesn’t mean your feet should get to just sit there doing nothing all day. In a recent project, [MacCraiger] shows you just how easy it can be to put some functionality under foot by building a pair of media control stomp switches.

Crimp pin connectors grant +50 professionalism.

If the devices pictured above look a lot like guitar effects, that’s because they share a lot of parts. [MacCraiger] used the same sort of switch and aluminum case that you might see on a pedal board, as he figured they’d be better suited to a lifetime of being stepped on than something he 3D printed.

Up on the desk, and this time in a printed case, is the Arduino Leonardo that they connect to. The wiring for this project is very straightforward, with the switches connected directly to the GPIO pins. From there, the Arduino firmware emulates a USB Human Interface Device and fires off the appropriate media control keystrokes to skip to the next track or pause playback depending on which switch has been engaged.

This hardware isn’t exactly breaking any new ground here, but we did like how [MacCraiger] used standard 3.5 mm audio cable and the associated jacks to connect everything up. It’s obviously on-theme for what’s essentially a music project, but more importantly, gives the whole thing a very professional look. Definitely a tip to mentally file away for the future.

For the more accomplished toe-tapper, our very own [Kristina Panos] recently recently took us through the construction of her macro slinging footstool. Between these two examples of bespoke peripherals, you should have everything you need to create your own custom input devices. We suppose you could even make one that’s hand operated if you’re into that sort of thing.

Continue reading “Stomp Switches Let You Skip Tracks Hands-Free”