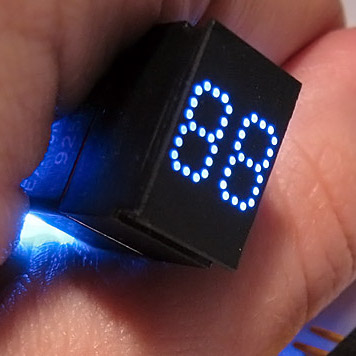
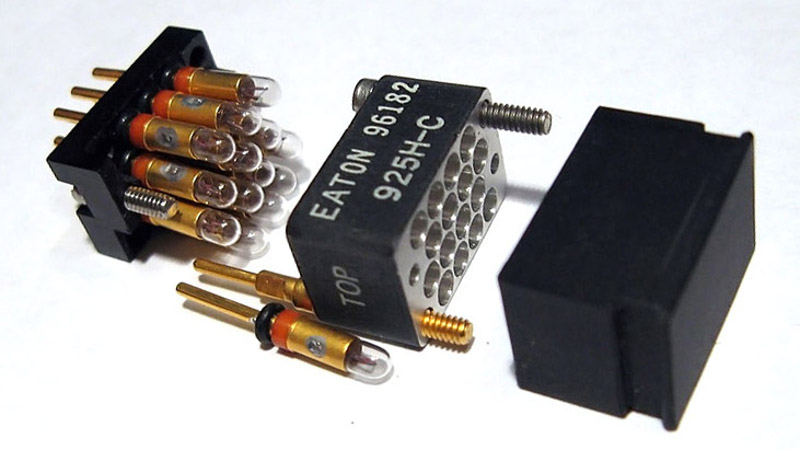
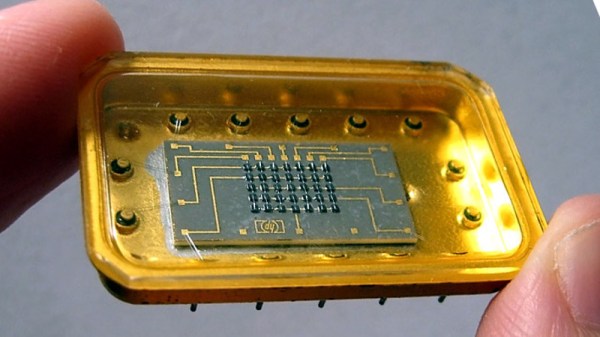
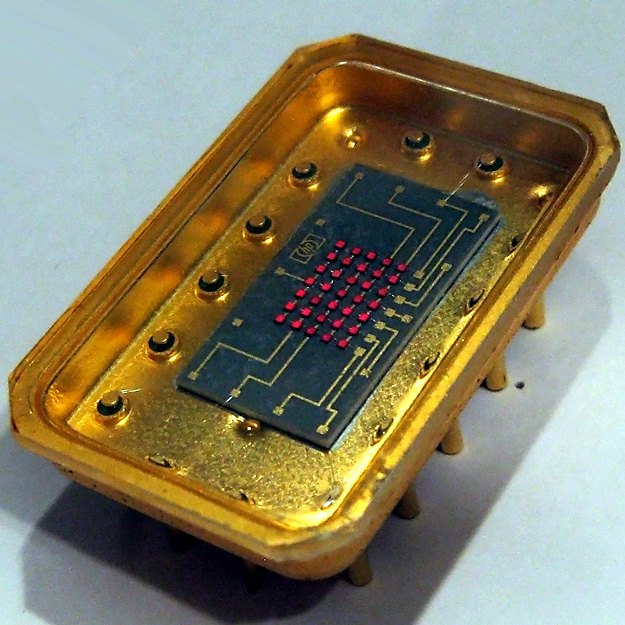
Vintage Calculator Design Shows Just How Much We Take For Granted Today

[Amen]’s Rockwell 920 calculator from the 70s was a very impressive piece of hardware for its time. It sported a 16-digit display, a printer, and it could run programs. It even had a magnetic card reader/writer that could be used to store programs and data externally. Seen through today’s eyes, it was less like a calculator and more like what we would call a single-board computer. They are also a window into another era, a time when many of the electrical design assumptions we take for granted hadn’t happened yet. When the time came to dig into what made the calculator tick, [Amen] had a lot of work to do just to get basic tools running.

For example, [amen]’s Blue Pill (an open-source, multipurpose test and measurement tool) is, on one hand, the perfect tool to snoop on the inner workings. However, those inner workings happen to use negative logic at -17 Volts, which means a logical zero is -17 V and a one is 0 V. Oh, and it uses an oddball clock rate, to boot. Since the Blue Pill doesn’t support -17 V negative logic (does anything?) a bit of custom work was needed to craft an interface. Once that was working, the Blue Pill was off to the races.

The unfamiliar elements didn’t end there. The pins on each IC, for example, are in a staggered layout quite unlike the DIP pattern most of us (and our tools, breadboards, and IC clips) are familiar with. As for the processor itself, [amen] has access to low-level documentation on Rockwell processors and instruction sets, but the timing diagrams are puzzling until one realizes the processor has two clock inputs at two different frequencies, resulting in what [amen] describes as four separate “clock phases”.

These design decisions were certainly made for good reasons at the time, and they even have a certain internal harmony to them, but it’s still a window into an era when the elements underpinning much of what we now have and work with had not yet happened.

Check out the video embedded below to see [amen] explain what it took to hook the Blue Pill up to a Rockwell 920. Also, if you’d like to see one of these vintage machines demonstrated in all its functioning glory, here’s a video of one being put through its paces.

Continue reading “Vintage Calculator Design Shows Just How Much We Take For Granted Today”

Radon Monitor Recreates Steam Gauge With E-Ink

While the full steampunk aesthetic might be a bit much for most people, those antique gauges do have a certain charm about them. Unfortunately, implementing them on a modern project can be somewhat tricky. Even if you’ve got a stock of old gauges laying around, you’ve still got to modify the scale markings and figure out how to drive them with digital electronics. While we’ve seen plenty of people do it over the years, there’s no debating it’s a lot harder than just wiring up an I2C display.

But maybe it doesn’t have to be. With his Rad-O-Matic, [Hans Jørgen Grimstad] created a pretty convincing “analog” gauge using a small e-ink panel. Of course it won’t fool anyone who gives it a close look, but at a glance, you could certainly be forgiven for thinking it was some kind of vintage indicator. Especially with the cracked and stained Fresnel lens he put in front of it.

For this project [Hans] used a LilyGo T5, which combines an ESP32 with a 2.13 inch electronic paper display. These are presumably meant to be development boards for digital signage applications, but they occasionally show up in hacker projects since they’re so easy to work with. The board pulls data from a RD200M radon sensor over a simple UART connection, and the current reading is indicated by a “needle” that moves across a horizontal scale on the display.

On its own, it wouldn’t look very vintage. In fact, quite the opposite. But [Hans] really helped sell the look on this project by designing and 3D printing a chunky enclosure and then weathering it to make it look like it’s been kicking around since the Cold War.

If you don’t feel like faking it, we’ve seen some very impressive projects based on authentic vintage gauges. As long as you don’t mind tearing up hardware that’s likely older than you are, putting in the extra effort necessary for a convincing modification can really pay off.

[Thanks to Tarjei for the tip.]

World Radio Lets Your Fingers Do The Walking

Listening to radio from distant countries used to take a shortwave rig, but thanks to the Internet we can now pull in streams from all over the globe from the comfort of our own desktop. With a few clicks you can switch between your local news station and the latest in pop trends from Casablanca. But as convenient as online streaming might be, some folks still yearn for the traditional radio experience.

For those people, the Raspberry Pi World Radio by [Abraham Martinez Gracia] might be the solution. Built into the body of a 1960s Invicta radio, this Internet radio uses a very unique interface. Rather than just picking from a list of channels, you use the knobs on the front to pan and zoom around a map of the world. Streaming channels are represented by bubbles located within their country of origin, so you’ll actually have to “travel” there to listen in. The video after the break gives a brief demonstration of how it works in practice.

We’ll admit it might become a bit tedious eventually, but from a visual standpoint, it’s absolutely fantastic. [Abraham] even gave the map an appropriately vintage look to better match the overall aesthetic. Normally we’d say using a Raspberry Pi 4 to drive a streaming radio player would be a bit overkill, but considering the GUI component used here, it’s probably the right choice.

Of course we’ve seen Internet radios built into vintage enclosures before, and we’ve even seen one that used a globe to select the station, but combining both of those concepts into one cohesive project is really quite an accomplishment.

Continue reading “World Radio Lets Your Fingers Do The Walking”

Retrocomputing Spray Paints: Amiga Beige, Commodore, And ATARI Grey

[retrohax] has provided vintage computer guidance for years, and part of that guidance is this: sometimes using paint as part of restoration is simply unavoidable. But the days of tediously color-matching to vintage hardware are gone, thanks to [retrohax] offering custom-mixed spray paints in Amiga 500 Beige, C-64 Beige, and ATARI ST/SE Grey. (At the moment only delivery within Poland is available due to shipping restrictions, but [retrohax] is working on a better solution.)

As a companion to making these vintage colors available, there is also a short how-to guide on how to properly prep and spray paint a computer case for best results that talks a little about the challenges in color matching to vintage hardware, and how getting custom paints mixed makes life much easier. Hackers may value making do with whatever is available, but we can also appreciate the value of having exactly the right material or tool for the job.

It’s not every day we see someone mixing custom spray paint colors, but off the shelf options don’t always cut it. Another example of getting specialty materials made from the ground up is custom plywood specifically designed for laser-cutting puzzles, something done because the troubles that came with off-the-shelf options were just not worth the hassle.

Antique Oscilloscope Gets New Home And Purpose

As the pace of technology charges blindly forward, a lot of older tools or products get left in the dust, forgotten to most but those left with them. This doesn’t mean they’re useless, though. In fact, old technology that continues to survive in the present tends to be more robust and sturdy than most modern, cheap replacements. While this might be survivorship bias, this is certainly true in particular of oscilloscopes. Rugged CRTs in large metal housings with discrete through-hole components in simple layouts made them reliable, but they’re heavy, bulky, and lack features of modern instruments. With some modifications, though, you can give them a new home and keep their vintage aesthetic.

[BuildComics] had just such an oscilloscope on hand and set out to make it into something useful but aesthetically pleasing as well. With a small circuit board, formerly available as a kit from Sparkfun/Dutchtronix but now only available if you can build them yourself, the cathode ray tube can be modified to output not waveforms but rather a working clock face. The donor oscilloscope was a Heathkit IO-102 which was fine for its time but is now lacking, so the CRT was removed from its housing and placed in a custom-built enclosure with a 40s radio style that suits its new purpose well.

Seeing old hardware that is past its prime being put to work in a new way is great, both from a technical standpoint and also because that’s usable hardware that’s being kept out of the landfill. Oscilloscopes are popular for projects like these too since they are relatively easy to understand and modify. Besides being used as clocks, we’ve also seen them modified to play video games such as Pac-Man.

Vintage Aircraft Controls Turned USB Button Box

The Gables Engineering G-2789 audio selector panels aren’t good for much outside of the aircraft they were installed in, that is, until [MelkorsGreatestHits] replaced most of the internals with a Teensy 3.2. Now they are multi-functional USB input devices for…well, whatever it is you’d do with a bunch of toggle switches and momentary push buttons hanging off your computer.

Tracing wires from the panel switches.

With the Teensy going its best impression of a USB game controller, the host operating system has access to seven momentary buttons, twelve toggles, and one rotary axis for the volume knob.

Right now [MelkorsGreatestHits] says the code is set up so the computer sees a button press on each state change; in other words, the button assigned to the toggle switch will get “pressed” once when it goes up and again when it’s flicked back down. But of course that could be modified depending on what sort of software you wanted to interface the device with.

As we’ve seen with other pieces of vintage aircraft instrumentation, lighting on the G-2789 was provided by a series of incandescent bulbs that shine through the opaque front panel material. [MelkorsGreatestHits] replaced those lamps with white LEDs, but unfortunately the resulting light was a bit too harsh. As a quick fix, the LEDs received a few coats of yellow and orange paint until the light was more of an amber color. Using RGB LEDs would have been a nice touch, but you work with what you’ve got.

This isn’t the first time that [MelkorsGreatestHits] has turned an old aircraft cockpit module into a USB input device, and we’re certainly interested in seeing what the next project will look like. Though we’re perhaps more interested in finding out where all all these old school airplane parts are coming from…

Finding A Secret Message From A Gaming Legend

Satoru Iwata is perhaps best remembered for leading Nintendo through the development of the DS and Wii, two wildly successful systems which undeniably helped bring gaming to a wider and more mainstream audience. But decades before becoming the company’s President in 2002, he got his start in the industry as a developer working on many early console and computer games. [Robin Harbron] recently decided to dig into one of the Iwata’s earliest projects, Star Battle for the VIC-20.

Finding the message was easy, if you knew were to look.

It’s been known for some time that Iwata, then just 22 years old, had hidden his name and a message in the game’s source code. But [Robin] wondered if there was more to the story. Looking at the text in memory, he noticed the lines were actually null-terminated. Realizing the message was likely intended to get printed on the screen at one point during the game’s development, he started hunting for a way to trigger the nearly 40 year old Easter Egg.

As it turns out, it’s hidden behind a single flag in the code. Just change it from 0 to 1, and the game will display Iwata’s long-hidden credit screen. That proved the message was originally intended to be visible to players, but it still didn’t explain how they were supposed to trigger it during normal game play.

That’s where things really get interesting. As [Robin] gives us a guided tour through Star Battle’s inner workings, he explains that Iwata originally intended the player to hit a special combination of keys to tick over the Easter Egg’s enable flag. All of the code is still there in the commercial release of the game, but it’s been disabled. As Iwata’s life was tragically cut short in 2015 due to complications from cancer, we’ll perhaps never know the reason he commented out the code in question before the game was released. But at least we can now finally see this hidden message from one of gaming’s true luminaries.

Last time we heard from [Robin], he’d uncovered a secret C64 program hidden on a vinyl record. With his track record so far, we can’t wait to see what he digs into next. Continue reading “Finding A Secret Message From A Gaming Legend”