Double Pendulum

Powered Double Pendulum Is A Chaotic Display

If you’ve never seen a double pendulum before, it’s basically just a pendulum with another pendulum attached to the end. You might not think that’s anything special, but these devices can exhibit extremely chaotic behavior if enough energy is put into the system. The result is often a display that draws attention. [David] wanted to build his own double pendulum display, but he wanted to make it drive itself. The result is a powered double pendulum.

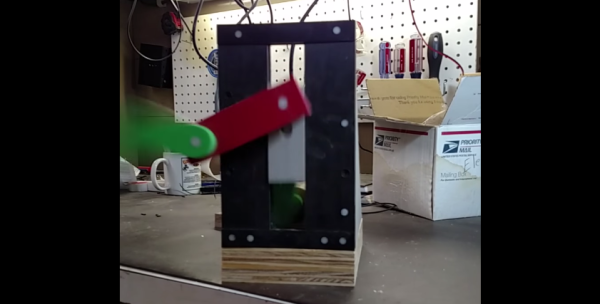
There aren’t many build details here, but the device is simple enough that we can deduce how it works from the demonstration video. It’s broken into two main pieces; the frame and the pendulum. The frame appears to be made mostly from wood. The front plate is made of three layers sandwiched together. A slot is cut out of the middle to allow a rail to slide up and down linearly. The rail is designed in such a way that it fits between the outer layers of the front plate like a track.

The pendulum is attached to the linear rail. The rail moves up and down and puts energy into the pendulum. This causes the pendulum to actually move and generate the chaotic behavior. The rail slides up and down thanks to an electric motor mounted to the base. The mechanics work similar to a piston on a crankshaft. The motor looks as though it is mounted to a wooden bracket that was cut with precision on a laser cutter. The final product works well, though it is a bit noisy. We also wonder if the system would be even more fun to watch if the rotation of the motor had an element of randomness added to it. Or he could always attach a paint sprayer to the end. Continue reading “Powered Double Pendulum Is A Chaotic Display”

Plastic Mallet

Turning Plastic Milk Jugs Into A Useful Tool

[Peter] obviously enjoys getting to work in his wood shop. He also likes turning things into other things. With his latest project, he combines his two hobbies by turning plastic milk jugs into a plastic joiner’s mallet.

[Peter] started out by collecting and “processing” the milk jugs. Milk jugs are commonly made with HDPE. HDPE is a petroleum-based plastic with a high strength-to-density ratio. It’s easy to recycle, which makes it perfect for this type of project. We’ve even seen this stuff recycled into 3D printer filament in the past. The “processing” routine actually just consists of cutting apart the jugs with a razor blade. [Peter] mentions in the past that he’s used a blender to do this with much success, but he’s unfortunately been banned from using the blender.

Next, all of the plastic pieces are piled up on a metal try to placed into a small toaster oven. They are melted into one relatively flat, solid chunk. This process is performed three times. The final step was to pile all three chunks on top of each other and melt them into one massive chunk of plastic.

While waiting for the plastic to melt together, [Peter] got to work on the handle. He put his woodworking skills to good use by carving out a nice wooden handle from a piece of cherry wood.  The handle was carefully shaped and sanded with a variety of tools. It is finished with some linseed oil for a nice professional look.

When the plastic was mostly melted together, [Peter] had to get to work quickly while the plastic was still soft. He pried the plastic off of the metal tray and stuffed it into a rectangular mold he made from some fiber board. He used a heat gun to soften the plastic as needed while he crammed it all into the mold. With the mold suitably stuffed, he closed it up and clamped it all shut.

Once the plastic cooled, [Peter] had to cut it into the correct shape and size. He took the solid chunk of plastic to his band saw to cut all the appropriate angles. He then used both a drill press and a chisel to cut the rectangular mounting hole for the handle. The plastic piece was then shaped into its final form using a belt sander. All that [Peter] had left to do was slide it up and only the handle. The shape of the handle and mounting hole prevent the plastic piece from flying off of the top of the handle. Check out the video below to see the whole process. Continue reading “Turning Plastic Milk Jugs Into A Useful Tool”

Pac Man Clock

Pac-Man Clock Eats Time, Not Pellets

[Bob’s] Pac-Man clock is sure to appeal to the retro geek inside of us all. With a tiny display for the time, it’s clear that this project is more about the art piece than it is about keeping the time. Pac-Man periodically opens and closes his mouth at random intervals. The EL wire adds a nice glowing touch as well.

The project runs off of a Teensy 2.0. It’s a small and inexpensive microcontroller that’s compatible with Arduino. The Teensy uses an external real-time clock module to keep accurate time. It also connects to a seven segment display board via Serial. This kept the wiring simple and made the display easy to mount. The last major component is the servo. It’s just a standard servo, mounted to a customized 3D printed mounting bracket. When the servo rotates in one direction the mouth opens, and visa versa. The frame is also outlined with blue EL wire, giving that classic Pac-Man look a little something extra.

The physical clock itself is made almost entirely from wood. [Bob] is clearly a skilled wood worker as evidenced in the build video below. The Pac-Man and ghosts are all cut on a scroll saw, although [Bob] mentions that he would have 3D printed them if his printer was large enough. Many of the components are hot glued together. The electronics are also hot glued in place. This is often a convenient mounting solution because it’s relatively strong but only semi-permanent.

[Bob] mentions that he can’t have the EL wire and the servo running at the same time. If he tries this, the Teensy ends up “running haywire” after a few minutes. He’s looking for suggestions, so if you have one be sure to leave a comment. Continue reading “Pac-Man Clock Eats Time, Not Pellets”

Beautiful Touch-Sensitive Furniture

lamp

It’s taken over a year, but [tinkering techie] has finally completed his touch sensitive nightstand. At first glance, it looks like any normal piece of furniture. With the addition of an Arduino, some copper clad board, and a few LEDs, he’s turned it into a very elegant, electronic home furnishing.

The nightstand is built out of a few very nice pieces of mahogany. Underneath the top of the nightstand, three Kapton-covered copper clad boards are inset along the front and side edges. These capacitive sensing boards are connected to an Arduino Fio that reads the capacitance of these sensors and turns on a small LED under the drawer or the mains powered lamp.

The electronics are powered by a small USB charger with a battery backup all hidden underneath the top of the nightstand. Inside the drawer, a magnetic reed switch turns on an RGB LED whenever the drawer is opened.

While the nightstand itself is a wonderful piece of woodworking, we need to tip our hat for a remarkably seamless integration of fine furniture and electronics. The electronic furniture modifications we usually see are Ikea cruft, but this wonderful homemade nightstand should last decades or centuries.

Video of [techie] going over his build below

Continue reading “Beautiful Touch-Sensitive Furniture”