Organizational Inspiration From The Discount Tool Company

When in need of any tool to get a job done quickly, or only for a small number of times, it’s great to have a local “discount tool” company locally for some working, yet often low-quality solution to whatever problem might arise. While there are some gems, most of these tools won’t last through heavy, sustained use like their more expensive counterparts will. On the other hand, there are other things to be had at these discount shops, such as inspiration for tackling a storage problem.

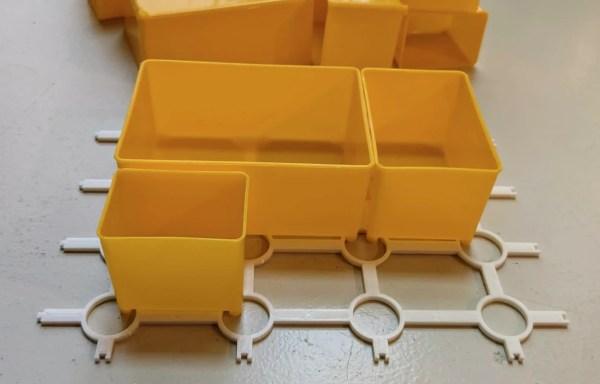
This particular storage system comes from Harbor Freight, and uses a set linked crosshairs, the center of which is hollowed out. A set of movable compartments sits on top with feet that can interlock inside the crosshairs. This allows much more efficient use of space within the toolboxes, but [Alan] wanted it to be useful for more that that. He designed and implemented the Storage Case Base Template (SCBT) which allows for a container of any size to be fitted with a similar crosshair network.

With this non-proprietary system implemented and printed, the original goal of reducing the clutter in [Alan]’s workspace was accomplished. The 3D printing files can be modified easily for any space, and are available both on Thingiverse and Printables. For some other ways of packing a lot into a small space, we featured this tiny workshop a while back that’s packed with storage hacks.

Modular Box Design Eases Silicone Mold-Making

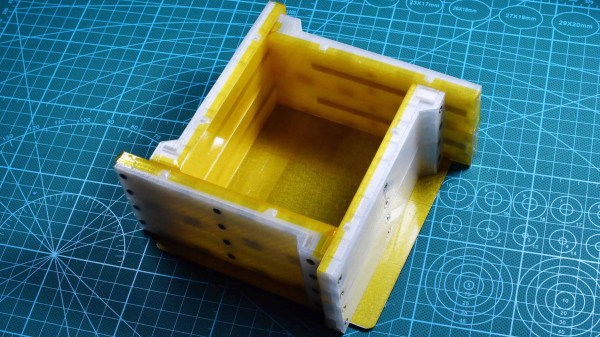
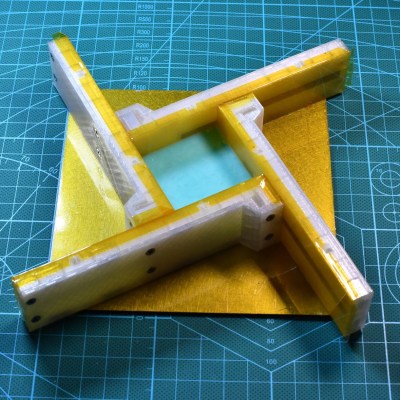
Resin casting is a fantastic way to produce highly detailed parts in a wide variety of colors and properties, and while the process isn’t complicated, it does require a certain amount of care and setup. Most molds are made by putting a part into a custom-made disposable box and pouring silicone over it, but [Foaly] was finding the process of making and re-making those boxes a bit less optimized than it could be. That led to this design for a re-usable, modular, adjustable mold box that makes the workflow for small parts considerably more efficient.

The walls of the adjustable box are four identical 3D-printed parts with captive magnets, and the base of the box is a piece of laser-cut steel sheet upon which the magnetic walls attach. The positioning and polarity of the magnets are such that the box can be assembled in a variety of sizes, and multiple walls can be stacked to make a taller mold. To aid cleanup and help prevent contamination that might interfere with curing, the inner surfaces of each piece are coated in Kapton tape.

The result is a modular box that can be used and re-used, and doesn’t slow down the process of creating and iterating on mold designs. The system as designed is intended for small parts, but [Foaly] feels there is (probably) no reason it can’t be scaled up to some degree. Interested? The design files are available from the project’s GitHub repository, and if you need to brush up a bit on how resin casting works, you can read all about it here.

Where We’re Going, We Don’t Need Keycaps

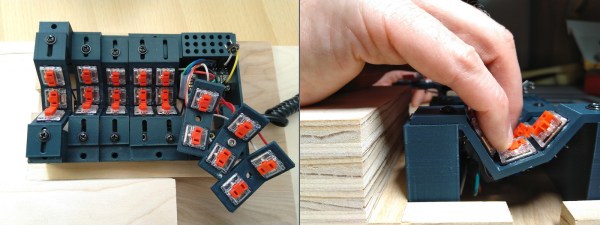
Just when we thought we’d seen the peak of ergonomic, split keyboards, along comes [Peter Lyons] with the Squeezebox — an adjustable, column-staggered, streamlined beauty with 21 keys per hand. Much like the Kinesis Advantage and the Dactyl, the user’s fingers are allowed to dangle comfortably and stay in their naturally curled position, moving as little as possible between keys, rows, and columns. But the Squeezebox goes a few steps farther to reduce finger travel.

For starters, each column of keys is adjustable on the fly in the Y-direction by loosening the screw and sliding it until it’s just right. The columns are also adjustable in the Z-direction, but for now, this requires reprinting a few parts. In case you didn’t notice, the grid is pretty tightly packed, and those low-profile Kailh choc switches are naked to the world, mostly because keycaps wouldn’t fit anyway.

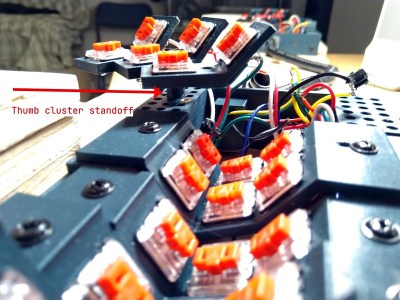
At that angle, there’s no reaching required at all between the middle and bottom rows. The 100° corner that they form both invites and supports chording — that’s pressing multiple keys simultaneously to do some action. There’s no real need to reach for the top row, either, because [Peter] merely moves his finger upward in the Z-direction a little bit to hit those. The similarly-angled thumb clusters are chord-able as well, and their position relative to the mainland is adjustable thanks to a grid of holes that are meant for threaded inserts. Genius!

For the next version, [Peter] plans to bring the three sets of thumb cluster switches closer together, and arrange them like a tri-fold science fair display board. Be sure to check out the super cool but somewhat impossible-to-solder prototypes in the build log, and stay for more stuff in the huge build gallery. Typing demo is after the break.

Still too much travel for your taste? How about a 5-way for each finger?

Continue reading “Where We’re Going, We Don’t Need Keycaps”

Portable Telescope Rolls Anywhere

Since Galileo began observing celestial objects with a telescope, an almost uncountable number of improvements have been made to his designs and methods. Telescopes can now view anything from radio waves to gamma waves, come in a wide range of sizes and shapes, and some are also fairly accessible to hobbyists as well. In fact, several homemade telescopes are specifically designed for ease of use, portability, and minimum cost, like this portable ball telescope. (Google Translate from Italian)

The telescope was designed and built by [andrea console] and features a ball-shaped mount for the mirror which was built from a bowl. Ball designs like this are easier to orient than other telescopes since the ball allows for quick repositioning in any direction, but the main focus of this project was to investigate focal length with various accessories while also being as portable as possible. To that end, the mount for the eyepiece is on a lattice that assembles and disassembles quickly, and the ball and other equipment are easily packed. This makes transportation quick and easy and reduces weight compared to a more traditional, or even Dobsonian, telescope.

This build is impressive not just from having an extremely portable telescope, but also from [andrea console]’s documentation of the optics in his build. It includes some adjustable parts which can increase the magnification and has detailed notes on all of the finer points of its operation. The ball telescope is a popular build, and we’ve recently seen others made out of parts from IKEA as well.

Continue reading “Portable Telescope Rolls Anywhere”

Capstan Winch Central To This All-Band Adjustable Dipole Antenna

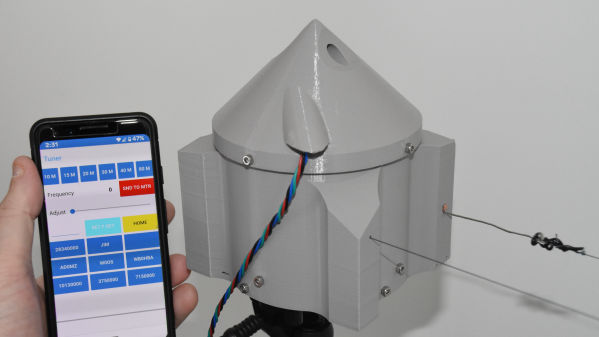
The perfect antenna is the holy grail of amateur radio. But antenna tuning is a game of inches, and since the optimum length of an antenna depends on the frequency it’s used on, the mere act of spinning the dial means that every antenna design is a compromise. Or perhaps not, if you build this infinitely adjustable capstan-winch dipole antenna.

Dipoles are generally built to resonate around the center frequency of one band, and with allocations ranging almost from “DC to daylight”, hams often end up with a forest of dipoles. [AD0MZ]’s adjustable dipole solves that problem, making the antenna usable from the 80-meter band down to 10 meters. To accomplish this feat it uses something familiar to any sailor: a capstan winch.

The feedpoint of the antenna contains a pair of 3D-printed drums, each wound with a loop of tinned 18-gauge antenna wire attached to some Dacron cord. These make up the adjustable-length elements of the antenna, which are strung through pulleys suspended in trees about 40 meters apart. Inside the feedpoint enclosure are brushes from an electric drill to connect the elements to a 1:1 balun and a stepper motor to run the winch. As the wire pays out of one spool, the Dacron cord is taken up by the other; the same thing happens on the other side of the antenna, resulting in a balanced configuration.

We think this is a really clever design that should make many a ham happy across the bands. We even see how this could be adapted to other antenna configurations, like the end-fed halfwave we recently featured in our “$50 Ham” series.

Printed It: Collet Drill Stop

You’d think that being quarantined in your home would be perfect for hackers and makers like us, as we all have a project or two that’s been sitting on the back burner because we didn’t have the time to tackle it. Unfortunately, some are finding that the problem now is actually getting the parts and tools needed to do the job. When there’s a bouncer and a line outside the Home Depot like it’s a nightclub on Saturday night, even the simplest of things can be difficult to source when making in the time of COVID.

Which is exactly the situation I found myself in recently when I needed to drill a bunch of holes to the same depth. The piece was too big to put in the drill press, and while I contemplated just wrapping the bit in some tape to serve as a makeshift stop, I wasn’t convinced it would be accurate or repeatable enough. It occurred to me that a set of drill stop collars would be easy enough to design and 3D print, but before I fired up OpenSCAD, I decided to see what was already available online.

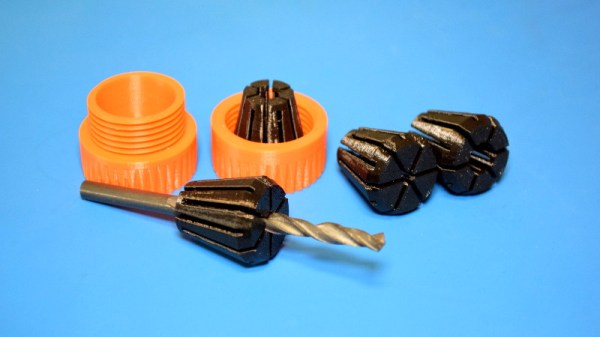
Which is how I found the “Collet Drill Stop” from Adam Harrison. Rather than the traditional ring and setscrew arrangement, his design uses a printable collet that will clamp down on the bit at an arbitrary position without tools. So not only could I avoid a trip to the store by printing this design out, it looked like it would potentially be an upgrade over what I would have bought.

Of course, it’s wise not to take anything for granted when dealing with 3D printing. The only way I could be sure that Adam’s design would work for me was to commit it to plastic and try it out.

Continue reading “Printed It: Collet Drill Stop”

Custom Drill Press Table Eliminates Hassles

Getting a perfect workshop together, with all the right tools, is a dream for many. A lot of us cobble together what we can with a dremel tool, a soldering iron, and whatever work surface happens to be available in the kitchen or spare bedroom. But even when we finally get a permanent garage or shop to work in, there are still some challenges to overcome with our workspaces. [Workshop From Scratch] was having issues with his drill press, and solved them with this custom build.

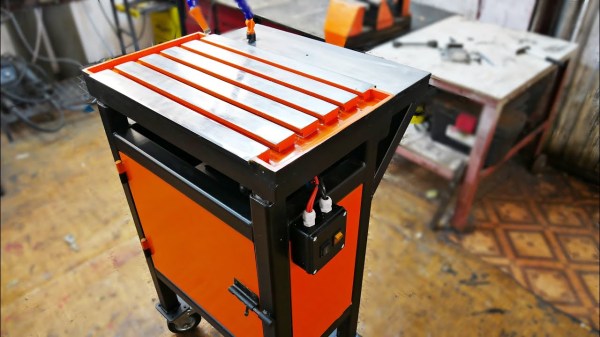
Rather than modify an existing press, he first welded a table together from scratch using square tube. From there he set about solving those issues. The first was having to make a large number of adjustments up and down when working on larger pieces. For that he added an electrically adjustable worktop which keeps him from having to make constant adjustments of the press itself. The second improvement over the standard press workspace was adding a cooling system for the cutting tools, saving himself money in bits and allowing quicker drilling.

The finished product looks professional thanks to a quality paint job and, of course, having all the right tools in the workshop in the first place to put something like this together. We all have an idea in our heads about the perfect workshop for our own needs, but don’t forget to think outside the box when it comes to building one yourself.

Continue reading “Custom Drill Press Table Eliminates Hassles”