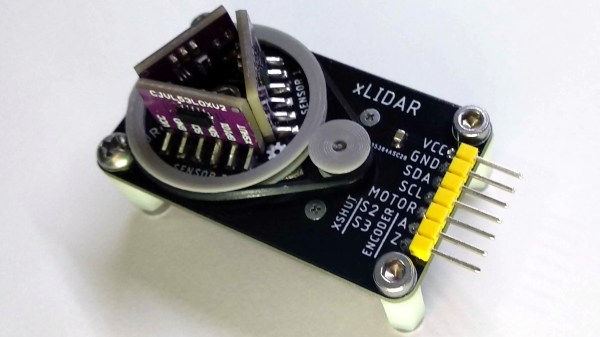
Learn What Did And Didn’t Work In This Prototyping Post-Mortem

[Tommy] is a one-man-shop making electronic musical things, but that’s not what this post is about. This post is about the outstanding prototyping post-mortem he wrote up about his attempt to turn his Four-Step Octaved Sequencer into a viable product. [Tommy] had originally made a hand-soldered one-off whose performance belied its simple innards, and decided to try to turn it into a product. Short version: he says that someday there will be some kind of sequencer product like it available from him, “[B]ut it won’t be this one. This one will go on my shelf as a reminder of how far I’ve come.”

The unit works, looks great, has a simple parts list, and the bill of materials is low in cost. So what’s the problem? What happened is that through prototyping, [Tommy] learned that his design will need many changes before it can be used to create a product, and he wrote up everything he learned during the process. Embedded below is a demo of the prototype that shows off how it works and what it can do, and it helps give context to the lessons [Tommy] shares.

Continue reading “Learn What Did And Didn’t Work In This Prototyping Post-Mortem”

Arbor Press Modded For Applying Specific Force

Arbor presses are simple and effective tools made for a particular task: exerting force in a specific spot. A 1-ton arbor press fits on a desktop and is very affordable, but doesn’t offer a lot of particularly fine control over the ram beyond lowering and raising it. [concreted0g] got to thinking about ways to gain more control and knowledge about the amount of force being applied, and made a simple modification to combine his press with a torque wrench.

He removed the spindle which raises and lowers the ram, and drilled and tapped it to fit a bolt. Now, by attaching a torque wrench to the bolt and using the wrench as the handle for lowering the ram, he can take advantage of the wrench’s ability to break at set amounts of force. As a result, he has a repeatable way to accurately apply specific amounts of force with a tool that usually lacks this ability. It looks like this mod is limited to lower forces only (too much could shear off the bolt head, after all) but it combines two tools in an unusual way to gain an ability that didn’t exist before, which is great to see. Mods and presses seem to go very well together; don’t miss this DIY thermal insert add-on for an arbor press, and 3D printed dies for a press brake turned out to be remarkably durable and versatile, not to mention economical.

The Weedinator Returns

We are delighted to see The Weedinator as an entry for the 2018 Hackaday Prize! Innovations in agriculture are great opportunities to build something to improve our world. [TegwynTwmffat]’s Weedinator is an autonomous, electric platform aimed at small farms to take care of cultivating, tilling, and weeding seedbeds. The cost of this kind of labor can push smaller farms out of sustainability if it has to be done by people.

Greater efficiency in agriculture is traditionally all about multiplying the work a single person can do, and usually takes the form or bigger and heavier equipment that can do more at once and in less time. But with an autonomous robotic platform, the robot doesn’t get tired or bored so it doesn’t matter if the smaller platform needs to make multiple passes to cover a field or accomplish a task. In fact, smaller often means more maneuverable, more manageable, and more energy-efficient when it comes to a small farm.

The Original Weedinator was a contender for the 2017 Hackaday Prize and we’re deeply excited to see it return with an updated design and new people joining their team for 2018. Remember, there’s money set aside to help bootstrap promising concepts and all you really need to get started is an idea, an image, and documentation. There’s no better opportunity to dust off that idea and see if it has legs.

Stecchino Game Is All About Balancing A Big Toothpick

Stecchino demo by the creator

Self-described “Inventor Dad” [pepelepoisson]’s project is called Stecchino (English translation link here) and it’s an Arduino-based physical balancing game that aims to be intuitive to use and play for all ages. Using the Stecchino (‘toothpick’ in Italian) consists of balancing the device on your hand and trying to keep it upright for as long as possible. The LED strip fills up as time passes, and it keeps records of high scores. It was specifically designed to be instantly understood and simple to use by people of all ages, and we think it has succeeded in this brilliantly.

To sense orientation and movement, Stecchino uses an MPU-6050 gyro and accelerometer board. An RGB LED strip gives feedback, and it includes a small li-po cell and charger board for easy recharging via USB. The enclosure is made from a few layers of laser-cut and laser-engraved material that also holds the components in place. The WS2828B WS2812B LED strip used is technically a 5 V unit, but [pepelepoisson] found that feeding them direct from the 3.7 V cell works just fine; it’s not until the cell drops to about three volts that things start to glitch out. All source code and design files are on GitHub.

Games are great, and the wonderful options available to people today allow for all kinds of interesting experimentation like a blind version of tag, or putting new twists on old classics like testing speed instead of strength.

Curved Wood LED Lamp Needs No Fancy Tools

Those of us who aren’t familiar with woodworking might not expect that this curved wood and acrylic LED lamp by [Marija] isn’t the product of fancy carving, just some thoughtful design and assembly work. The base is a few inches of concrete in a plastic bowl, then sanded and given a clear coat. The wood is four layers of beech hardwood cut on an inverted jigsaw with the middle two layers having an extra recess for two LED strips. After the rough-cut layers were glued together, the imperfections were rasped and sanded out. Since the layers of wood give a consistent width to the recess for the LEDs, it was easy to cut a long strip of acrylic that would match. Saw cutting acrylic can be dicey because it can crack or melt, but a table saw with a crosscut blade did the trick. Forming the acrylic to match the curves of the wood was a matter of gentle heating and easing the softened acrylic into place bit by bit.

Giving the clear acrylic a frosted finish was done with a few coats of satin finish clear coat from a spray can, which is a technique we haven’t really seen before. Handy, because it provides a smooth and unbroken coating along the entire length of the acrylic. This worked well and is a clever idea, but [Marija] could still see the LEDs and wires inside the lamp, so she covered them with some white tape. A video of the entire process is embedded below.

Continue reading “Curved Wood LED Lamp Needs No Fancy Tools”

DIY Power Supply And TS100 Outlet Combo Shows Off Great Layout

Here’s a combination of two important electronics workbench tools into a single, cleanly-assembled unit. [uGen] created a DC power supply complete with a plug for the popular TS100 soldering iron, and it looks great! Most of the main components are familiar offerings, like a LM2596 DC to DC buck converter board and a DPS3003 adjustable DC power supply unit (we previously covered a DIY power supply based around the similar DPS5005.) The enclosure is an economical, featureless desktop instrument case whose panels were carefully cut to fit the necessary components. There’s one limitation to the combo: the unit uses a switch to either power an attached TS100 iron, or act as a general DC power supply. It cannot do both at once. So long as one doesn’t mind that limitation, it’s a nice bundle made from very affordable components.

It’s easy for something to look like a hack job, but to look clean and professional involves thoughtful measurement, planning, and assembly. Fortunately, [uGen] has supplied all the drawings and bill of materials for the project so there’s no need to start from scratch. Also, don’t forget that if the capabilities of the DPS power supply units leave you wanting a bit more, there is alternative firmware in the form of OpenDPS; it even offers a remote control feature by adding an ESP8266.

Gamecube Dock For Switch Mods Nintendo With More Nintendo

[Dorison Hugo] let us know about a project he just completed that not only mods Nintendo with more Nintendo, but highlights some of the challenges that come from having to work with and around existing hardware. The project is a Gamecube Dock for the Nintendo Switch, complete with working Gamecube controller ports. It looks like a Gamecube with a big slice out of it, into which the Nintendo Switch docks seamlessly. Not only that, but thanks to an embedded adapter, original Gamecube controllers can plug into the ports and work with the Switch. The original orange LED on the top of the Gamecube even lights up when the Switch is docked. It was made mostly with parts left over from other mods.

The interesting parts of this project are not just the attention to detail in the whole build, but the process [Dorison] used to get everything just right. Integrating existing hardware means accepting design constraints that are out of one’s control, such as the size and shape of circuit boards, length of wires, and often inconvenient locations of plugs and connectors. On top of it all, [Dorison] wanted this mod to be non-destructive and reversible with regards to the Nintendo Switch dock itself.

To accomplish that, the dock was modeled in CAD and 3D printed. The rest of the mods were all done using the 3D printed dock as a stand-in for the real unit. Since the finished unit won’t be painted or post-processed in any way, any scratches on both the expensive dock and the Gamecube case must be avoided. There’s a lot of under-cutting and patient sanding to get the cuts right as a result. The video (embedded below) steps through every part of the process. The final screws holding everything together had to go in at an odd angle, but in the end everything fit.

Continue reading “Gamecube Dock For Switch Mods Nintendo With More Nintendo”