When it comes to portable power, lithium-ion batteries are where it’s at. Unsurprisingly, there’s a lot of work being done to better understand how to maximize battery life and usable capacity.
Red electrolytic solution, which should normally be clear.
While engaged in such work, [Dr. Michael Metzger] and his colleagues at Dalhousie University opened up a number of lithium-ion cells that had been subjected to a variety of temperatures and found something surprising: the electrolytic solution within was a bright red when it was expected to be clear.
It turns out that PET — commonly used as an inert polymer in cell assembly — releases a molecule that leads to self-discharge of the cells when it breaks down, and this molecule was responsible for the color change. The molecule is called a redox shuttle, because it travels back and forth between the cathode and the anode. This is how an electrochemical cell works, but the problem is this happens all the time, even when the battery isn’t connected to anything, causing self-discharge.
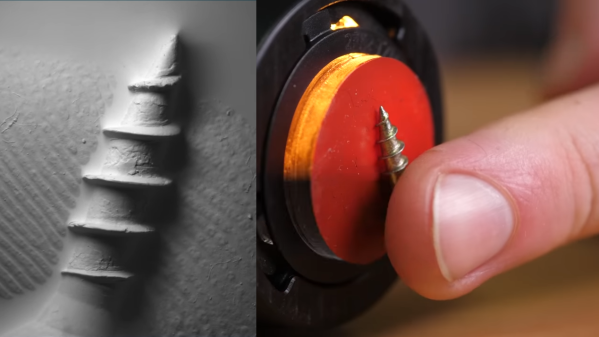
Gel pad removed, exposing lens and multi-directional lighting.
The wand-like device is made by Gelsight, and instead of an optical lens like a normal microscope, it sports a gel pad on the sensing end. By squashing an object into the gel, the device is able to carefully illuminate and image the impression created. By taking multiple images lit from different angles, a lot of information can be extracted.
The result is a high-resolution magnification — albeit a monochromatic one — that conveys depth extremely well. It’s pretty neat clearly seeing tiny specks of dust or lint present on surfaces when [Steve] demonstrates imaging things like coin cells.
Many a hacker knows that the devil is in the details when it comes to executing an idea. Even so, the basic principles of the Gelsight seem simple enough and possibly within the realm of inspired DIY in the same way that we saw a CNC gantry and USB microscope repurposed as an optical comparator.
Watch the Gelsight in action in the video below, embedded below the page break.
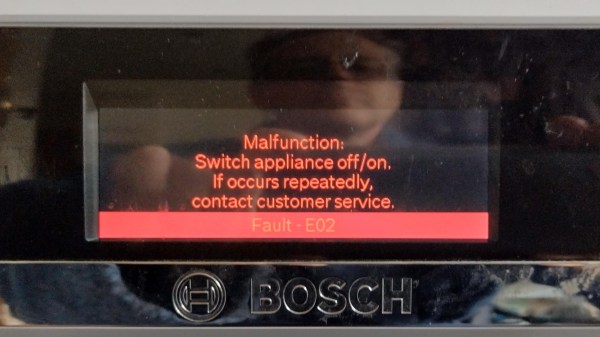
It all started with a vague error code (shown in the image above) on [nophead]’s Bosch SMS88TW01G/01 dishwasher, and it touched off a months-long repair nightmare that even involved a logic analyzer. [nophead] is normally able to handily diagnose and repair electronic appliances, but this time he had no idea what he was in for.
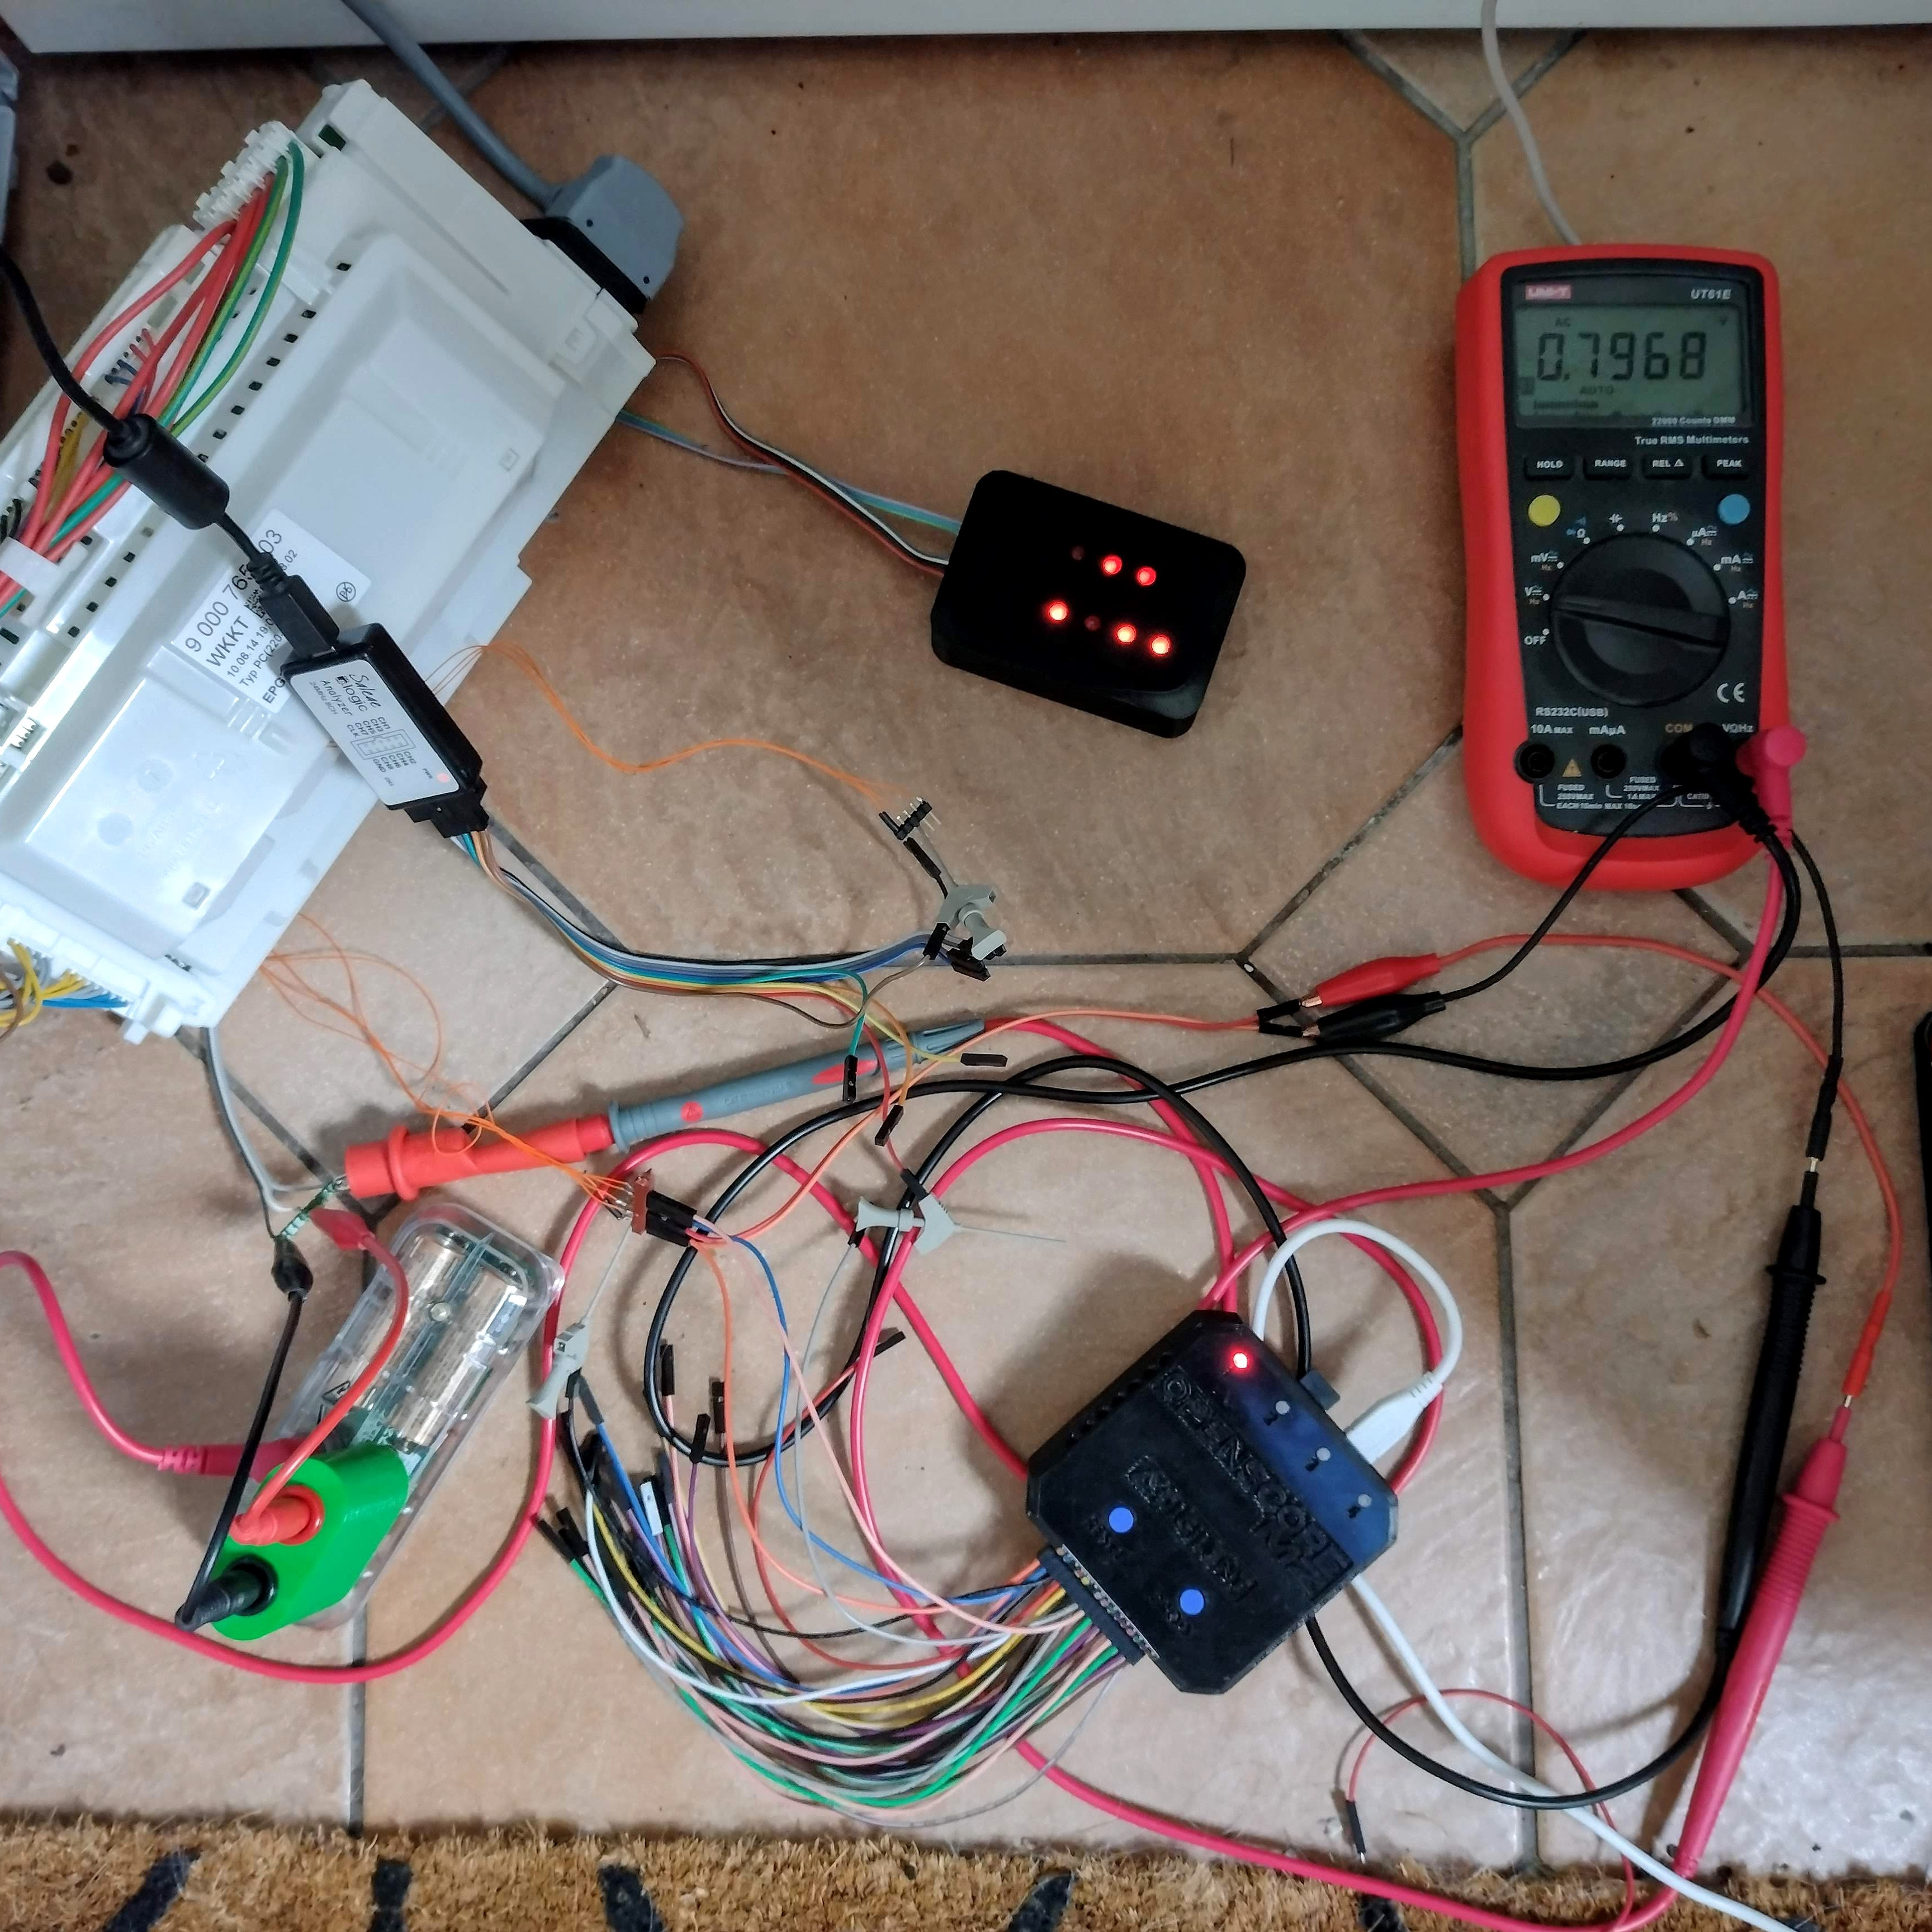
Not many dishwashers require breaking out a logic analyzer and 3D-printed custom adapters, but this one did.
Not only were three separate and unrelated faults at play (one of them misrepresented as a communications error that caused a lot of head-scratching) but to top it all off, the machine is just not very repair-friendly. The Bosch device utilized components which are not easily accessible. In the end [nophead] prevailed, but it truly was a nightmare repair of the highest order. So what went wrong?
One error appears to have been due to a manufacturing problem. While reverse-engineering the electronics in the appliance, [nophead] noticed a surface-mounted transistor that looked crooked. It was loose to the touch and fell into pieces when he attempted to desolder it. This part was responsible for switching an optical sensor, so that was one problem solved.
Another issue was a “communications error”. This actually came down to ground leakage due to a corroded and faulty heater, and to say that it was a pain to access is an understatement. Accessing this part requires the machine to be turned upside down, because the only way to get to it is by removing the base of the dishwasher, which itself requires a bizarre series of awkward and unintuitive steps to remove. Oh, and prior to turning the machine upside down, one has to purge the sump pump, which required a 3D-printed adapter… and the list goes on.
And the E02 error code, the thing that started it all? This was solved early in troubleshooting by changing a resistor value by a tiny amount. [nophead] is perfectly aware that this fix makes no sense, but perhaps it was in fact related to the ground leakage problem caused by the corroded heater. It may return to haunt the future, but in the meantime, the machine seems happy.
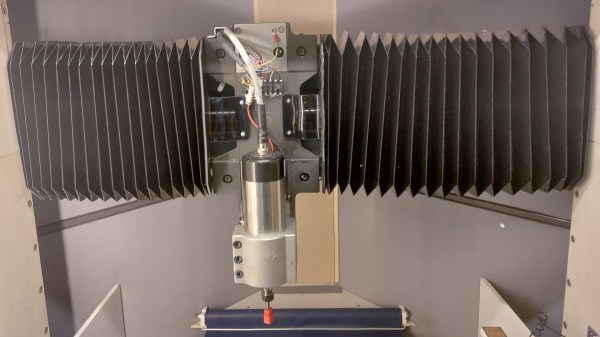
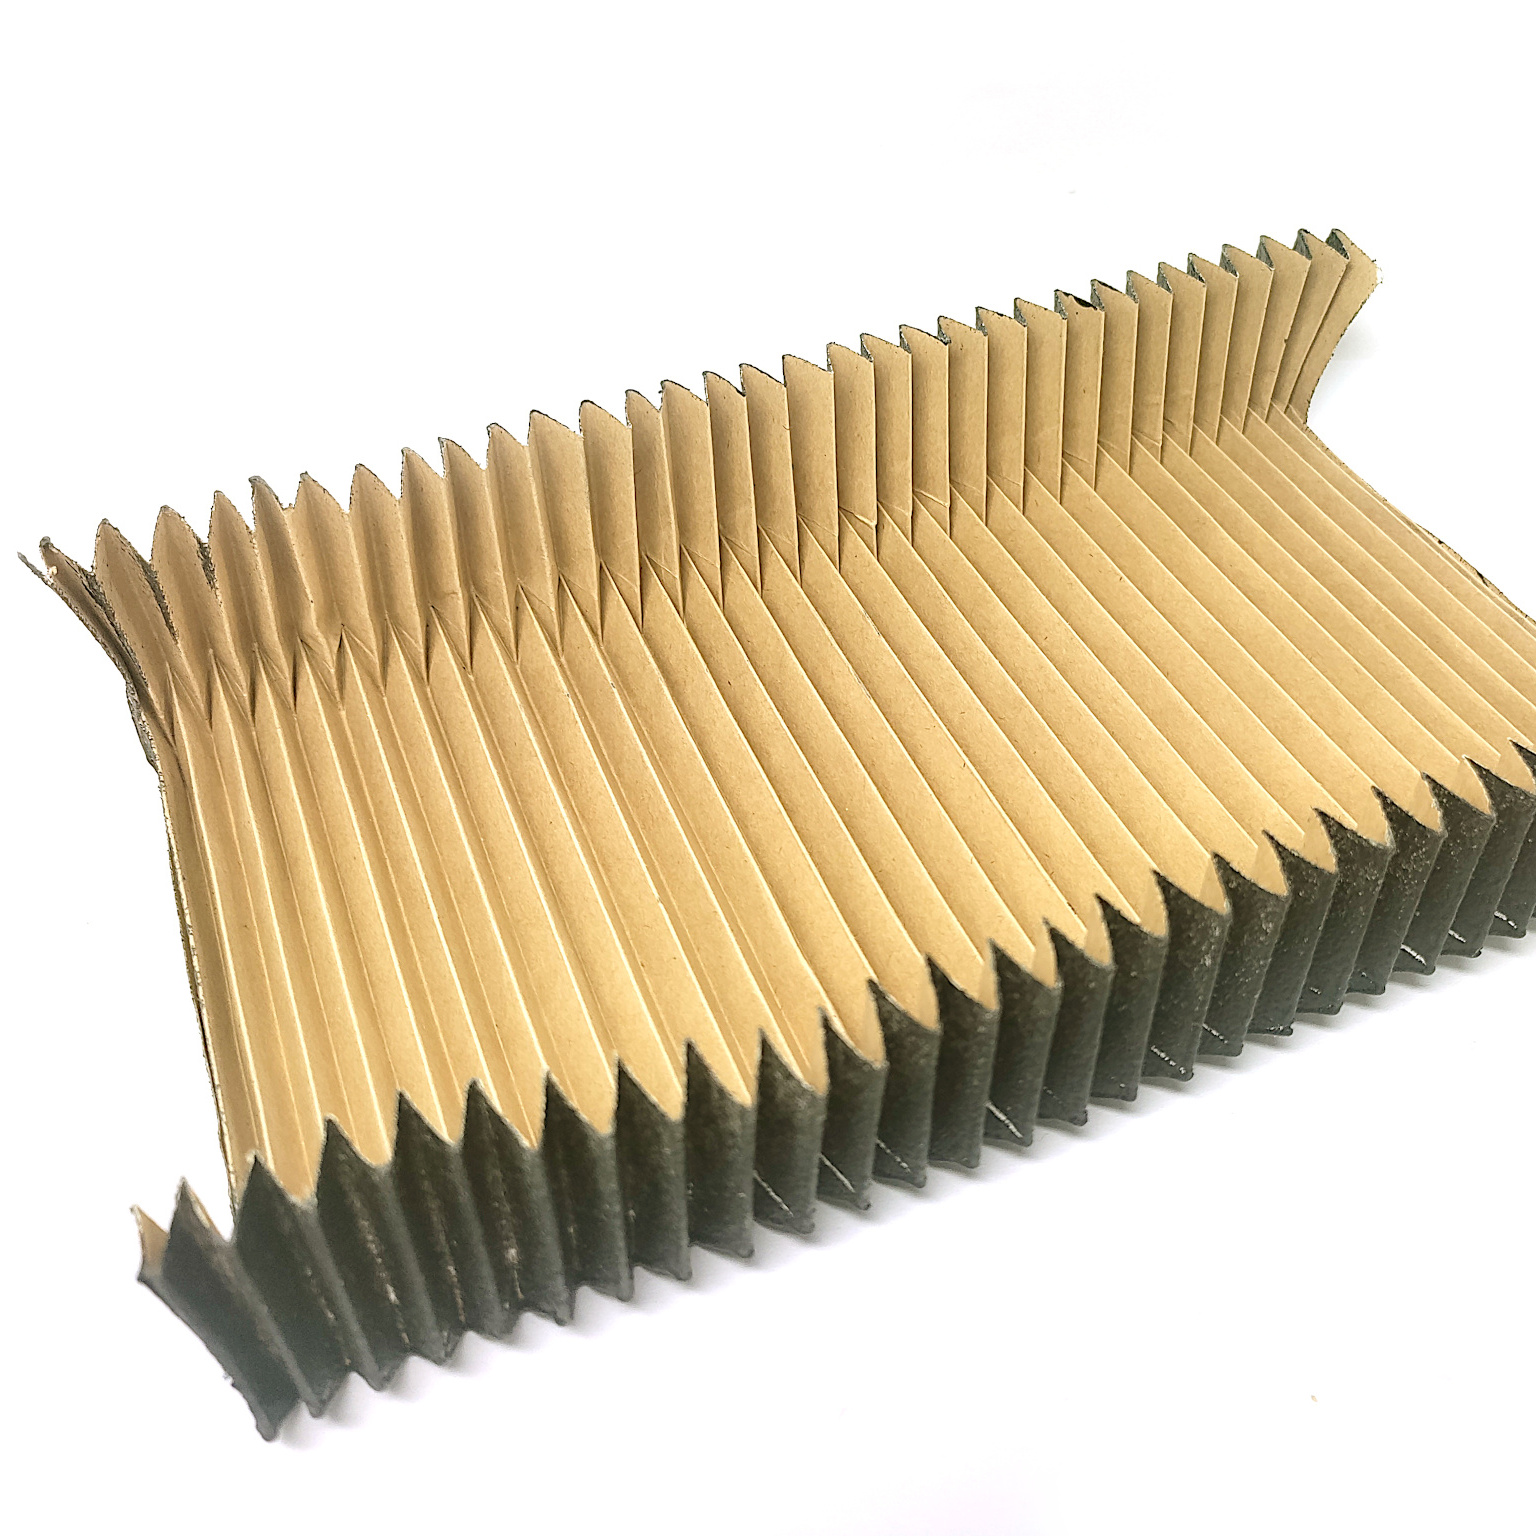
Home shop machinists know dust shields are important for keeping swarf out of expensive linear rails and ball screws. [Petteri Aimonen] demonstrates three inexpensive ways to DIY some bellows-style dust covers. Such things can of course be purchased, but they’re priced at a premium and not always available in the size one needs.
A bellows-style dust cover ideally maximizes extension length while minimizing side wall distortion. It should hold its shape without external support.
The first method is to fold a suitable flat plastic or paper sheet into a bellows pattern. This method is all about the fold pattern, and thankfully, there’s no need to reinvent the wheel. [Petteri] used a fellow enthusiast’s bellows folding pattern generator which is, believe it or not, itself inspired by a remarkably comprehensive US Patent Number 6,054,194.
The downside to this method is the thickness of the bellows when it is fully collapsed. The corners always contain the most material, because it is there that the material is folded upon itself, and this limits how close to the end of travel the CNC carriage can move with the bellows attached.
The second method is to cut a large number of C-shaped sections from fabric and sew them together to make bellows. This method collapses down well and holds its shape well, but the cutting and sewing it requires can be a barrier.
The final method — and the one [Petteri] found most useful — was to hack some IKEA window blinds. IKEA Schottis pleated blinds are inexpensive, with a slick finish on one side and polyester fabric. The polyester is perfect for gluing. By cutting the material at a 45-degree angle into three sections and gluing them into a U-shape, one can create a serviceable bellows-style cover for a minimum of work.
Any of the explored methods can do the job, but [Petteri] has formulas to determine the maximum extensions and folded thicknesses of each method just in case one would like to see for themselves before choosing. And if a bellows-style cover isn’t your cup of tea, check out this method for turning a plastic strip into a spring-like tube that does the same job.
Self-watering planters are low-maintenance, and common DIY projects. What we like most about [Tommy]’s design is that it reuses empty jars to create self-watering planters. After all, jars are fantastic at reliably holding water, so why not put them to work? Incorporating jars as part of the design means fewer worries about leakage, but it also means less 3D printing is needed overall.
A wick (in this case, a piece of string) takes care of moving water from jar to the soil.
[Tommy]’s planter screws onto the threads of a jar’s neck. Getting water to the plant is helped by a small piece of string, which acts as a wick between the soil at the top and the water in the jar at the bottom. This design works best with small plants, but on the plus side there are no moving parts or other complexities. Got a 3D printer? Models for the planter are available here.
The biggest challenge for this design is that not all jar threads are alike, so planters made in this way are not completely interchangeable across all different types of jars. Fortunately, [Tommy] provides the OpenSCAD code he used to generate his design, which he created with the help of an industry guide on how to measure the finish (or threads) of jars and lids.
If you find yourself needing to further customize your own version to fit a particular container’s threads, there’s no need to start from scratch. Unsurprisingly, threads and lids are highly standardized so chances are there exists a calculator, tool, or existing model for exactly what you need.
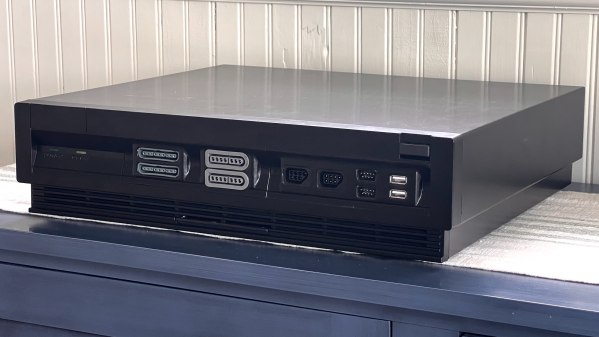
Some careful measuring and a little extra effort can be all that separates what looks like a hack job from a slick end product, and that is apparent in [Eric Sorensen]’s classy retrogaming rig, complete with ports for original console controllers.
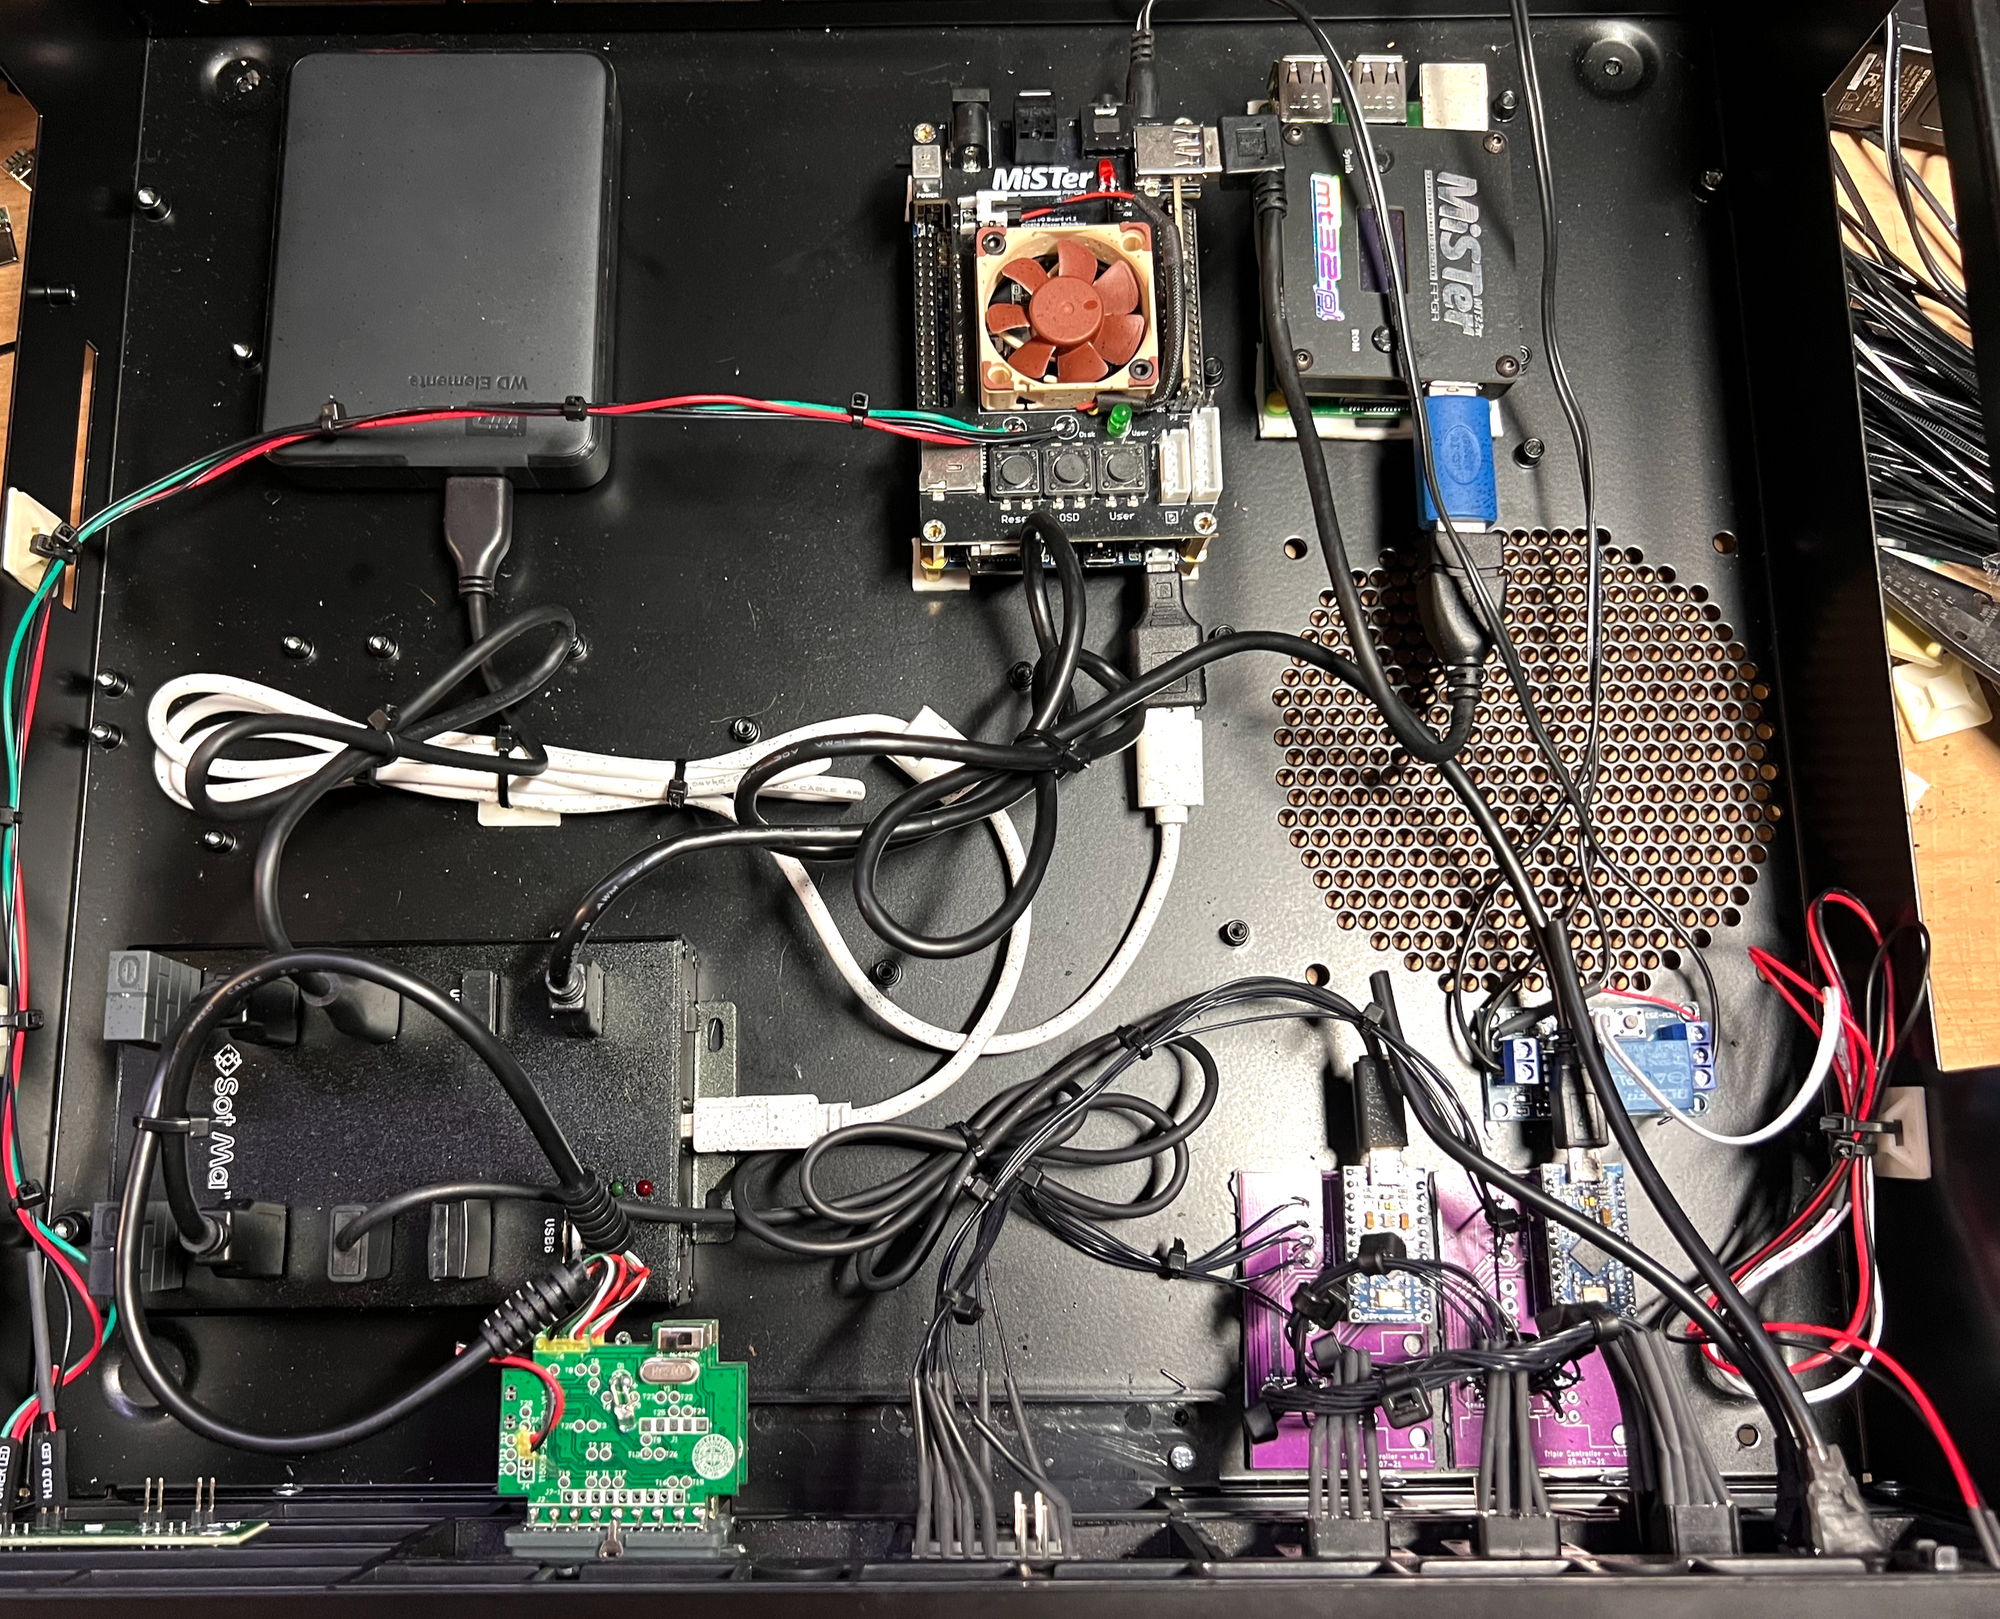
Neatly housing these components in a case makes all the difference.
[Eric] likes his vintage gaming, and was terrifically pleased with MiSTer, an open-source project that recreates various classic computers, game consoles and arcade machines using modern FPGA-based hardware. Of course, what makes retro gaming even better is using a platform’s genuine original controllers, which just takes a little extra hardware and wiring.
But [Eric] found that all the required accessories and peripherals started to look awfully cluttered. He solved this issue by packing everything carefully into a specialty PC case called the Checkmate A1500 Plus, which gives off a strong 80s design vibe. As a bonus, the front panels are all removable and that’s where [Eric] decided to house the custom controller ports.
First [Eric] carefully measured each controller connector to create CAD models, then designed matching front panels to house the connectors and 3D printed them. Once that was done, post-processing the panels was a long process of apply Bondo, sand, paint, and repeat as needed. The results looks fantastic, and this project is a prime example of how aesthetics and finish can matter.
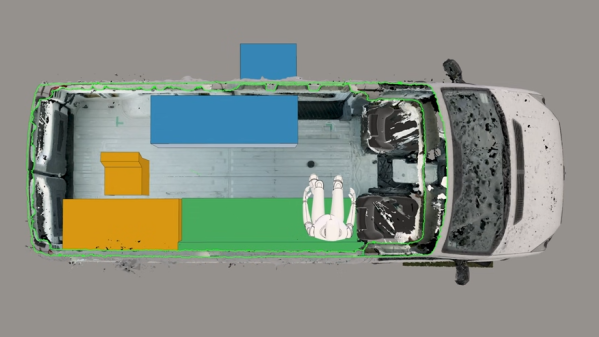
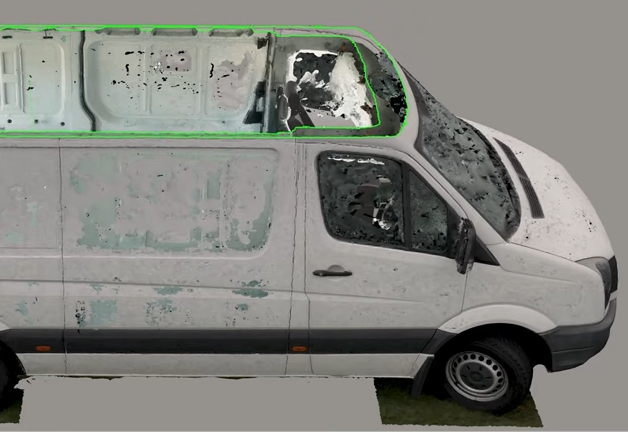
Folks who refurbish and rebuild vans into off-grid campers (especially with the ability to work in them remotely) put a fantastic amount of planning and work into their projects. [Rob] meticulously documented his finished van conversion and while he does a ton of clever work, we especially liked how he shows modern tools like photogrammetry can improve the process.
Photogrammetry helped turn a bunch of photos from different angles into a textured 3D model with accurate dimensions.
[Rob] used a camera and photogrammetry software to 3D scan the van inside and out. The resulting model means that CAD tools can better assist with the layout and design phase. This is an immense help, because as [Rob] points out, an empty van is anything but a hollow box on wheels. Every surface is curved, none of the sides are identical, and there frankly isn’t a right angle to be found anywhere. When every little scrap of space counts, it’s important to have an accurate reference.
Of course, mapping the work are was just the beginning. It took six months, but he turned a Volkswagen Crafter cargo van into a slick off-grid camper capable of remote work. The full series of videos is on his site, but you can also watch the video highlights, embedded below.