Not Your Typical POV Clock

Persistence of vision displays are fun, and a natural for clocks, but they’re getting a little Nixie-ish, aren’t they? There are only so many ways to rotate LEDs and light them up, after all. But here’s something a little different: a POP, or “persistence of phosphorescence” clock.

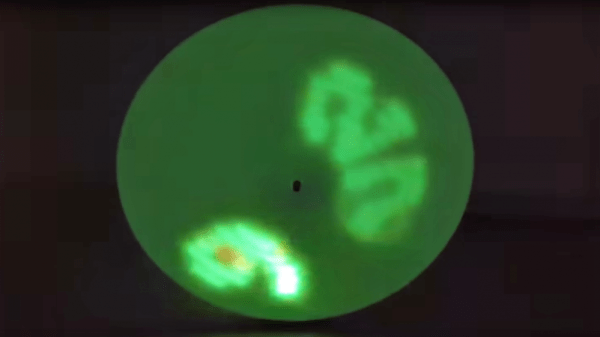
[Chris Mitchell] turned the POV model around for this clock and made the LEDs stationary, built into the tower that holds the slowly rotated display disk. Printed from glow-in-the-dark PLA, the disk gets charged by the strip of UV LEDs as it spins, leaving behind a ghostly dot matrix impression of the time. The disk rotates on a stepper, and the clock runs on a Nano with an RTC. The characters almost completely fade out by the time they get back to the “write head” again, making an interesting visual effect. Check it out in the video after the break.

Our only quibble is the choice to print the disk rather than cut it from sheet stock. Seems like there has to be commercially available phosphorescent plastic, or even the glow-in-the-dark paper used for this faux LED scrolling sign. But if you’ve got glowy PLA, why not use it?

Continue reading “Not Your Typical POV Clock”

Motorized Mini Excavator Rises From Sheets Of Plywood

Fathers of Hackaday, we’ve got bad news — you’ve been out-fathered. Behold the mechanism of your undoing: a working miniature excavator, executed in plywood.

To be fair, the rules of the game have changed lately. Time was when a nipper would ask for the impossible, and we dads would never have to deliver. But with CNC routers, 3D-printing, and industrial-grade CAD software you can use for free, the possibility hurdle is getting ever shorter. Still, when his son put in this request, [Alex Lovegrove] really delivered. Everything on this excavator works, from tracks to boom to bucket. There are hundreds of parts, mostly machined from plywood but with a smattering of 3D-printed gears and brackets. The tracks and slew gear are powered by gear motors, while linear actuators stand in for hydraulic rams on the boom. The videos below show the machine under test and the unbearable cuteness of it being loved.

Hacker parents need not despair, of course. There’s plenty of room left for your imagination to run amok. For inspiration, check out this working railway system, or any of the several backyard roller coasters we’ve featured.

Continue reading “Motorized Mini Excavator Rises From Sheets Of Plywood”

Discrete Pong Project Goes Big, Adds A Player

Some projects just take on a life of their own. What started as a pleasant diversion or a simple challenge becomes an obsession, and the next thing you know you’ve built a two-player color Pong game with audio completely from discrete components.

If this one seems familiar, it’s because we were dazzled by its first incarnation last year. As impressive as version 1.0 was, all the more so since it was built using the Manhattan method and seemingly over the course of a weekend, it did have its limitations. [GK] has been refining his design ever since and keeping accurate track of the process, to the tune of 22 pages on the EEVblog forum. We haven’t pored through it all yet, but the state of the project now is certainly worth a look. The original X-Y output to an oscilloscope was swapped out to composite video for a monitor, in both mono and color. This version also allows two people to play head-to-head instead of just battling the machine. It looks like [GK] had to add a couple of blocks worth of real estate to his Manhattan board to accommodate the changes, and he tidied the wiring significantly while he was at it.

It’s a project that keeps on giving, so feast your eyes and learn. We suspect [GK] doesn’t have any plans to finish this soon, but if he does, we can’t wait to see what’s next.

Thanks to [David Gustafik] for reminding us to check back on this one.

Repairs You Can Print: Fixing A Rat-Attacked Mic Cord

We’ve all been there — a steamy night in the rainforest of Papua New Guinea, sweaty slumber disturbed by the unmistakable sounds of gnawing. In the morning we discover that a rodent of unusual tastes has chewed the microphone cable of our transceiver right half in two, leaving us out of touch with base camp. If we had a nickel for every time that’s happened.

It may sound improbable, but that’s the backstory behind [Marius Taciuc]’s 3D-printed mic cord repair. Even with more mundane failure modes, the retractile cords on microphones are notoriously difficult to fix. Pretty much any of the usual suspects, like heat-shrink tubing or electrical tape, are going to do very little to restore the mechanical stability lost once that tough outer jacket is breached. [Marius]’s solution was to print as small an enclosure as possible to mechanically support the splice. The fit is tight, but there was just enough room to solder the wires and stuff everything back in place. Cable ties provide strain relief where the cord exits the splice, and a liberal squirt of hot glue pots the joint. It’s not perfect — we’ll bet the splice acts as a catch point and gets a little annoying after a while — but if it gets you back on the air fast and cheap, it probably makes sense.

[Marius] entered this rat-race beating hack into the Repairs You Can Print contest. Do you have an epic repair that was made possible by a 3D printer? Let the world know about it and you might just win a prize.

Continue reading “Repairs You Can Print: Fixing A Rat-Attacked Mic Cord”

Benchtop Fume Extractor Cuts The Cord, Clears The Air

What good is safety gear that isn’t used because it’s annoying and gets in the way of getting the job at hand completed? None, really, and the solder fume extractor is one item that never seems to live in harmony with your workspace. They’re often noisy, they obstruct your vision, and a power cord draped across your bench is a sure way to ruin your soldering zen.

To fix those problems, [Nate] has built a nice battery powered solder fume extractor that’s so low profile and so quiet, you won’t mind sharing a bench with it. Based on a standard 80-mm case fan, the extractor has a built-in 18650 battery for power and a USB charging port. There are nice little features, like a speed control and a low-battery indicator. The fan mounts to a pair of custom PCBs, which form the feet for the fan. [Nate] claims to have run the fan for 12 hours straight on battery before needing a charge, and that it’s so quiet he needs to add a power indicator to the next version. Also making an appearance in rev 2 will be a carbon filter to catch the fumes, but as [Nate] notes, better to spread them around for now than let them go directly up his nose.

Are you in the hacking arts for the long haul? Let’s hope so. If you are, make sure you’re up on the basics of mitigating inhalation hazards.

Careful Testing Reveals USB Cable Duds

What’s worse than powering up your latest build for the first time only to have absolutely nothing happen? OK, maybe it’s not as bad as releasing the Magic Smoke, but it’s still pretty bewildering to have none of your blinky lights blink like they’re supposed to.

What you do at that point is largely a matter of your troubleshooting style, and when [Scott M. Baker]’s Raspberry Pi jukebox build failed to chooch, he returned to first principles and checked the power cable. That turned out to be the culprit, but instead of giving up there, he did a thorough series of load tests on multiple USB cables to see which ones were suspect, with interesting results.

[Scott] originally used a cable with a USB-A on one end and a 3.5-mm barrel plug on the other with a switch in between, under the assumption that the plug on the Pi end would be more robust, as well as to have a power switch for the jukebox. Testing that cable using an adjustable DC load would prove that the cable was unfit for Pi duty, dropping the voltage to under 2 volts at a measly 500-mA load. Other cables proved much better under load, even those with USB mini jacks and even one with a 5.5-mm barrel. But the larger barrel-plug cable also proved to be a stinker when it was paired with an inline switch. In the video below, [Scott] walks through not only the testing process, but also gives a quick tour of his homebrew DC load.

The lesson is clear: not all USB cables are created equal, so caveat hacker. And if you’ve got a yen to check the cables in your junk bin like [Scott] did, this full-featured smart DC load might be just the thing.

Continue reading “Careful Testing Reveals USB Cable Duds”

Start Your Apollo Collection With An Open Source DSKY

Given that there have been only six manned moon landings, and that almost all of the hardware that started on the launch pad was discarded along the way, getting your hands on flown hardware is not generally the business of mere mortals. Such artifacts are mostly in museums or in the hands of very rich private collectors. Enthusiasts have to settle for replicas like this open source Apollo Guidance Computer DSKY.

The DSKY, or Display and Keyboard, was the user interface for the Apollo Guidance Computer, that marvel of 1960s computer engineering that was purpose-built to control the guidance and navigation of the Command and Lunar Excursion modules. [ST-Geotronics] has made a decent replica of the DSKY using 3D-printed parts for the housing and bezel. There’s a custom PCB inside that houses a matrix of Neopixels for the indicator light panel and seven-segment LEDs for the numeric displays. Sadly but understandably, the original electroluminescent display could not be reproduced, but luckily [Fran Blanche] is working on just that project these days. The three-segment displays for the plus and minus signs in the numeric displays proved impossible to source commercially, so the team had to roll their own for that authentic look. With laser cut and engraved overlays for the displays and keycaps, the look is very realistic, and the software even implements a few AGC-like functions.

We like this a lot, although we could do without the sound clips, inspirational though Kennedy’s speech was. Everything is open source so you can roll your own, or you can buy parts or even a complete kit too.

Continue reading “Start Your Apollo Collection With An Open Source DSKY”