3D Print Your E-Drum Pads

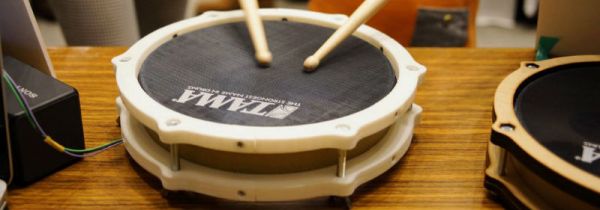
The concept behind DIY electronic drum kits is fairly simple — small piezoelectric elements are used to generate a voltage when the drumpads are struck. That’s easy enough, but the mechanical design can be a difficult problem to approach. To solve that, [ryo.kosaka.10] decided to design an E-drum pad made with paper & 3D printed parts.

As far as E-drum triggers go, it follows the basic rules — a piezo element used as a trigger with some foam used for damping. For the striking surface, a Tama-brand mesh drum head is used. Being an off-the-shelf drum head, it has a good feel and playability. But the shell is where the creativity really shines through. While the top and bottom parts are 3D printed in the usual way, the main shell of the drum is made with several layers of thick paper laminated together with glue. This creates a surprisingly strong, sturdy shell and is also much faster and less wasteful than waiting for a similar part to 3D print.

To round out the guide, instructions are given on how to wire the piezo triggers up for either a regular E-drum sound module or an Arduino. It’s a nice touch, as those inexperienced with E-drums may not be entirely familiar with how they work – this way, anyone can give the project a try.

Keen for something bigger? Back in 2014 we saw this awesome 5-piece e-drum kit built out of buckets.

Garage Door Opener Logs To Google Drive

A garage door opener is a pretty classic hack around these parts. IR, Bluetooth, WiFi, smartphone controlled, web interfaces — we’ve seen it all.  But if you want to keep track of people going in and out, you need some way of logging what’s happening. You could go ahead and roll up your own SQL based solution, tied into a custom web page. But there’s an easier way; you can build a garage door opener that logs events to Google Drive.

[WhiskeyTangoHotel] was looking for an ESP8266 project, and a garage door opener seemed just the ticket. It’s simple enough to code up, and control over WiFi comes in handy. Interfacing with the garage door was simple enough — the existing opener uses a simple push button, which is easily controlled by wiring up a relay to do the job. Logging is as simple as having the ESP8266 send requests to IFTTT which is set up to make posts to a Google Sheet with status updates.

The project is fairly basic, but there’s room for expansion. By using separate Maker Channel triggers on IFTTT, different users of the garage door could be tracked. It would also be easy to add some limit switches or other sensors to detect the door’s position, so it can be determined whether the door was opened or closed.

There’s always another take on the garage door opener — check out this hack that opens the garage door in response to flashing headlights.

Fixing Bugs In A 37 Year Old Apple II Game

Emulators are a great way to reminisce about games and software from yesteryear. [Jorj Bauer] found himself doing just that back in 2002, when they decided to boot up Three Mile Island for the Apple II. It played well enough, but for some reason, crashed instantly if you happened to press the ‘7’ key. This was a problem — the game takes hours to play, and ‘7’ is the key for saving and restoring your progress. In 2002, [Jorj] was content to put up with this. But finally, enough was enough – [Jorj] set out to fix the bug in Three Mile Island once and for all.

The project is written up in three parts — the history of how [Jorj] came to play Three Mile Island and learn about Apple IIs in the first place, the problem with the game, and finally the approach to finding a solution. After first discovering the problem, [Jorj] searched online to see if it was just a bad disk image causing the problem. But every copy they found was the same. There was nothing left for it to be but problem in the binary.

Continue reading “Fixing Bugs In A 37 Year Old Apple II Game”

C64 Keyboard Emulation Over Serial

There’s a lot of reasons you might want to emulate the keyboard on your Commodore 64. The ravages of time and dust may have put the original keyboard out of order, or perhaps you need to type in a long program and don’t fancy pecking away with the less-than-stellar feedback of the standard keys. [podstawek] has come up with the solution: a Commodore 64 keyboard emulator that works over serial.

It’s a simple concept, but one that works well. A Python script accepts incoming keypresses or pre-typed text, then converts them into a 6-bit binary code, which is sent to an Arduino over the serial connection. The Arduino uses the 6-bit code as addresses for an MT8808 crosspoint switch.

MT8808 Functional Diagram from Datasheet

The MT8808 is essentially an 8×8 matrix of controllable switches, which acts as the perfect tool to interface with the C64’s 8×8 keyboard matrix. Hardware wise, this behaves as if someone were actually pressing the keys on the real keyboard. It’s just replacing the original key switches with an electronic version controlled by the Arduino.

[podstawek] already has the setup working on Mac, and it should work on Linux and Windows too. There’s a little more to do yet – modifying the script to allow complex macros and to enable keys to be held – so check out the Github if you want to poke around in the source. Overall it’s a tidy, useful hack to replace the stock keyboard.

The C64 remains a popular platform for hacking — it’s even had a Twitter client since 2009.

TruffleHog Sniffs Github For Secret Keys

Secret keys are quite literally the key to security in software development. If a malicious actor gains access to the keys securing your data, you’re toast. The problem is, to use keys, you’ve got to write them down somewhere – oftentimes in the source code itself. TruffleHog has come along to sniff out those secret keys in your Github repository.

It’s an ingenious trick — a Python script goes through the commit history of a repository, looking at every string of text greater than 20 characters, and analyzing its Shannon entropy. This is a mathematical way of determining if it looks like a relatively random string of numbers and letters. If it has high entropy, it’s probably a key of some sort.

Sharing source code is always a double-edged sword for security. Any flaws are out for all to see, and there are both those who will exploit the flaws and those who will help fix them. It’s a matter of opinion if the benefits outweigh the gains, but it’s hard to argue with the labor benefits of getting more eyes on the code to hunt for bugs. It’s our guess though, that a lot of readers have accidentally committed secret keys in a git repository and had to revert before pushing. This tool can crawl any publicly posted git repo, but might be just as useful in security audits of your own codebase to ensure accidentally viewable keys are invalidated and replaced.

For a real world example of stolen secret keys, read up on this HDMI breakout that sniffs HDCP keys.

Portal Ported To The Apple II

[deater] readily admits they’re a little behind on what’s new in gaming – only having just gotten around to Valve’s 2007 release of Portal. It’s a popular game, but [deater] didn’t want anyone to miss out on the fun – so set about porting Portal to the Apple II.

The port uses the “hires” mode of the Apple II for the flashy graphics that were state of the art around 1980 or so. It’s not a copy of the full game – only the first and last levels, combined with Jonathan Coulton’s now-classic ending theme, Still Alive. As is to be expected, it’s not a wild, fast paced gaming experience, but a cool use of BASIC to put together a fun tribute to a popular franchise.

It’s a little different to the original – portals can be placed anywhere, for example – but it rings true to the original. Source code and a disk image is provided, so you can try it for yourself – even in this online emulator.

We’re looking forward to the sequel so we can use the post title “Portal 2 Ported To The Apple II, Too”, but until then, check out [deater]’s Apple II web server, also in Applesoft BASIC. Video after the break.

Continue reading “Portal Ported To The Apple II”

How To Add More Games To The NES Classic

The hype around the NES Classic in 2016 was huge, and as expected, units are already selling for excessively high prices on eBay. The console shipped with 30 games pre-installed, primarily first-party releases from Nintendo. But worry not — there’s now a way to add more games to your NES Classic!

Like many a good hack, this one spawned from a forum community. [madmonkey] posted on GBX.ru about their attempts to load extra games into the console. The first step is using the FEL subroutine of the Allwinner SOC’s boot ROM to dump the unit’s flash memory. From there, it’s a matter of using custom tools to inject extra game ROMs before reburning the modified image to the console. The original tool used, named hakchi, requires a Super Mario savegame placed into a particular slot to work properly, though new versions have already surfaced eliminating this requirement.

While this is only a software modification, it does come with several risks. In addition to bricking your console, virus scanners are reporting the tools as potentially dangerous. There is confusion in the community as to whether these are false positives or not. As with anything you find lurking on a forum, your mileage may vary. But if you just have to beat Battletoads for the umpteenth time, load up a VM for the install process and have at it. This Reddit thread (an expansion from the original pastebin instructions) acts as a good starting point for the brave.

Only months after release, the NES Classic is already a fertile breeding ground for hacks — last year we reported on this controller mod and how to install Linux. Video of this ROM injection hack after the break.

Continue reading “How To Add More Games To The NES Classic”