A series of five cymbals sitting on white and black speckled carpet in front of a green loveseat. Each cymbal is assembled from four printed sections. Their colors from left to right are yellow and grey, red and black, black, teal and black, and white and black. A sixth, grey and black cymbal is sitting in the middle of the loveseat cushion.

Challenging The Limits Of 3D Printing With Cymbals

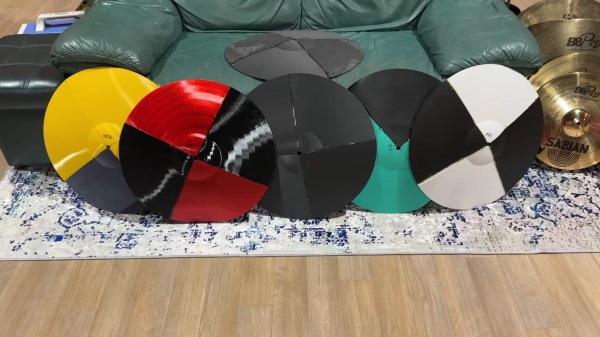
We’re big believers in 3D printing here at Hackaday, but it’s important to recognize that there are plenty of applications where additive manufacturing (at least, from a desktop machine) just isn’t suitable. But that doesn’t mean we don’t want to see what happens if you try. For example, [The Drum Thing] wanted to test the limits of 3D printing by printing a set of cymbals.

[The Drum Thing] had a friend design a cymbal in CAD and then the printed quarters were glued together. In the name of science, they produced them in six different materials to compare performance. Each cymbal was played for a short period or until it failed, including some very interesting slow motion camera work showing the vibrations traveling through the cymbals.

As one might expect, bashing “wafer thin” pieces of printed plastic with a wooden drumstick didn’t work out well for most of the cymbals, although the TPU, carbon fiber, and nylon cymbals were did largely survive their time in the limelight. The other cymbals all failed, either shattering, cracking, or failing at the glue joints. Based on the video, it seems the same glue was used for all of the cymbals, so making sure to have a better match between material and adhesive could help with the glue failures.

Maybe future testing can involve playing these cymbals with a quadrotor?

Continue reading “Challenging The Limits Of 3D Printing With Cymbals”

A person holds a bundle of white, black, and blue wires. The left hand side of the wires are wrapped with black tape. The wires are inside a wire wrapping machine with a grey plastic "C" which rotates inside seven small pulleys. A large pulley in the background drives three of the pulleys to rotate the "C" around and wrap the wires with tape from the spool attached to the "C."

DIY Tool Makes Wrapping Wiring Harnesses A Breeze

If you’re making a lot of wiring harnesses, wrapping them can become a bit of a drag. [Well Done Tips] wanted to make this process easier and built a wiring harness wrapping machine.

The “C” shape of this wrapping machine means that you can wrap wires that are still attached at one or both ends, as you don’t have to pull the wires all the way through the machine. The plastic “C” rotates inside a series of pulleys with three of them driven by a belt attached to an electric motor. A foot pedal actuates the motor and speed is controlled by a rotary dial on the motor controller board.

Since this is battery powered, you could wrap wires virtually anywhere without needing to be near a wall outlet. This little machine seems like it would be really great if you need to wrap a ton of wire and shouldn’t be too complicated to build. Those are some of our favorite hacks.

If you’re wanting more wire harness fun, try this simple online wiring harness tool or see how the automotive industry handles harnesses.

Continue reading “DIY Tool Makes Wrapping Wiring Harnesses A Breeze”

A dark grey couch with a white pegboard on a drawer slide protruding from its arm. The pegboard has a magazine holder, pen holder, and several other miscellaneous bins holding odds and ends on it.

Sofa Armrest Is A Nifty Storage Spot

If you’re like us, you’re always in need of a little more space to store things. [Javier Guerrero] realized his sofa wasn’t living up to its full storage potential and designed this sofa armrest storage.

[Guerrero]’s sofa arms were hiding 80 liters of space, so he really wanted to do something with it. After disassembling them, he found his original plan of just cutting them up wouldn’t work due to the minimal structure inside. Not to be discouraged, he drew up some plans and built replicas from 15 mm plywood.

For one armrest, he made a single giant box that opens from the top where he can store a couple of folding chairs. On the other side, he made a shorter top-opening bin for charging phones and storing the remote. Underneath that is a large pull out drawer with a pegboard for organizational bliss.

The arms were upholstered using the fabric from the original arms plus a little extra from another slip cover. Separate arm modules and easily obtainable matching fabric aren’t a given for every couch, but we expect that almost any sofa with arms could benefit from this hack given a little ingenuity.

If you’re looking for more storage hacks, checkout this Modular Storage from Old Filament Spools, the Last Component Storage System You’d Ever Need, or the ever popular Gridfinity.

Two pairs of steel parallel pliers sit on a rough wooden benchtop. The pair on the left is open and the pair on the right is closed, demonstrating the parallel nature of the pliers' jaws over their entire range of motion. There are three brass pins flush with the steel surface of the handles and you can just barely make out the brass and copper filler material between the steel outer surfaces of the handles.

Producing A Pair Of Parallel Pliers

A regular pair of pliers is fine most of the time, but for delicate work with squarish objects you can’t go wrong with a pair of parallel pliers. [Neil Paskin] decided to make his own pair from scratch. (YouTube)

The jaws were machined down from round stock in [Paskin]’s mill before heat treating and tempering. The steel portions of the handles were cut from 16 gauge plate steel and half of them were stamped on a fly press to make the bridging section around the pivot bolt. The filler for the handles is copper on one side and brass on the other as [Paskin] didn’t have enough brass of the correct size to do both.

The steel and filler were joined with epoxy and copper pins before beveling the edges and sanding to give a comfortable contour to the handles. The bolts for the pliers started as ordinary hex bolts before being machined down on the lathe to a more aesthetically-pleasing shape and size. The final touches included electrolytically etching a logo into the bridge and then spraying down the pliers with a combination lubricant and corrosion preventative spray. This is surely a pair of pliers worth handing down through the generations.

For more mesmerizing machining, checkout this pocket safe or this tiny adjustable wrench.

Continue reading “Producing A Pair Of Parallel Pliers”

Two people lounge over a wooden tabletop to lean on a large black laptop. It has a green leaf on its 43" LCD desktop and RGB lighting around its edge is glowing a slightly deeper shade of green.

Supersized Laptop Laughs In The Face Of Portability

Sometimes a project needs to go big, and [Evan and Katelyn] threw portability to the wind to build the “world’s biggest” laptop.

Stretching the believability of “bigger is better,” this laptop features a 43″ screen, an enormous un-ergonomic keyboard, and a trackpad that might be bigger than your hand. Not to be outdone by other gaming laptops, it also features RGB lighting and a logo that really pops with neon resin.

The pair started the build with an aluminum extrusion frame joined by hinges. Plywood forms the top lid and bottom of the device, and the interior was covered with a mix of vinyl and ABS to keep everything tidy. A nice detail is the windows cut in the area above the keyboard to keep an eye on the charge of the two battery packs powering the laptop. Weighing more than 100 pounds, we suspect that this won’t be the next revolution in computing.

If you need more supersized gadgets, maybe try out the world’s biggest working keyboard or this giant Xbox Series X?

OpenStructures Is A Modular Building System For The RepRap Age

Modular construction toys like LEGO and Meccano are great for prototyping, but they aren’t so great for large builds. OpenStructures promises to be a modular building system for projects large and small.

A series of images showing the disassembly of a short, red cabinet and its reassembly as a tall, white cabinet. The shelves are reused between both objects since they both are part of the OS Grid.

Originally conceived in 2007 by [Thomas Lommée], OpenStructures is a modern, more robust reinterpretation of Grid Beam, which was itself a reinterpretation of the earlier Living Structures. By using a common standard (PDF), parts can be reused project after project as they would with LEGO, meaning you can spend more time building and less time cutting or figuring out joints. OpenStructures parts need connection points, part diameters, or part dimensions at multiples of 20 mm to be compatible. To fulfill the spirit of the project, parts should be designed for disassembly, use recyclable materials when possible, and be Open Source.

The system seems like a great starting point for prototyping furniture or other large builds more quickly than building everything on a case-by-case basis. By including diameters for round objects as well as square and rectangular profiles, OpenStructures is a more flexible (and aesthetically pleasing?) option than Grid Beam.

A couple more options for furniture-scale modular construction are these big LEGO bricks or copper pipe.

(via Low Tech Magazine)

A man with dark skin in a red shirt and khaki shorts sits in a chair. His left leg has a prosthetic below the knee. The upper half of the prosthethic is an off white plastic socket with flecks of different off white plastic throughout hinting at the recycled nature of the plastic. The lower half is a metal tube attached to an artificial foot in black sandals.

Precious Plastic Prosthetics

Plastic waste is a major problem, but what if you could turn the world’s trash into treasure? [Yayasan Kaki Kita Sukasada (YKKS)] in Indonesia is doing this by using recycled plastic to make prosthetic legs.

Polypropylene source material is shredded and formed into a sheet which is molded into the required shape for the socket. A layer of cloth and foam is used to cushion the interface between the patient and the socket itself. Using waste plastic to make parts for the prosthetics lowers the price for patients as well as helps to keep this material out of the landfill.

What makes this project really exciting is that [YKKS] employs disabled people who develop the prosthetics and also trains patients on how to maintain and repair their prosthetics with easily sourced tools and materials. With some medical device companies abandoning their devices, this is certainly a welcome difference.

We’ve previously covered the Precious Plastic machines used to make the plastic sheets and the organization’s developments at small scale injection molding.

Continue reading “Precious Plastic Prosthetics”