Sous Vide Brewing

Brewing Beer With A Sous Vide Cooker

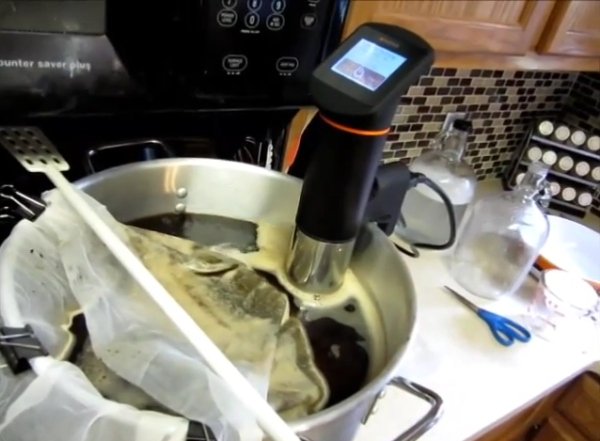
[Ken] found an interesting use for his sous vide cooker. He’s been using it to help him with his home brewing. It’s unlikely that the manufacturer ever intended it to be used in this manner, but as hackers we don’t really care about warranties.

Beer brewing is as much of an art as it is a science. There are a lot of variables that go into the process, and tweaking any one of them can result in your beer tasting different. There is one process during brewing that is called mashing. Mashing is when you soak malted grains in hot water to pull out the sugar. The amount of sugar that gets extracted is very dependent on how long the grains are soaked, and the temperature of the water. If you want your beer to taste a certain way, then you want to ensure that the water stays at constant, repeatable temperature.

As a home brewer, [Ken] has been using his stove top to heat the water. This gets the water warm, but in order to keep the temperature consistent, he has to constantly monitor the temperature and adjust the knob accordingly. Who wants to sit around and do that all day? He needed something to control the temperature automatically. Enter the sous vide cooker.

Sous vide is a method of cooking in which food is placed into an airtight bag and then submerged in a water bath with very strict temperature control. The process takes a long time to cook the food, but the result is supposed to be meat that is cooked perfectly even while also retaining all of the moisture and juices. [Ken] figured he might be able to use a sous vide cooker to control the temperature of the mash instead of a water bath.

His experiment worked wonderfully. He used the stove top to help get the mash up to the close temperature, then the sous vide cooker was used to fine tune things from there. [Ken] says he was able to achieve 75% efficiency with his mash, which is exactly what he was going for. Continue reading “Brewing Beer With A Sous Vide Cooker”

GreenScreen

How Green Screen Worked Before Computers

If you know anything about how films are made then you have probably heard about the “green screen” before. The technique is also known as chroma key compositing, and it’s generally used to merge two images or videos together based on color hues. Usually you see an actor filmed in front of a green background. Using video editing software, the editor can then replace that specific green color with another video clip. This makes it look like the actor is in a completely different environment.

It’s no surprise that with computers, this is a very simple task. Any basic video editing software will include a chroma key function, but have you ever wondered how this was accomplished before computers made it so simple? [Tom Scott] posted a video to explain exactly that.

In the early days of film, the studio could film the actor against an entirely black background. Then, they would copy the film over and over using higher and higher contrasts until they end up with a black background, and a white silhouette of the actor. This film could be used as a matte. Working with an optical printer, the studio could then perform a double exposure to combine film of a background with the film of the actor. You can imagine that this was a much more cumbersome process than making a few mouse clicks.

For the green screen effect, studios could actually use specialized optical filters. They could apply one filter that would ignore a specific wavelength of the color green. Then they could film the actor using that filter. The resulting matte could then be combined with the footage of the actor and the background film using the optical printer. It’s very similar to the older style with the black background.

Electronic analog video has some other interesting tricks to perform the same basic effect. [Tom] explains that the analog signal contained information about the various colors that needed to be displayed on the screen. Electronic circuits were built that could watch for a specific color (green) and replace the signal with one from the background video. Studios even went so far as to record both the actor and a model simultaneously, using two cameras that were mechanically linked together to make the same movements. The signals could then be run through this special circuit and the combined image recorded all simultaneously.

There are a few other examples in the video, and the effects that [Tom] uses to describe these old techniques go a long way to help understand the concepts. It’s crazy to think of how complicated this process can be, when nowadays we can do it in minutes with the computers we already have in our homes. Continue reading “How Green Screen Worked Before Computers”

Wimshurst

3D Printed Wimshurst Machine

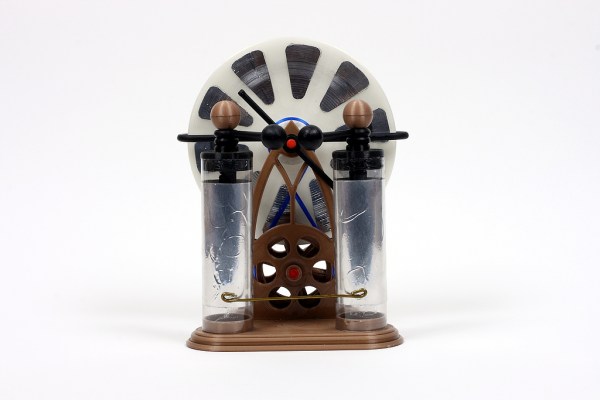
Steampunk extraordinaire [Jake von Slatt] has released his latest creation. This time he’s built a Wimshurst machine from mostly 3D printed parts. The Wimshurst machine is an electrostatic generator and was originally invented in the late 1800’s by James Wimshurst. It uses two counter-rotating disks to generate an electrostatic charge which is then stored in two Leyden jars. These jars are also connected to a spark gap. When the voltage raises high enough, the jars can discharge all at once by flashing a spark across the gap.

[Jake’s] machine has a sort of Gothic theme to it. He designed the parts using Autodesk’s 123D Design. They were initially printed in PLA. Skate bearings were used in the center of the disks to ensure a smooth rotation. The axle was made from the fiberglass shaft of a driveway reflector. The vertical supports were attached the base with machine screws.

The Leyden jars were made from sections of clear plastic tube. The caps for the jars were 3D printed and are designed to accept a short length of threaded 1/8″ pipe. Copper wire was used for the interior contacts and are held in place with electrical tape. The metal sectors on each disk were made from pieces of cut aluminum tape.

You may be wondering how this machine works if it’s almost entirely made out of plastic. [Jake] actually painted most of the parts with a carbon paint. This makes them electrically conductive and he can then use the parts to complete electrical circuits. Unfortunately he found this to be rather ineffective. The machine does work, but it only produces sparks up to 1/2″ in length. For comparison, his other machine is capable of 6″ sparks using similar sized Leyden jars.

[Jake] actually tried rebuilding this project using ABS, thinking that the PLA may have been collecting moisture from his breath, but the result is still only 1/2″ sparks. He suspects that the bumpy surface of the plastic parts may be causing the charge to slowly leak away, preventing a nice build up. He’s released all of his designs on Thingiverse in case any other hackers want to give it a whirl.

PS4 NES

Add Extra Storage To Your PS4 With Retro Flair

[Frank] came up with a clever way to extend the storage of his PS4. He’s managed to store his digital PS4 games inside of storage devices in the shape of classic NES cartridges. It’s a relatively simple hack on the technical side of things, but the result is a fun and interesting way to store your digital games.

He started out by designing his own 3D model of the NES cartridge. He then printed the cartridge on his Ultimaker 3D printer. The final print is a very good quality replica of the old style cartridge. The trick of this build is that each cartridge actually contains a 2.5″ hard drive. [Frank] can store each game on a separate drive, placing each one in a separate cartridge. He then prints his own 80’s style labels for these current generation games. You would have a hard time noticing that these games are not classic NES games at first glance.

Storing the game in cartridge form is one thing, but reading them into the PS4 is another. The trick is to use a SATA connector attached to the PS4’s motherboard. [Frank’s] project page makes it sound like he was able to plug the SATA cable in without opening the PS4, by attaching the connector to a Popsicle stick and then using that to reach in and plug the connector in place. The other end of the SATA cable goes into a custom 3D printed housing that fits the fake NES cartridges. This housing is attached to the side of the PS4 using machine screws.

Now [Frank] can just slide the cartridge of his choice into the slot and the PS4 instantly reads it. In an age where we try to cram more and more bits into smaller and smaller places, this may not be the most practical build. But sometimes hacking isn’t about being practical. Sometimes it’s simply about having fun. This project is a perfect example. Continue reading “Add Extra Storage To Your PS4 With Retro Flair”

Pac Man Clock

Pac-Man Clock Eats Time, Not Pellets

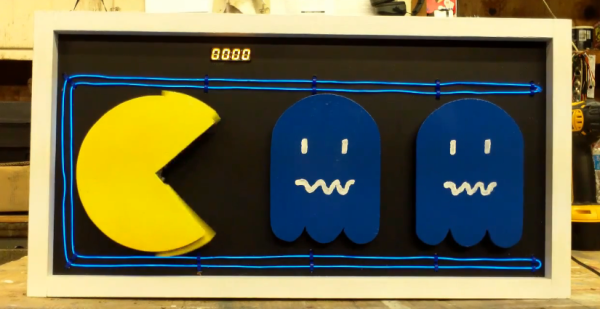
[Bob’s] Pac-Man clock is sure to appeal to the retro geek inside of us all. With a tiny display for the time, it’s clear that this project is more about the art piece than it is about keeping the time. Pac-Man periodically opens and closes his mouth at random intervals. The EL wire adds a nice glowing touch as well.

The project runs off of a Teensy 2.0. It’s a small and inexpensive microcontroller that’s compatible with Arduino. The Teensy uses an external real-time clock module to keep accurate time. It also connects to a seven segment display board via Serial. This kept the wiring simple and made the display easy to mount. The last major component is the servo. It’s just a standard servo, mounted to a customized 3D printed mounting bracket. When the servo rotates in one direction the mouth opens, and visa versa. The frame is also outlined with blue EL wire, giving that classic Pac-Man look a little something extra.

The physical clock itself is made almost entirely from wood. [Bob] is clearly a skilled wood worker as evidenced in the build video below. The Pac-Man and ghosts are all cut on a scroll saw, although [Bob] mentions that he would have 3D printed them if his printer was large enough. Many of the components are hot glued together. The electronics are also hot glued in place. This is often a convenient mounting solution because it’s relatively strong but only semi-permanent.

[Bob] mentions that he can’t have the EL wire and the servo running at the same time. If he tries this, the Teensy ends up “running haywire” after a few minutes. He’s looking for suggestions, so if you have one be sure to leave a comment. Continue reading “Pac-Man Clock Eats Time, Not Pellets”

Sentiment

Display Your City’s Emotional State With Illuminated Snow

[Hunter] wanted to do something a bit more interesting for his holiday lights display last year. Rather than just animated lights, he wanted something that was driven by data. In this case, his display was based on the mood of people in his city. We’ve seen a very similar project in the past, but this one has a few notable differences.

The display runs off of an Arduino. [Hunter] is using an Ethernet shield to connect the Arduino to the Internet. It then monitors all of the latest tweets from users within a 15 mile radius of his area. The tweets are then forwarded to the Alchemy Sentiment API for analysis. The API uses various algorithms and detection methods to identify the overall sentiment within a body of text. [Hunter] is using it to determine the general mood indicated by the text of a given tweet.

Next [Hunter] needed a way to somehow display this information. He opted to use an LED strip. Since the range of sentiments is rather small, [Hunter] didn’t want to display the overall average sentiment. This value doesn’t change much over short periods of time, so it’s not very interesting to see. Instead, he plots the change made since the last sample. This results in a more obvious change to the LED display.

Another interesting thing to note about this project is that [Hunter] is using the snow in his yard to diffuse the light from the LEDs. He’s actually buried the strip under a layer of snow. This has the result of hiding the electronics, but blurring the light enough so you can’t see the individual LEDs. The effect is rather nice, and it’s something different to add to your holiday lights display. Be sure to check out the video below for a demonstration. Continue reading “Display Your City’s Emotional State With Illuminated Snow”

SuperBowlLamp

Super Bowl Football Lamp Keeps You Informed

[David] loves to watch football. After his preferred team lost the playoffs, he wanted another reason to watch the big game last Sunday. He ended up building himself a football-shaped lamp that changes color based on who scored last.

[David] started with a Spark Core and a Spark Button. The Spark is the primary microcontroller and includes WiFi. The Spark Button is essentially a shield for the Spark that includes an accelerometer, some LEDs, and a few push buttons. The other part of this build was the housing. [David] used a toy football he got for free as swag from a parade.

As for the code, [David] started by first learning how to control the LEDs on the Spark Button. Then he wrote his own touchdown function to illuminate the football a specific color. Since the Spark uses the REST API, [David] is able to trigger this function by simply visiting the URL of his Spark. This makes it very simple to trigger the event.

The final part of this build was made easy thanks to IfThisThenThat (IFTTT). This is a web service that allows you to monitor and interact with various online web services. It can monitor one service, and then interact with another based on events that happen in the first service. In this case, [David] is using a “channel” added to IFTTT by ESPN. This channel can trigger when certain events happen for whatever team you specify. For this project [David] is monitoring touchdowns.

After combining all of these various services, [David] had a working light that would change colors based on which team scored. He did notice that IFTTT has anywhere between a 1 and 15 minute delay, and he hopes to improve upon this design by hooking directly to an API and skipping the extra service altogether.