Two-Part Primer In A Can Is A DIY Dream Come True

When putting together a home workshop, available floor space is often the deciding factor when it comes time to pick tools and equipment. This ultimately leads to some very difficult decisions, and we’d wager there isn’t a hacker or maker reading this that hasn’t had to pass on a new piece of gear because they didn’t have anywhere to put it.

For example, the average home gamer isn’t going to have a paint booth and spraying equipment, so they have to settle for a rattle can in the backyard. Traditionally this has limited the kinds of products you can realistically apply, but as [Eric Strebel] shows off in his latest video, it seems like spray can technology is starting to catch up.

3D printed part with two coats of spray primer applied
The finish after two coats of primer.

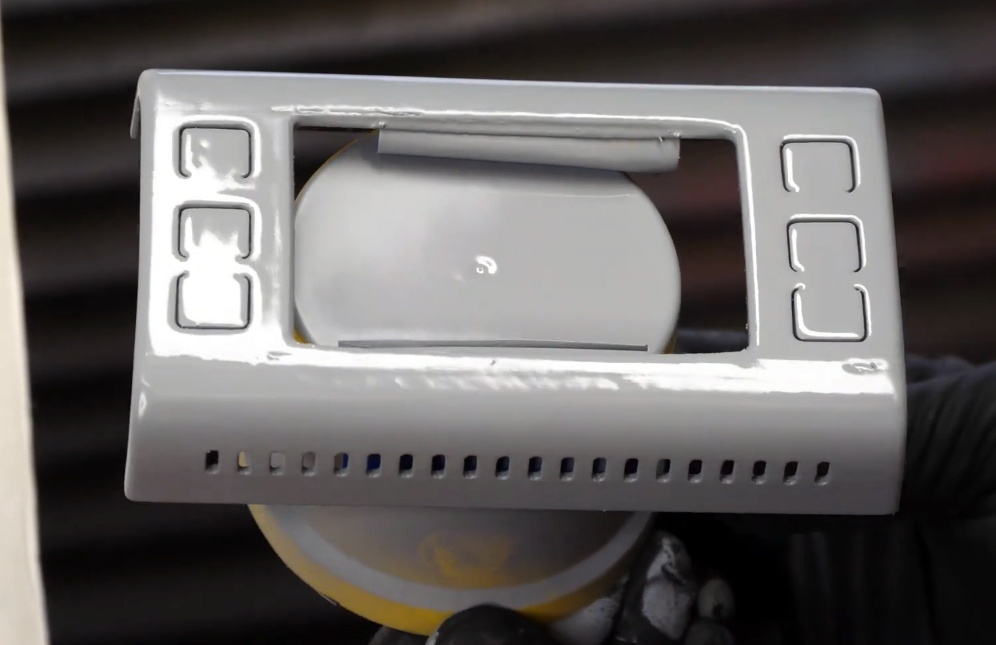
Specifically, he’s been working with a canned two-part primer that doesn’t require any complicated mixing or special equipment to apply. After hitting a plunger on the bottom, a small compartment containing the activator is ruptured and the reaction begins. From that point, you’ve only got 24 hours to use the contents of the can before it cures. But since you only need to wait about 10 minutes between coats, that should give you plenty of time to complete the project.

In the video, [Eric] demonstrates how quickly this high-build primer can smooth out the layer lines on a 3D print. While you’ll still need to sand and potentially break out the spot filler to achieve that perfect finish, it’s clear that the primer works much better than anything we’re used to seeing come out of a can. Even after just two coats, the results are truly remarkable.

If there’s a downside, it’s that a can of this primer will run you about $25 USD. That’s about five times the cost of the Rust-Oleum Filler Primer that usually gets recommended in DIY circles, but the results really do seem to speak for themselves. We wouldn’t necessarily use this on every project, but if you’ve got something that needs an especially fine finish, you’ve at least got an option that doesn’t involve borrowing somebody’s compressor and spray gun.

If you need help shaking your paint before spraying – definitely give this 3D printed paint shaker a look!

Continue reading “Two-Part Primer In A Can Is A DIY Dream Come True”

Spaghetti Detective Users Boiled By Security Gaffe

For readers that might not spend their free time watching spools of PLA slowly unwind, The Spaghetti Detective (TSD) is an open source project that aims to use computer vision and machine learning to identify when a 3D print has failed and resulted in a pile of plastic “spaghetti” on the build plate. Once users have installed the OctoPrint plugin, they need to point it to either a self-hosted server that’s running on a relatively powerful machine, or TSD’s paid cloud service that handles all the AI heavy lifting for a monthly fee.

Unfortunately, 73 of those cloud customers ended up getting a bit more than they bargained for when a configuration flub allowed strangers to take control of their printers. In a frank blog post, TSD founder Kenneth Jiang owns up to the August 19th mistake and explains exactly what happened, who was impacted, and how changes to the server-side code should prevent similar issues going forward.

Screenshot from TSD web interface
TSD allows users to remotely manage and monitor their printers.

For the record, it appears no permanent damage was done, and everyone who was potentially impacted by this issue has been notified. There was a fairly narrow window of opportunity for anyone to stumble upon the issue in the first place, meaning any bad actors would have had to be particularly quick on their keyboards to come up with some nefarious plot to sabotage any printers connected to TSD. That said, one user took to Reddit to show off the physical warning their printer spit out; the apparent handiwork of a fellow customer that discovered the glitch on their own.

According to Jiang, the issue stemmed from how TSD associates printers and users. When the server sees multiple connections coming from the same public IP, it’s assumed they’re physically connected to the same local network. This allows the server to link the OctoPrint plugin running on a Raspberry Pi to the user’s phone or computer. But on the night in question, an incorrectly configured load-balancing system stopped passing the source IP addresses to the server. This made TSD believe all of the printers and users who connected during this time period were on the same LAN, allowing anyone to connect with whatever machine they wished.

Changed TSD code from GitHub
New code pushed to the TSD repository limits how many devices can be associated with a single IP.

The mix-up only lasted about six hours, and so far, only the one user has actually reported their printer being remotely controlled by an outside party. After fixing the load-balancing configuration, the team also pushed an update to the TSD code which puts a cap on how many printers the server will associate with a given IP address. This seems like a reasonable enough precaution, though it’s not immediately obvious how this change would impact users who wish to add multiple printers to their account at the same time, such as in the case of a print farm.

While no doubt an embarrassing misstep for the team at The Spaghetti Detective, we can at least appreciate how swiftly they dealt with the issue and their transparency in bringing the flaw to light. This is also an excellent example of how open source allows the community to independently evaluate the fixes applied by the developer in response to a discovered flaw. Jiang says the team will be launching a full security audit of their own as well, so expect more changes getting pushed to the repository in the near future.

We were impressed with TSD when we first covered it back in 2019, and glad to see the project has flourished since we last checked in. Trust is difficult to gain and easy to lose, but we hope the team’s handling of this issue shows they’re on top of things and willing to do right by their community even if it means getting some egg on their face from time to time.

Inkplate Comes Full Circle, Becomes True Open Reader

Regular readers will likely remember the Inkplate, an open hardware electronic paper development board that combines an ESP32 with a recycled Kindle screen. With meticulous documentation and full-featured support libraries for both the Arduino IDE and MicroPython, the Inkplate makes it exceptionally easy for hackers and makers to write their own code for the high-quality epaper display.

Now, thanks to the efforts of [Guy Turcotte], the Inkplate family of devices can now boast a feature-rich and fully open source ereader firmware. The project started in October of last year, and since then, the codebase has been steadily updated and refined. Nearing its 1.3 release, EPub-InkPlate has most of the functions you’d expect from a modern ereader, and several that might take you by surprise.

For one thing, [Guy] has taken full advantage of the ESP32 microcontroller at the heart of the Inkplate and implemented a web server that lets you manage the reader’s library from your browser. This allows books in EPUB v2 and v3 formats to be uploaded and saved on the Inkplate’s SD card without any special software. There’s currently support for JPG, PNG, BMP, and GIF images, as well as embedded TTF and OTF fonts.

As of this writing EPub-InkPlate supports both the six and ten inch Inkplate variants, and uses the touch pads on the side of the screen for navigation. While it’s on the wishlist for the final 1.3 release, the project currently doesn’t support the Inkplate 6PLUS; which uses the backlit and touch compatible displays pulled from Kindle Paperwhites. With shipments the new 6PLUS model reportedly going out in November, hopefully it won’t be long before its enhanced features are supported.

With the rising popularity of ebooks, it’s more important than ever that we have open hardware and software readers that work on our terms. While they may never compete with the Kindle in terms of units sold, we’re eager to see projects like EPub-InkPlate and the Open Book from [Joey Castillo] mature to the point that they’re a valid option for mainstream users who don’t want to live under Amazon’s thumb.

Continue reading “Inkplate Comes Full Circle, Becomes True Open Reader”

Arduino Caller ID Display Is Better Late Than Never

It’s no secret that the era of the landline telephone is slowly coming to a close. As of 2020, it was estimated that less than half the homes in America still subscribed to plain old telephone service (POTS). But of course, that still amounts to millions upon millions of subscribers that might get a kick out of this Arduino caller ID developed by [Dilshan Jayakody].

HT9032D caller ID decoder board
The completed HT9032D board.

Truth be told, until this point, we hadn’t really given a lot of thought to how the caller ID system works. But as [Dilshan] explains, you can actually pick up a dedicated IC that can decode incoming caller data that’s sent over the telephone line. In this case he’s using a Holtek HT9032D, which comes in a through-hole DIP-8 package and can be picked up for around $2 USD. The chip needs a handful of passives and a 3.58 MHz crystal to help it along on its quest, but beyond that, it’s really just a matter of reading the decoded data from its output pin.

To display the caller’s information, [Dilshan] is using an Arduino Uno and common 16×2 HD44780 LCD. As a nice touch, the code will even blink the Arduino’s onboard LED when you’ve missed a call. As a proof of concept there’s been no attempt to condense the hardware or ditch the breadboard, but it’s not hard to imagine that all the components could be packed into a nice 3D printed enclosure should you want something a bit more permanent.

We’ve seen caller ID data being collected in previous projects, but they used a USB modem combined with a software approach. We really like the idea of doing it with a cheap dedicated IC, though we’ll admit this demonstration would probably have been a bit more exciting a decade ago.

Continue reading “Arduino Caller ID Display Is Better Late Than Never”

Custom Isolated Variac Is Truly One Of A Kind

It’s no surprise that many hardware hackers avoid working with AC, and frankly, we can’t blame them. The potential consequences of making a mistake when working with mains voltages are far greater than anything that can happen when you’re fiddling with a 3.3 V circuit. But if you do ever find yourself leaning towards the sparky side, you’d be wise to outfit your bench with the appropriate equipment.

Take for example this absolutely gorgeous variable isolation transformer built by [Lajt]. It might look like a  high-end piece of professional test equipment, but as the extensive write-up and build photographs can attest, this is a completely custom job. The downside is that this particular machine will probably never be duplicated, especially given the fact its isolation transformer was built on commission by a local company, but at least we can look at it and dream.

This device combines two functions which are particularly useful when repairing or testing AC hardware. As a variable transformer, often referred to as a variac, it lets [Lajt] select how much voltage is passed through to the output side. There’s a school of thought that says slowly ramping up the voltage when testing an older or potentially damaged device is better than simply plugging it into the wall and hoping for the best. Or if you’re like Eddie Van Halen, you can use it to control the volume of your over-sized Marshall amplifiers when playing in bars.

Image of the device's internal components.Secondly, the unit isolates the output side. That way if you manage to cross the wrong wire, you’re not going to pop a breaker and plunge your workshop into darkness. It also prevents you from accidentally blowing up any AC powered test equipment you might employ while poking around, such as that expensive oscilloscope, since the devices won’t share a common ground.

Additional safety features have been implemented using an Arduino Uno R3 clone, a current sensor, and several relays. The system will automatically cut off power to the device under test should the current hit a predetermined threshold, and will refuse to re-enable the main relay until the issue has been resolved. The code has been written in such a way that whenever the user makes a configuration change, power will be cut and must be reestablished manually; giving the user ample time to decide if its really what they want to do.

[Lajt] makes it clear that the write-up isn’t meant as a tutorial for building your own, but that shouldn’t stop you from reading through it and getting some ideas. Whether you’re in the market for custom variac tips or just want to get inspired by an impeccably well engineered piece of equipment, this project is a high-water mark for sure.

Teardown: 3D Printed Space Shuttle Lamp

Since the very beginning, the prevailing wisdom regarding consumer desktop 3D printers was that they were excellent tools for producing prototypes or one-off creations, but anything more than that was simply asking too much. After all, they were too slow, expensive, and finicky to be useful in a production setting. Once you needed more than a few copies of a plastic part, you were better off biting the bullet and moving over to injection molding.

But of course, things have changed a lot since then. Who could have imagined that one day you’d be able to buy five 3D printers for the cost of the crappiest Harbor Freight mini lathe? Modern 3D printers aren’t just cheaper either, they’re also more reliable and produce higher quality parts. Plus with software like OctoPrint, managing them is a breeze. Today, setting up a small print farm and affordably producing parts in mass quantities is well within the means of the average hobbyist.

Space shuttle lamp
Flickering LEDs provide a sense of motion

So perhaps I shouldn’t have been so surprised when I started seeing listings for these 3D printed rocket lamps popping up on eBay. Available from various sellers at a wide array of price points depending on how long you’re willing to wait for shipping, the lamps come in several shapes and sizes, and usually feature either the Space Shuttle or mighty Saturn V perched atop a “exhaust plume” of white PLA plastic. With a few orange LEDs blinking away on the inside, the lamp promises to produce an impressive flame effect that will delight space enthusiasts both young and old.

As a space enthusiast that fits somewhere in between those extremes, I decided it was worth risking $30 USD to see what one of these things looked like in real life. After waiting a month, a crushed up box arrived at my door which I was positive would contain a tiny mangled version of the majestic lamp I was promised — like the sad excuse for a hamburger that McBurgerLand actually gives you compared to what they advertise on TV.

But in person, it really does look fantastic. Using internally lit 3D printed structures to simulate smoke and flame is something we’ve seen done in the DIY scene, but pulling it off in a comparatively cheap production piece is impressive enough that I thought it deserved a closer look.

Now it’s always been my opinion that the best way to see how something was built is to take it apart, so I’ll admit that the following deviates a bit from the rest of the teardowns in this series. There’s no great mystery around flickering a couple LEDs among Hackaday readers, so we already know the electronics will be simplistic in the extreme. This time around the interesting part isn’t what’s on the inside, but how the object itself was produced in the first place.

Continue reading “Teardown: 3D Printed Space Shuttle Lamp”

DIY Handheld Game Puts Its Brains On A Removable Cart

Over the years we’ve seen plenty of homebrew handheld game systems that combine an AVR microcontroller, a few buttons, and an small OLED display. Some of them have even been turned into commercial products, such as the Arduboy. They’re simple, cheap, and with the right software, a lot of fun. But being based on an MCU, most of them share the same limitation of only being able to hold a single game at any one time.

But not the Game Card, by [Dylan Turner]. This handheld was specifically designed so that games could be easily swapped out using physical cartridges. But rather than trying to get the system’s microcontroller to boot code from an external flash chip, the system relocates the MCU to the removable cartridge. That might seem a bit overkill, but given how cheap the ATTINY84A on each cartridge is, it’s not exactly going to break the bank.

With the microcontroller on the cartridge, the only hardware that stays behind on the Game Card is the SSD1306 128×64 OLED display, buttons, and the battery. That means the handheld is effectively non-functional unless a game is slotted in, but that could be said of most early cartridge-based game systems as well. On the other hand, it also opens up the possibility of producing cartridges with more powerful microcontrollers down the line.

Using a different microcontroller for each game is a neat hack, but it’s not the only solution to the problem. We previously saw a community effort to add expandable storage to the Arduboy in the form of a DIY cartridge, which ultimately led to the development of an official flash chip upgrade for the handheld.

Continue reading “DIY Handheld Game Puts Its Brains On A Removable Cart”