3D Printed Mecanum Wheels For Hoverboard Motors

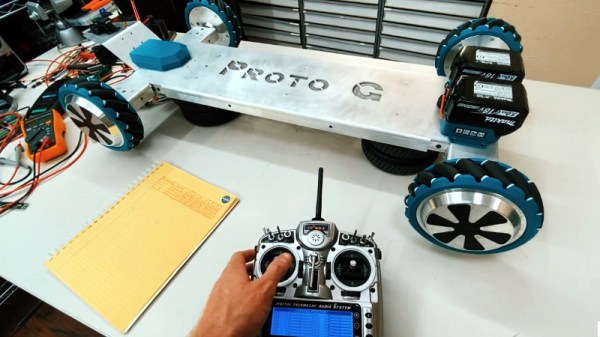
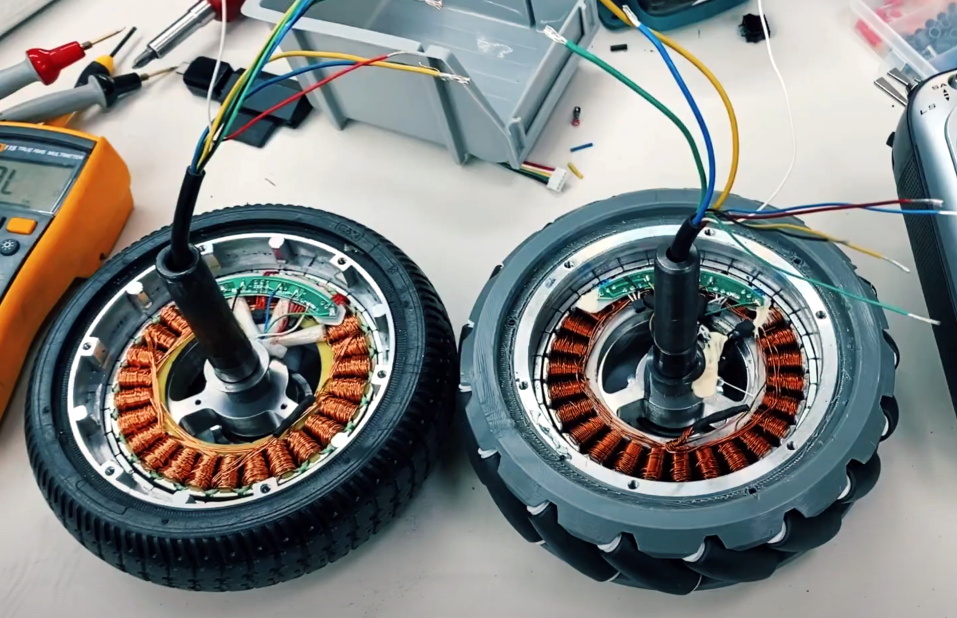
At this point, somebody taking the motors out of a cheap “hoverboard” and using them to power a scooter or remote controlled vehicle isn’t exactly a new idea. But in the case of the FPV rover [Proto G] has been working on, his choice of motors is only part of the story. The real interesting bit is the 3D printed omnidirectional Mecanum wheels he’s designed to fit the motors, which he thinks could have far reaching applications beyond his own project.

Now, that isn’t to say that the rover itself isn’t impressive. All of the laser cutting and sheet metal bending was done personally by [Proto G], and we love the elevated GoPro “turret” in the front that lets him look around while remotely driving the vehicle. Powered by a pair of Makita cordless tool batteries and utilizing hobby-grade RC parts, the rover looks like it would be a fantastic robotic platform to base further development on.

The Mecanum wheels themselves are two pieces, and make use of rollers pulled from far smaller commercially available wheels. This is perhaps not the most cost effective approach, but compared to the alternative of trying to print all the rollers, we see the advantage of using something off-the-shelf. If you’re not sure how to make these weird wheels work for you, [Proto G] has also released a video explaining how he mixes the RC channels to get the desired omnidirectional movement from the vehicle.

If you’re content with more traditional wheeled locomotion, we’ve previously seen how quickly a couple of second-hand hoverboards can be turned into a impressively powerful mobile platform for whatever diabolical plans you may have.

Continue reading “3D Printed Mecanum Wheels For Hoverboard Motors”

Hacked AC Window Unit Split In Half To Cool The Garage

It’s getting into the hot summer months for those of us in the Northern Hemisphere, and for many Hackaday readers, that means its time to get the old window air conditioner out of storage and lug it back into position. But what if you’re trying to cool a space that doesn’t have a convenient window? In that case, this clever conversion that [Infrared] came up with to keep his garage cool might be of interest.

Basically, he’s taken the classic window AC and turned it into an impromptu ductless unit. By rotating the evaporator coils into a vertical position and lengthening the compressor wires, he was able to make the center of the AC thin enough that he could close his garage door over it. The back of the unit looks largely untouched, but the front side has a real Mad Max vibe going on; with sheet metal, exposed wiring, and a couple of fans thrown in for good measure. Fine for the garage or workspace, but probably not a great choice for the kid’s room.

[Infrared] says the hacked up AC can get his garage 18 degrees cooler than the outside air temperature in its current form, but he hopes the addition of some high CFM computer fans will not only improve performance, but let him make the new front panel look a bit neater. Though even in its current form, this is far from the most ridiculous DIY AC project we’ve seen in recent memory.

Continue reading “Hacked AC Window Unit Split In Half To Cool The Garage”

ISS Gets Roll-Out Solar Panels In Post-Shuttle Fix

Astronauts are currently installing the first of six new solar arrays on the International Space Station (ISS), in a bid to bolster the reduced power generation capability of the original panels which have now been in space for over twenty years. But without the Space Shuttle to haul them into orbit, developing direct replacements for the Stations iconic 34 meter (112 foot) solar “wings” simply wasn’t an option. So NASA has turned to next-generation solar arrays that roll out like a tape measure and are light and compact enough for the SpaceX Dragon to carry them into orbit.

Space Shuttle Atlantis carrying part of the ISS truss.

Considering how integral the Space Shuttle was to its assembly, it’s hardly a surprise that no major modules have been added to the ISS since the fleet of winged spacecraft was retired in 2011. The few small elements that have been installed, such as the new International Docking Adapters and the Nanoracks “Bishop” airlock, have had to fit into the rear unpressurized compartment of the Dragon capsule. While a considerable limitation, NASA had planned for this eventuality, with principle construction of the ISS always intended to conclude upon the retirement of the Shuttle.

But the International Space Station was never supposed to last as long as it has, and some components are starting to show their age. The original solar panels are now more than five years beyond their fifteen year service life, and while they’re still producing sufficient power to keep the Station running in its current configuration, their operational efficiency has dropped considerably with age. So in January NASA announced an ambitious timeline for performing upgrades the space agency believes are necessary to keep up with the ever-increasing energy demands of the orbiting laboratory.

Continue reading “ISS Gets Roll-Out Solar Panels In Post-Shuttle Fix”

Gorgeous Specimen Is The Final Word In Word Clocks

At this point, it’s safe to say that word clocks aren’t quite as exciting as they once were. We’ve seen versions that boil the concept down to what amounts to a parts bin build, which for better or for worse, takes a lot of the magic out of it. You just get an array of LEDs, put some letters in front of it, write some code, and you’re done.

But then [Mark Sidell] sent in his build, and we remembered why we collectively fell in love with these clocks in the first place. It wasn’t the end result that captivated us, although the final clock is indeed gorgeous, but the story of its painstaking design and construction. The documentation created for this project is unquestionably some of the best we’ve seen in a very long time, and whether or not you have any desire to build a word clock of your own, you won’t regret sitting down and reading through it.

If you can somehow come away from reading through that build log and not be impressed, surely the clock’s feature set will put you over the edge. The ability to show time in just five minute increments makes this one of the most practical word clocks we’ve seen, and the quality of life features such as automatic brightness control based on ambient light level, and a smartphone-controlled web interface for configuring the clock are just a few of its standout features.

Incidentally the glow behind the clock, provided by a dedicated array of WS2812 RGB LEDs, isn’t just for ambiance. It indicates the position of the sun in the sky as calculated by the Python astral package, as well as mimicking the colors of the sunrise and sunset. There’s even a compass onboard to make sure the LEDs are properly aligned with their astronautical counterpart.

[Mark] actually made several of these clocks, most of which were given away as gifts. Some of the lucky recipients lived far enough away that the clock had to be shipped, so he designed a custom shipping case to hold everything securely during the trip. It also meant he had to come up with a way of remotely maintaining the code on these clocks without user intervention, so he created a firmware update and telemetry gathering backend with Amazon Web Services that they check into periodically. Honestly, the attention to detail put into every element of this project is just staggering.

If you’re interested in seeing what all the fuss is about with these word clocks, but aren’t quite at [Mark]’s level, don’t worry. As we said earlier, you can build a small version with little more than an LED array and a microcontroller. Just don’t blame us if it ends up turning into an obsession.

Continue reading “Gorgeous Specimen Is The Final Word In Word Clocks”

DOOM Comes To The NRF5340

If you’re looking for a reminder of how powerful the tiny microcontrollers that run our everyday gadgets have become, check out the work impressive work [Audun Wilhelmsen] has done to get DOOM running on the Nordic Semiconductor nRF5340. This is the sort of Bluetooth SoC you’d expect to find in a headset or wireless keyboard, and yet it’s packing a 128 MHz processor that can go head to head with the Intel 486 that the iconic first person shooter recommended you have in your old beige box PC.

That said, porting the open source shooter over to the nRF5340 wasn’t exactly easy. The challenge was getting the game, which recommended your PC have 8 MB back in 1993, to run on a microcontroller with a paltry 512 KB of memory. Luckily, a lot of the data the game loads into RAM is static. While that might have been necessary when the game was running from a pokey IDE hard drive, the nearly instantaneous access times of solid state storage and the nRF5340’s execute in place (XIP) capability meant [Audun] could move all of that over to an SPI-connected 8 MB flash chip with some tweaks to the code.

nRF53 Development board with I2S DAC

In general, [Audun] explains that many of the design decisions made for the original DOOM engine were made with the assumption that the limiting factor would be CPU power rather than RAM. So that lead to things often getting pre-calculated and stored in memory for instant access. But with the extra horsepower of the nRF5340, it was often helpful to flip this dynamic over and reverse the optimizations made by the original developers.

On the hardware side, things are relatively straightforward. The 4.3″ 800×480 LCD display is connected over SPI, and an I2S DAC handles the sound. Bluetooth would have been the logical choice for the controls, but to keep things simple, [Audun] ended up using a BBC micro:bit that could communicate with the nRF5340 via Nordic’s own proprietary protocol. Though he does note that Bluetooth mouse and keyboard support is something he’d like to implement eventually.

If some of the software tricks employed by this hack sounded familiar, it’s because a very similar technique was used to get DOOM running on an IKEA TRÅDFRI light bulb a week or so back. Unfortunately it must have ruffled some feathers, as it was pulled from the Internet in short order. It sounds like [Audun] got the OK from his bosses at Nordic Semiconductor to go public with this project, so hopefully this one will stick around for awhile.

Continue reading “DOOM Comes To The NRF5340”

Teardown: Franz Crystal Metronome

I wish I could tell you that there’s some complex decision tree at play when I select a piece of hardware to take apart for this series, but ultimately it boils down two just two factors: either the gadget was something I was personally interested in, or it was cheap. An ideal candidate would check both boxes, but that’s not always the case. This time around however, I can confidently say our subject doesn’t fall into either category.

Now don’t get me wrong, at first glance I found the Franz Crystal Metronome to be intriguing in its own way. With that vintage look, how could you not? But I’m about as far from a musician as one can get, so you’d hardly find a metronome on my wish list. As for the cost, a check on eBay seems to show there’s something of a following for these old school Franz models, with ones in good condition going for $50 to $80. Admittedly not breaking the bank, but still more than I’d like to pay for something that usually ends up as a pile of parts.

That being the case, why are you currently reading about it on Hackaday? Because it exploits something of a loophole in the selection process: it doesn’t work, and somebody gave it to me to try and figure out why. So without further ado let’s find out what literally makes a Franz Crystal Metronome tick, and see if we can’t get it doing so gain.

Continue reading “Teardown: Franz Crystal Metronome”

Steady Hand Brings GBA Cart Back From The Grave

The flash chips used in Game Boy Advance (GBA) cartridges were intended to be more reliable and less bulky than the battery-backed SRAM used to save player progress on earlier systems. But with some GBA titles now hitting their 20th anniversary, it’s not unheard of for older carts to have trouble loading saves or creating new ones. Perhaps that’s why the previous owner tried to reflow the flash chip on their copy of Golden Sun, but as [Taylor Burley] found after he opened up the case, they only ended up making the situation worse.

A previous repair attempt left the PCB badly damaged.

When presented with so many damaged traces on the PCB, the most reasonable course of action would have been to get a donor cartridge and swap the save chips. But a quick check on eBay shows that copies of Golden Sun don’t exactly come cheap. So [Taylor] decided to flex his soldering muscles and repair each trace with a carefully bent piece of 30 gauge wire. If you need your daily dose of Zen, just watch his methodical process in the video below.

While it certainly doesn’t detract from [Taylor]’s impressive soldering work, it should be said that the design of the cartridge PCB did help out a bit, as many of the damaged traces had nearby vias which gave him convenient spots to attach his new wires. It also appears the PCB was designed to accept flash chips of varying physical dimensions, which provided some extra breathing room for the repairs.

Seeing his handiwork, it probably won’t surprise you to find that this isn’t the first time [Taylor] has performed some life-saving microsurgery. Just last year he was able to repair the PCB of an XBox controller than had literally been snapped in half.

Continue reading “Steady Hand Brings GBA Cart Back From The Grave”