You don’t have to look very hard to find another rousing success by SpaceX. It’s a company defined by big and bold moves, and when something goes right, they make sure you know about it. From launching a Tesla into deep space to the captivating test flights of their next-generation Starship spacecraft, the private company has turned high-stakes aerospace research and development into a public event. A cult of personality has developed around SpaceX’s outlandish CEO Elon Musk, and so long as he’s at the helm, we can expect bigger and brighter spectacles as he directs the company towards its ultimate goal of putting humans on Mars.
Of course, things don’t always go right for SpaceX. While setbacks are inevitable in aerospace, the company has had a few particularly embarrassing failures that could be directly attributed to their rapid development pace or even operational inexperience. A perfect example is the loss of the Israeli AMOS-6 satellite during a static fire of the Falcon 9’s engines on the launch pad in 2016, as industry experts questioned why the spacecraft had even been mounted to the rocket before it had passed its pre-flight checks. Since that costly mistake, the company has waited until all engine tests have been completed before attaching the customer’s payload.

But sometimes the failure isn’t so much a technical problem as an inability for the company to achieve their own lofty goals. Occasionally one of Musk’s grand ideas ends up being too complex, dangerous, or expensive to put into practice. For instance, despite spending several years and untold amounts of money perfecting the technology involved, propulsive landings for the Crew Dragon were nixed before the idea could ever fully be tested. NASA was reportedly uncomfortable with what they saw as an unnecessary risk compared to the more traditional ocean splashdown under parachutes; it would have been an impressive sight to be sure, but it didn’t offer a substantive benefit over the simpler approach.
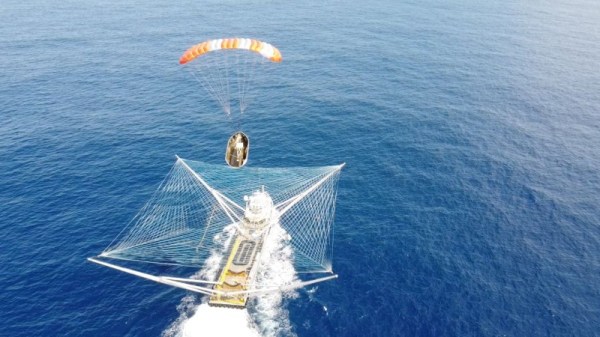
A similar fate recently befell SpaceX’s twin fairing recovery ships Ms. Tree and Ms. Chief, which were quietly retired in April. These vessels were designed to catch the Falcon’s school bus sized payload fairings as they drifted down back to Earth using massive nets suspended over their decks, but in the end, the process turned out to be more difficult than expected. More importantly, it apparently wasn’t even necessary in the first place.
Continue reading “SpaceX Drops The Ball On Catching Fairings”