A Network Attached VFD Tube Clock

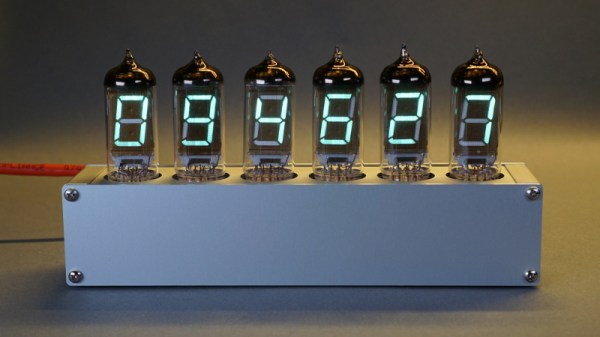
The elegance of Power over Ethernet (PoE) is that you can provide network connectivity and power over a single cable. Unfortunately not nearly enough hardware seems to support this capability, forcing intrepid hackers to take matters into their own hands. The latest in this line of single-cable creations is this beautiful Vacuum Fluorescent Display (VFD) clock from [Glen Akins].

Testing the VFD tube socket

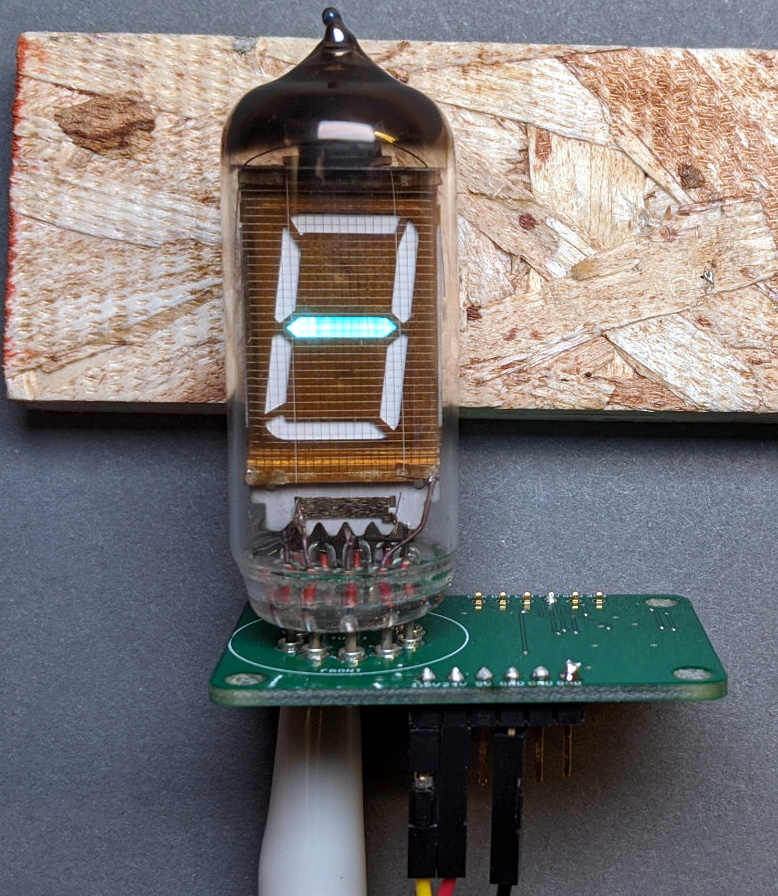
One of the key advantages VFDs have over their Nixie predecessors is greatly reduced energy consumption, and after [Glen] ran the numbers, he saw that a display using six VFD tubes could easily be powered with standard PoE hardware. With this information, he started designing the PCB around the early 1990s era IV-12 tube, which has the advantage of being socketed so he could easily remove them later if necessary.

[Glen] first had to create a schematic and PCB footprint for the IV-12 tube that he could import into Eagle, which he was kind enough to share should anyone else be working with these particular tubes down the line. After a test of the newly designed socket was successful, he moved onto the rest of the electronics.

The clock is powered by a Microchip PIC18F67J60, which connects to the Ethernet network and pulls the current time down from NTP. After seeing so many clocks use an ESP to connect to the Internet over WiFi, there’s something refreshing about seeing a wired version. The tube segments are driven by a HV5812, also Microchip branded. Lastly, [Glen] used a number of DC/DC converters to generate the 1.5 V, 3.3 V, 5 V, and 25 V necessary to drive all the electronics and VFDs.

We absolutely love the simplicity of this clock, from its sleek aluminum enclosure to that single RJ45 jack on the back. But if you’re looking for something with a bit more flash, [Glen] also put together some PoE Christmas lights over the holidays which share a number of design elements with this project.

Continue reading “A Network Attached VFD Tube Clock”

3D Printed GIFs For Stop Motion Memes

Lithophanes are nothing new, with examples going back to the 1800s. But they’ve become popular again thanks to the ease of which these pieces of artwork can be 3D printed. While the Internet would be more than happy to see somebody press a 3D image of their cat into a thin piece of translucent porcelain ready to have a light shone through it, that’s quite a bit harder than just firing up the Monoprice.

But since the machine is doing all the work for you, why stop at one? That’s precisely the sort of thinking that lead [The Mad Maker] to recreate animated GIFs with stop motion photography and a stack of printed lithophanes. Now all your favorite reaction memes can make the leap to the physical world…and then go right back into the computer.

The method here is pretty simple: [The Mad Maker] disassembles his favorite GIF to get the individual frame images, converts each one of those into a lithophane STL via an online tool, prints it out, photographs it, and then stitches all those photographs back into a new GIF. Given the incredibly time consuming nature of this process you’ll want to limit it to short animations, and even then, probably do only every 2nd or 3rd frame to preserve your sanity.

In the video after the break you can see the entire process, as well as check out the final result. While there weren’t really any technical hurdles to overcome in this project, we did like seeing how [The Mad Maker] experimented to find the ideal position for the backlight and camera. The wooden frame he came up with to hold everything in position should make subsequent meme conversions a lot easier, now he just needs to add a little color. Continue reading “3D Printed GIFs For Stop Motion Memes”

Lathe And 3D Printer Help Repair Buried Buttons

Usually corroded buttons on a piece of electronic equipment wouldn’t be that big a deal to repair, but as [Haris Andrianakis] recently found out, things can get a little tricky when they are sealed inside a device meant to operate in a marine environment. Figuring out how to get into the case to clean the buttons up is only half the battle, when you’re done you still need to close it back well enough that the elements can’t get in.

The device in question is a tachometer intended for a Yamaha outboard motor, and the buttons are sealed between the guage’s face and the compartment in the rear that holds the electronics. Pulling the guts out of the back was no problem, but that didn’t get [Haris] any closer to the defective buttons. In light of the cylindrical design of the gauge, he decided to liberate the front panel from the rest of the unit with his lathe.

Removing the face was a delicate operation, to put it mildly. The first challenge was getting the device mounted securely in the chuck, but then the cutting had to be done very carefully so as not to damage the housing. Once he cut through the side far enough to get the face off, the actual repair of the buttons was fairly straightforward. But how to get it back together?

After a few missteps, [Haris] finally found a solution that have him the results he was looking for. He 3D printed a ring that fit the front of the gauge tightly, hot glued it into place, and used it as a mould to pour in black epoxy resin. Once the epoxy had cured, the mould was cut off and the gauge went back on the lathe so he could trim away the excess. He had to do some hand sanding and filing to smooth out the bezel, but overall the end result looks very close to factory.

We get it, there’s a lot to consider when you add a lathe to your workshop. But hacks like these are wonderful reminders of how many tricks these versatile machines are really capable of.

Continue reading “Lathe And 3D Printer Help Repair Buried Buttons”

Stinger: The Hacked Machine Gun Of Iwo Jima

During the Second World War, the United States was pumping out weapons, aircraft, and tanks at an absolutely astonishing rate. The production of military vehicles and equipment was industrialized like never before, and with luck, never will be again. But even still, soldiers overseas would occasionally find themselves in unique situations that required hardware that the factories back at home couldn’t provide them with.

A Stinger machine gun in WWII

Which is precisely how a few United States Marines designed and built the “Stinger” light machine gun (LMG) during the lead-up to the invasion of Iwo Jima in 1945. The Stinger was a Browning .30 caliber AN/M2, salvaged from a crashed or otherwise inoperable aircraft, that was modified for use by infantry. It was somewhat ungainly, and as it was designed to be cooled by the air flowing past it while in flight, had a tendency to overheat quickly. But even with those shortcomings it was an absolutely devastating weapon; with a rate of fire at least twice that of the standard Browning machine guns the Marines had access to at the time.

Six Stingers were produced, and at least on a Battalion level, were officially approved for use in combat. After seeing how successful the weapon was during the invasion of Iwo Jima, there was even some talk of putting the Stinger into larger scale production and distributing them. But the war ended before such a plan could be put into place.

As such, the Stinger is an exceedingly rare example of a field modified weapon that was not only produced in significant numbers, but officially recognized and even considered for adoption by the military. But the story of this hacked machine gun actually started years earlier and thousands of kilometers away, as Allied forces battled for control of the Solomon Islands.

Continue reading “Stinger: The Hacked Machine Gun Of Iwo Jima”

Up Your Game With DIY Headset Motion Tracking

While there’s been a lot of advancements in VR gaming over the last couple of years, plenty of folks are still happy enough to just stare at their monitor. But that’s not to say some of those fancy head-tracking tricks wouldn’t be a welcome addition to their repertoire. For players who are literally looking to get their head in the game, [Adrian Schwizgebel] has created qeMotion.

The idea here is simple enough: attach a motion sensor to a standard gaming headset (here a MPU-6050 IMU), and use the data from it to virtually “press” keys through USB HID emulation. Many first person shooter games offer the ability to lean left or right by pressing Q or E respectively, so all [Adrian] had to do was map the appropriate accelerometer readings to those keys for it to work seamlessly with popular titles such as Tom Clancy’s Rainbow Six Siege and Insurgency.

The concept might be basic, but the execution is anything but. Rather than just duct taping an Arduino to his headset, [Adrian] designed a very slick 3D printed enclosure for the electronics that sits on his desk. While they haven’t all been implemented yet, the devices features indicator lights and buttons to switch through various modes. The sensor on the headset has similarly been encased in a very professional looking 3D printed box, complete with a nice braided cable to link it to the desk unit.

It’s been awhile since we’ve seen a head tracking project, and most of those utilized something like the Wii Remote. Adding sensors to a person’s head normally wouldn’t be an ideal situation, but if you’re going to be wearing the headset anyway to listen to the game and chat, it’s not really a problem. If your hair is too nice for the qeMotion, you could always try doing something similar with computer vision.

Continue reading “Up Your Game With DIY Headset Motion Tracking”

A Tiny USB Hub For All Your Hardware Modding Needs

Going all the way hack to the heady days of Eee PC modding, hardware hackers have been on the hunt for small USB hubs that can easily be liberated from their enclosures and integrated into whatever project they happen to be working on. From time to time you see recommendations out there for makes and models which lend themselves to this sort of repurposing, but it’s seemed more difficult than necessary to source such a basic component.

Which is why [RETROCUTION] has developed a USB hub that’s not only extremely small, but relatively easy to assemble with only six components. Plus best of all, they are dirt cheap.

When you add up the cost of getting the PCBs made and buying all the SMD components, the per-unit price of these hubs is only going to be a few dollars. If you’ve got what it takes to make the PCBs in-house, even better. Considering how much easier these things could make other projects, it seems more than worth the upfront cost.

The star of the show is the FE1.1s, a four port USB 2.0 controller in a SSOP-28 package. As of this writing, it goes for about 25 cents from the usual overseas sources (even less, for larger orders). Add to the mix a few 10 μF ceramic capacitors, a 2.7 kΩ resistor, and a 12 MHz crystal.

There’s no provision for actual USB ports in the design, but they would just take up space anyway; this hub is intended to be directly soldered to the other devices. Incidentally, to reduce the number of traces and pads on the PCB, there aren’t power lines for the downstream devices either. So you’ll need to power them separately.

The passives are 0603, but the crystal is a good old fashioned through-hole component. [RETROCUTION] assembles the boards with a solder paste stencil and a hot air station, but if you’ve got a little practice, it’s certainly something you could do with an iron. With such a straightforward design, you could build a lifetime supply of these itty-bitty hubs in an afternoon. That’s certainly our plan, anyway.

Continue reading “A Tiny USB Hub For All Your Hardware Modding Needs”

Pavlok Gets A Literally Shocking Teardown

Apparently, there is a wrist-mounted device that delivers electric shocks to the wearer when it receives the appropriate command over Bluetooth. No, it’s not part of some kind of house arrest program. If you can believe it, the gadget is actually intended to help break bad habits or wake up exceptionally deep sleepers. We don’t know which of those problems [Becky Stern] has, but we’re glad to see she decided to take hers apart before the 21st century self-flagellation started.

Called the Pavlok and available for $180 USD from various online retailers, the device looks like a chunky fitness tracker. But in place of the screen that would show you how many steps you’ve taken or your current heart rate, there’s a lighting bolt button that you can press when you want to shock yourself. With the smartphone application, you can control the device remotely with a handy desktop widget that allows you to select the intensity of the shock. No, we aren’t making any of this up. Check out the video after the break to see it in action.

When [Becky] tried to take the Pavlok apart, she found that it was nearly impossible to handle it without inadvertently triggering a shock. So until she could get the case open and physically disconnect the battery, all she could do was turn the intensity down in the application and work through the occasional jolts from the device. We can only hope that more devices don’t adopt a similar sense of self-preservation.

Once inside she found mainly the same kind of hardware you’d expect in a standard, non-masochistic, fitness wearable. There’s a nRF52832 Bluetooth SoC, a MMA8451Q accelerometer, a PCF85063A I2C RTC, and a FXAS21002C gyroscope. What you’re somewhat less likely to find inside your FitBit however is the LPR6235 coupled inductor and beefy capacitors which are used to build up a high-voltage charge from the standard 3.7 V LiPo battery.

We’ve been very interested in the recent projects which are creating custom firmwares for commercially available fitness wearables, as it could be an express route to a hacker-friendly smartwatch. While the Pavlok has some compelling hardware, and the programming header [Becky] identified looks interesting, we don’t like the idea of being one misplaced if statement away from riding the lightning.

Continue reading “Pavlok Gets A Literally Shocking Teardown”