A Cyclonic Vacuum Cleaner On A Hacker’s Budget

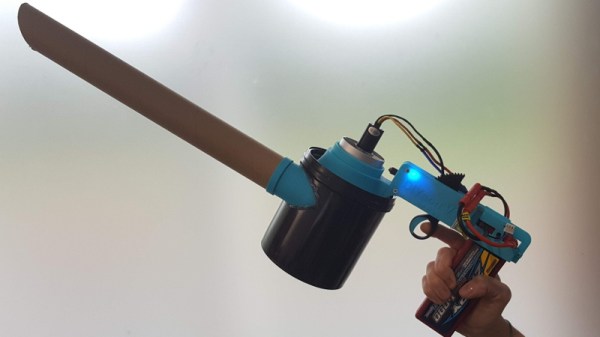
Have you ever seen a product in the store and been shocked at what the manufacturer was trying to charge for it? Since you’re reading Hackaday, we can safely assume the answer to that question; building a homebrew version of some commercial product for a fraction of its retail price is practically a rite of passage around these parts. So it’s fitting that for his entry into the 2019 Hackaday Prize, [Madaeon] submitted the “DIYson”, an open source version of a popular high-end vacuum made by a British company who’s name you can surely guess.

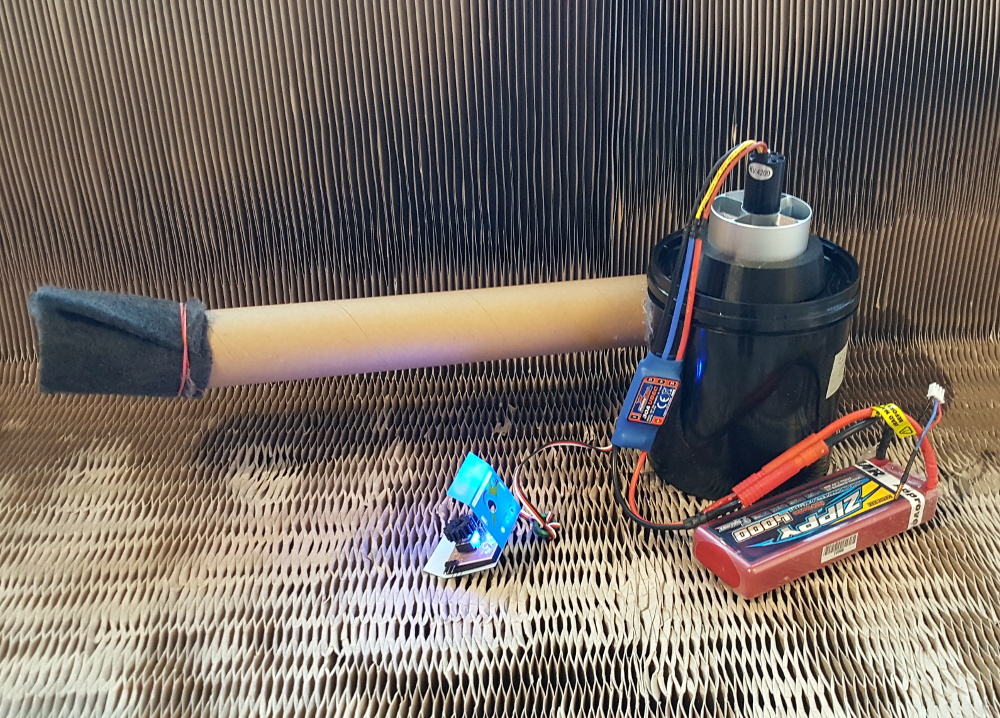
As [Madaeon] explains on the project’s Hackaday.io page, the idea behind “cyclonic” vacuums is not particularly complex. Essentially, with a powerful enough blower and carefully designed chamber, the incoming air will spin around so fast that dust is pulled out by centrifugal force. The trick is getting it working on a small enough scale to be a handheld device. Especially given the energy requirements for the blower motor.

Luckily for the modern hacker, we’re living in the “Golden Age” of DIY. With a 3D printer you can produce plastic components with complex geometry, and thanks to a resurgence in remote controlled aircraft, powerful motors and high capacity lithium-ion batteries are easily obtainable. Powered by what’s essentially the hardware that would go into an electric ducted fan plane, the total cost of all the electronics for the DIYson comes in right around $60 USD. Even with a roll of printer filament added to the mix, you’re still comfortably at half the cost of the “name brand” alternative.

With some refinements, [Madaeon] hopes that this open source dust-buster will be a staple of labs and hackerspaces all over the world. Judging by the performance his early prototype shows in the video after the break, we know we wouldn’t mind having one.

Continue reading “A Cyclonic Vacuum Cleaner On A Hacker’s Budget”

Building An ESP8266 Game System With MicroPython

After a seemingly endless stream of projects that see the ESP8266 open doors or report the current temperature, it can be easy to forget just how powerful the little WiFi-enabled microcontroller really is. In fact, you could argue that most hackers aren’t even scratching the surface of what the hardware is actually capable of. But that’s not the case for [Brian Wagner] and his students from the Kentucky Country Day School.

Their project, the GamerGorl, is a completely custom handheld game system running on a Wemos D1 Mini development board. The team’s PCB, which was developed over several iterations, is essentially a breakout board which allows them to easily connect up peripheral devices. Given the low total component cost of the GamerGorl and relative simplicity of its construction, it looks like a phenomenal project for older STEM students.

Beyond the ESP8266 board, the GamerGorl features a SSD1106 1.3″ OLED display, a buzzer for sound effects, two tactile buttons, and an analog joystick originally intended for an Xbox controller. Around the backside there’s a WS2812B RGB LED strip that’s at least partially for decoration, but it’s also actively used in some of the games such as the team’s take on Simon.

Even if you aren’t in the market for a portable game system, the GameGorl does provide an interesting case study for MicoPython applications on the Wemos D1 Mini. Browsing through the team’s source code as well as the helpful hints that [Brian] gives about getting the software environment up and running could be useful if you’re looking to expand your ESP8266 programming repertoire. We’d also love to see this device running the “ESP Little Game Engine” we covered recently.

Continue reading “Building An ESP8266 Game System With MicroPython”

An Impeccably Designed High-Speed LED Flash

If you want to take a picture of something fast, and we mean really fast, you need to have a suitably rapid flash to illuminate it. A standard camera flash might be good enough to help capture kids running around the back yard at night, but it’s not going to do you much good if you’re trying to get a picture of a bullet shattering a piece of glass. For that you’ll need something that can produce microsecond flashes, allowing you to essentially “freeze” motion.

You can buy a flash that fast, but they aren’t common, and they certainly aren’t cheap. [td0g] thought he could improve on the situation by developing his own microsecond flash, and he was kind enough to not only share it with the world, but create a fantastically detailed write-up that takes us through the entire design and construction process. Even if you aren’t in the market for a hyper-fast flash for your camera, this is a fascinating look at how you can build an extremely specialized piece of gear out of relatively common hardware components.

So what goes into a fast LED flash? Rather unsurprisingly, the build starts with high-quality LEDs. After some research, [td0g] went with an even dozen CREE CXA2530 arrays at just shy of $7 USD each. Not exactly cheap, but luckily the rest of the hardware is pretty garden variety stuff, including a ATMega328P microcontroller, some MOSFETs, and a TC4452 driver. He did pack in some monstrous 400 V 10μf capacitors, but has since realized they were considerably overkill and says he would swap them out if doing it all over again.

To make development easier (and less costly, should anything go wrong), [td0g] designed the flash so that the LEDs are arranged in banks of three which can be easily removed or swapped in the 3D printed case. Each trio of LEDs is in a removable “sled” that also holds the corresponding capacitor and MOSFET. Then it was just a matter of getting the capacitors charged up and safely dumping their energy into the banks of LEDs without frying anything. Simple.

At this point, the astute reader is probably thinking that a high speed flash is worthless without an equally fast way of triggering it. You’d be right, but [td0g] already figured that part. A couple years back we covered his incredible ballistic chronometer which is being used as a sensor to fire off his new flash.

Lifelike Dinosaur Emerges From The Plumbing Aisle

Despite the incredible advancements in special effects technology since the film’s release, the dinosaurs in 1993’s Jurassic Park still look just as terrifying today as they did nearly 30 years ago. This has largely been attributed to the fact that the filmmakers wisely decided to use physical models in many of the close-up shots, allowing them to capture the nuances of movement which really helps sell the idea you’re looking at living creatures.

[Esmée Kramer] puts that same principle to work in her incredible articulated dinosaur costume, and by the looks of it, Steven Spielberg could have saved some money if he had his special effects team get their supplies at the Home Depot. Built out of PVC pipes and sheets of foam, her skeletal raptor moves with an unnerving level of realism. In fact, we’re almost relieved to hear she doesn’t currently have plans on skinning the creature; some things are better left to the imagination.

In her write-up on LinkedIn (apparently that’s a thing), [Esmée] explains some of the construction tricks she used to help bring her dinosaur to life, such as heating the pipes and folding them to create rotatable joints. Everything is controlled by way of thin ropes, with all the articulation points of the head mirrored on the “steering wheel” in front of her.

Now to be fair, it takes more than a bundle of PVC pipes to create a convincing dinosaur. Obviously a large part of why this project works so well is the artistry that [Esmée] demonstrates at the controls of her creation. Judging by her performance in the video after the break, we’re going to assume she’s spent a not inconsiderable amount of time stomping around the neighborhood in this contraption to perfect her moves.

In the past we’ve seen the Raspberry Pi used to upgrade life-sized animatronic dinosaurs, but even with the added processing power, those dinos don’t hold a candle to the smooth and organic motion that [Esmée] has achieved here. Just goes to show that sometimes low-tech methods can outperform the latest technological wizardry.

Continue reading “Lifelike Dinosaur Emerges From The Plumbing Aisle”

Perfecting The Open Source RC Controller

Over the last few months we’ve seen an influx of homebrew RC controllers come our way, and we’re certainly not complaining. While the prices of commercial RC transmitters are at an all-time low, and many of them can even run an open source firmware, there’s still nothing quite like building the thing yourself. How else are you going to get exactly what you want?

For this entry into the 2019 Hackaday Prize, [Vitor de Miranda Henrique] is working on his own version of the ultimate open source remote control. His design follows some of the trends we’ve already seen in terms of outward design and hardware expandability, but also branches off into some new territory with features such as dual integrated displays.

Why does your controller need two displays? The top 4.3 inch TFT is linked up to a 5.2 GHz video receiver, which makes it perfect for controlling vehicles in “first-person” view, such as drones. The lower screen is a 2.8 inch touch screen from Adafruit, which is intended to be used for navigating through menus and options once the firmware is fully fleshed out.

Powering the controller is a ESP32 and dual MCP23017 GPIO expanders to connect up to the array of input devices available to the user. The current iteration of the controller has ten switches, two encoders, some buttons, and a pair of scroll wheels for good measure. Oh, and of course there are a couple of joysticks in the mix as well. All the devices terminate at a custom PCB in the back of the controller which looks to make modifying and adding input devices simple and neat.

We’ve previously seen the Alpha V1, an open source controller with a fairly similar setup, albeit without the dual displays. If even that one is a bit more complex than you’d like, you can always just do it with an Arduino.

2019 Cornell Cup Winners Include Autonomous Boat, Flapping UAV, And Leaping Rover

For college-aged engineers and designers, finding a problem they’re truly passionate about early on could very well set the trajectory for an entire career. This is precisely the goal of the Cornell Cup, a competition that tasks applicants with solving a real-world problem in a unique and interesting way. From what we saw this is definitely working, as teams showed up with ornithopter-based quadcopters, robotic dinghies, forest fire sniffers, and high-jumping rovers.

With such an open ended approach, individual entries have a tendency to vary wildly, running the gamut from autonomous vehicles to assistive technology. No team feels pressured to pursue a project they aren’t truly invested in, and everyone’s the better for it.

Given such lofty goals, Hackaday was proud to sponsor the 2019 Cornell Cup. Especially as it so closely aligns with the product design focus of this year’s Hackaday Prize. Designing something which solves a real-world problem is definitely part of the formula when the goal is to reach large scale production. And after seeing the entries first-hand during the Finals at Kennedy Space Center, we think every one of them would be a fantastic entry into the Hackaday Prize.

I don’t envy the judges who ultimately had to narrow it down to just a few teams to take home their share of the nearly $20,000 awarded. Join me after the break for a closer look at the projects that ended up coming out on top.

Continue reading “2019 Cornell Cup Winners Include Autonomous Boat, Flapping UAV, And Leaping Rover”

A Customizable Open Source Mechanical Numpad

Mechanical keyboards with reduced key counts are all the rage these days, but while those streamlined input devices might look cool on your desk, there are times when the traditional number pad or navigation keys are quite handy. Rather than just going without, [Mattia Dal Ben] decided to put together his own mechanical auxiliary input device for when the main board just isn’t cutting it.

[Mattia] is calling his creation the YamPAD, which stands for Yet Another Mechanical numPAD. One of the major goals for the project is to produce a design that’s easy for others to replicate and customize. His PCB has a socket designed to fit an Arduino Pro Micro, which combined with the QMK firmware, offers a wide array of configuration options. All that’s left is to add in the Cherry MX switches and some 1N4148 diodes.

But if you want to take things a little further, [Mattia] has that covered as well. The PCB design has provisions for RGB LED back-lighting should you find yourself in need of crunching some numbers in the dark. There’s even a spot for a 0.91″ OLED display if you really want to take things to the next level.

As of right now, the YamPAD is just a bare PCB, but [Mattia] is planning to design a 3D printed enclosure for it soon. The sketches he’s done so far depict a printed case which we think bears more than a passing resemblance to a Wii Fit Balance Board, but of course being a fully open source project, you’ll be free to design your own case based on the PCB’s dimensions. It would be interesting to see what other kind of customization the community might come up with once the design is finalized.

If you like the idea of the YamPAD, you might also want to check out the kbord we covered back in 2017. If you want to see the full keyboard done in this DIY open hardware style, there are already some choice entries into the field.