Cheap FPV Goggles Turned Pocket Sized Display

Thanks to the exploding popularity of First Person View (FPV) RC flying over the last couple of years, the cost of the associated hardware has dropped rapidly. Today you can get entry-level FPV goggles for under $40 USD on various import sites. For the money you’re getting a 5.8 GHz receiver, battery, and an LCD display; even if the components themselves aren’t exactly high end, at that price it’s essentially an impulse buy.

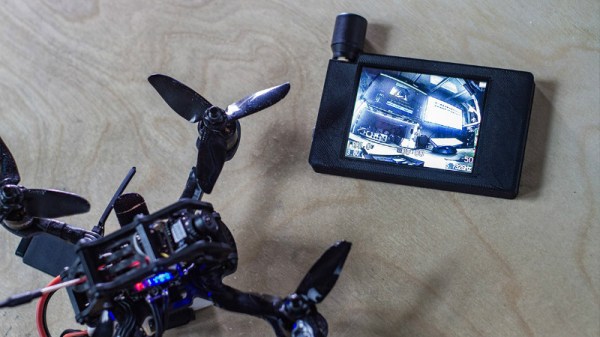
[nomand] didn’t necessarily have a use for a cheap FPV headset, but he did like the idea of having a pocket sized display that he could pass off to others so they could see what he’s seeing during flights. So he harvested the principle components from a Eachine VR006 headset and designed a new 3D printed enclosure for them. The final result looks fantastic, and is much cheaper than commercial alternatives on the market.

He’s created an exceptionally detailed step-by-step guide on how you can perform the conversion yourself in the project’s GitHub repository, and has also put together a video where he goes over the modification and discusses the end result. [nomand] clearly intends for this to be a project for others to duplicate instead of a one-off build, and given the price and final results, we wouldn’t be surprised if this conversion becomes popular in FPV circles.

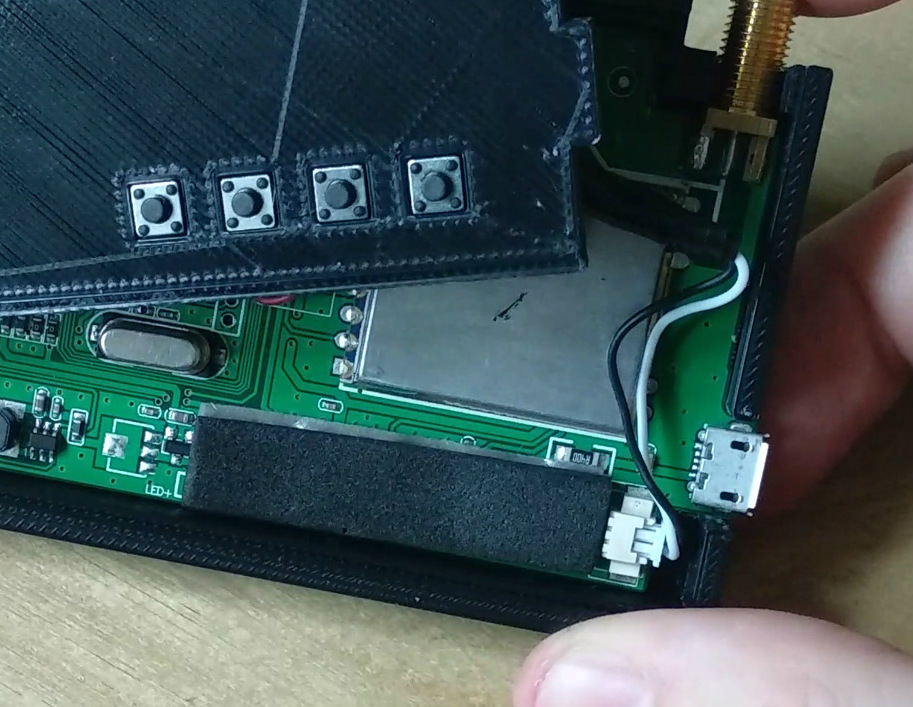
Perhaps the best part of this project is that it requires almost no modification of the original hardware; just soldering two wires because the original connector is too large. Otherwise just need to take the headset apart carefully, and transplant the components into the 3D-printed case [nomand] has meticulously designed. The case is so well designed it doesn’t even need any fasteners, it slides together and everything is held in with some strategically placed pieces of foam.

Between this modification and the custom built spectator display we covered recently, it looks like there’s a clear demand for sub-$50 portable FPV monitors. Seems odd that no manufacture is trying to fill this niche so far.

Continue reading “Cheap FPV Goggles Turned Pocket Sized Display”

Create Your Own ESP8266 Shields

The ESP8266 has become incredibly popular in a relatively short time, and it’s no wonder. Cheap as dirt, impressively powerful, Arduino-compatible, and best of all, includes Wi-Fi right out of the box. But for all its capability and popularity, it’s still lagging behind the Arduino in at least one respect. Namely, the vast collection of add-on “Shields” which plug into the Arduino to add everything from breadboards to GPS receivers.

Until such time as the free market decides to pick up the pace and start making standardized shields for the various ESP8266 development boards, it looks as if hackers are going to have to pick up the slack. [Rui Santos] has put together a very detailed step-by-step guide on the creation of a simple shield for the popular Wemos D1 Mini board, which should give you plenty of inspiration for spinning up your own custom add-on modules.

Presented as a written tutorial as well as a two part video, this guide covers everything from developing and testing your circuit on a breadboard to designing your PCB in KiCad and sending it off for fabrication. The end result is a professional looking PCB that matches the footprint of the stock D1 Mini and adds a DS18B20 temperature sensor, PIR motion detector, photoresistor, and some screw down terminals.

[Rui] goes on to show how you can utilize the new sensors shield via a web interface hosted on the ESP8266, and even wraps the whole thing up in a 3D printed enclosure. All worthwhile skills to check out if you’re looking to produce more cohesive finished products.

If you’re looking for a similar project for the ESP32, [Rui] has you covered there as well. You may also be interested in the series of ESP8266 tutorials we recently highlighted.

Continue reading “Create Your Own ESP8266 Shields”

Scooter Hauls Kids With A Little Heavy Metal

Where there’s a will, there’s a way. Similarly, where there’s a paying customer and a well stocked metalworking shop, there will also be a way. That’s about all the backstory you need to understand this latest creation from [Richard Day] of 42Fab. A customer asked him to build something that didn’t exist, and in a few hours he not only fabricated it from scratch but documented the whole thing for our viewing pleasure.

The object in question is a mount that would allow the customer to pull a “Burley Bee” kid trailer behind their electric scooter. The trailer is only meant for a bicycle, but the expected stresses of getting pulled around by a scooter seemed similar enough that [Richard] figured it should work. Especially since the ride height of the scooter lined up almost perfectly with the trailer’s tongue. The trick is, he wanted to avoid making permanent changes to either the scooter or the trailer.

On the scooter side, [Richard] came up with a clamp arrangement that would squeeze onto the frame. This gave him plenty of strength, without having to put any holes in the scooter. To create the clamp he took two pieces of 1/4″ x 2″ steel flat bar and welded 5/16″ nuts to them. By drilling the threads out of outer nuts they act as bushings, so cranking down on the bolts draws the two pieces together. To simplify the alignment, he welded the nuts to the bars while the bolts were threaded in, so he knew everything would be in place.

For the trailer side, he took another piece of flat steel and turned it into a “U” shape by cutting almost all the way through the back of it and then folding it over in his vice. A bead of metal was then laid in the cut with the welder to strengthen it back up. [Richard] used this opportunity to demonstrate the difference between pushing and pulling the torch while welding, which is an interesting tip to file away. A hole drilled through the two sides and a little grinding, and it’s ready to mount.

Between the two fabricated components is some flat stock welded at an eyed up angle. As [Richard] says in the video, the nice thing about these one-off projects is that you can basically design on the fly. Plus you can always use a hammer to make some final adjustments.

While his isn’t the first bike trailer hack we’ve seen here at Hackaday, it would be fair to say it’s something of a rarity around these parts. Usually we get word of somewhat larger bits of kit getting dragged around.

Continue reading “Scooter Hauls Kids With A Little Heavy Metal”

FOSSCON 2018: Where Open Source And LEGO Collide

It probably won’t come as a surprise to anyone reading this, but hackers and makers absolutely love LEGO. We think you’d be hard pressed to find a Hackaday reader, young or old, that hasn’t spent some quality time with the little plastic bricks from Billund, Denmark. So it follows that there’s a considerable community of individuals who leverage their better than average technical prowess to utilize LEGO in new and unique ways. But the activities and history of these LEGO hackers is not exactly common knowledge to those who aren’t heavily vested in the hobby.

During the recent FOSSCON 2018 in Philadelphia, Daniel Pikora gave attendees a comprehensive look at the intersection of open source development and the world’s most popular brand of construction toys. A software developer with a penchant for open source code by trade, he’s also an avid member of what’s known as the Adult Fan of LEGO (AFOL) community who’s exhibited his creations at shows across the United States and Canada. Such a unique perspective, with a foot in both the FOSS and LEGO camps, makes Daniel an ideal tour guide for this particular microcosm of toys and tech.

In a whirlwind presentation that took attendees through 49 slides in about as many minutes, Daniel covered LEGO’s beginnings in the 1930s to the rise of 3D printed custom bricks, and everything in between. Some of the engineering-centric product lines, such as Technic and Mindstorms, were already fairly well known to the types of folk who spent a beautiful Saturday in Philadelphia at an open source conference. But Daniel’s deep-dive into the long history of open source LEGO projects brought to light the work of so many dedicated developers that everyone walked away with a newfound respect for the amount of work the AFOL community has put into elevating LEGO from a child’s toy to a legitimate tool. Join me below for a look at the particulars of that deep dive.

Continue reading “FOSSCON 2018: Where Open Source And LEGO Collide”

Don’t Look Now, But Your Necklace Is Listening

There was a time when the average person was worried about the government or big corporations listening in on their every word. It was a quaint era, full of whimsy and superstition. Today, a good deal of us are paying for the privilege to have constantly listening microphones in multiple rooms of our house, largely so we can avoid having to use our hands to turn the lights on and off. Amazing what a couple years and a strong advertising push can do.

So if we’re going to be funneling everything we say to one or more of our corporate overlords anyway, why not make it fun? For example, check out this speech-to-image necklace developed by [Stephanie Nemeth]. As you speak, the necklace listens in and finds (usually) relevant images to display. Conceptually this could be used as an assistive communication technology, but we’re cool with it being a meme display device for now.

Hardware wise, the necklace is just a Raspberry Pi 3, a USB microphone, and a HyperPixel 4.0 touch screen. The Pi Zero would arguably be the better choice for hanging around your neck, but [Stephanie] notes that there’s some compatibility issues with Node.js on the Zero’s ARM6 processor. She details a workaround, but says there’s no guarantee it will work with her code.

The JavaScript software records audio from the microphone with SoX, and then runs that through the Google Cloud Speech-to-Text service to figure out what the wearer is saying. Finally it does a Google image search on the captured words using the custom search JSON API to find pictures to show on the display. There’s a user-supplied list of words to ignore so it doesn’t try looking up images for function words (such as “and” or “however”), though presumably it can also be used to blacklist certain imagery you might not want popping up on your chest in mixed company.

We’d be interested in seeing somebody implement this software on a Raspberry Pi powered digital frame to display artwork that changes based on what the people in the room are talking about. Like in Antitrust, but without Tim Robbins offing anyone.

Photon Door Lock Swaps Keys For A POST Request

At this point we’re all well aware of the fact that there is some inherent danger involved when bringing “things” onto the Internet. Nobody wants to come home to a smoldering pile of ruble because their Internet connected toaster oven decided to get stuck on “Hades.” But even with the risks, occasionally we see projects that prove at least some intrepid hackers are managing to navigate the Internet of Things to solve real-world problems.

[Daniel Andrade] writes in to tell us about the Internet controlled entry system he’s setup at his new apartment, and while we imagine it’s not for everyone, we can’t deny it seems like it has improved his quality of life. Rather than giving all of his friends a copy of his key, he’s setup a system where anyone who has the appropriate link can “buzz” themselves in through the building’s existing intercom system.

Thanks to the old-school intercom setup, the hardware for this project is simple in the extreme. All [Daniel] needed was a relay to close the circuit on the door buzzer, and a way to fire it off. For his controller he chose the Photon from Particle, which is perhaps a bit overkill, but we all tend to work with what we’re personally comfortable with.

Most of the work went into the software, as [Daniel] ended up coming with two distinct ways to control the door lock over the Internet. The first method uses Blynk, which allows you to create slick visual interfaces for mobile devices. His second version is controlled with a POST request to a specific URL, which he likes because it gives him more flexibility as to how he can interact with the lock. Currently he has a simple web page setup that lets friends and family open the door by just clicking a button.

We’ve seen a similar setup using the Photon to open a garage door, and plenty of people have taken to using Blynk to control their home automation setups. All the tools are available for you to roll your own IoT gadgets, you just need to figure out what to do with the things…

ESP8266 Powered Tank With Voice Control

The high availability of (relatively) low cost modular components has made building hardware easier than ever. Depending on what you want to do, the hardware side of a project might be the hacker equivalent of building with LEGO. In fact, we wouldn’t be surprised if it literally involved building with LEGO. In any event, easy and quick hardware builds leave more time for developing creative software to run the show. The end result is that we’re starting to see very complex systems broken down into easy-to-replicate DIY builds that would have been nearly impossible just a few years ago.

[igorfonseca83] writes in to share with us his modular tank platform that uses the ESP8266 and a handful of software hacks to allow for voice control from the user’s mobile device. Presented as a step-by-step guide on Hackaday.io, this project is perfect for getting started in Internet-controlled robotics. Whether you just want to experiment with Google Assistant integration or use this as a blank slate to bootstrap a remotely controlled rover, this project has a lot to offer.

The chassis itself is a commercially available kit, and [igorfonseca83] uses a L298N dual channel H-bridge module to control its two geared motors. A Wemos D1 serves as the brains of the operation, and three 18650 3.7V batteries provide the juice to keep everything running. There’s plenty of expansion capability to add sensors and other gear, but for this project getting it rolling was the only concern.

Software wise, there are a number of pieces that work together to provide the Google Assistant control demonstrated in the video after the break. It starts by interfacing the ESP8266 board Adafruit.IO, which connects to IFTTT, and then finally Google Assistant. By setting up a few two variable phrases in IFTTT that get triggered by voice commands in Google Assistant, you can push commands back down to the ESP8266 through Adafruit.IO. It’s a somewhat convoluted setup, admittedly, but the fact that involves very little programming makes it an interesting solution for anyone who doesn’t want to get bogged down with all the minutiae of developing your own Internet control stack.

[igorfonseca83] is no stranger to building remotely controlled rovers. Last year we covered another of his creations which was commanded through a web browser and carried an Android phone to stream video of its adventures.

Continue reading “ESP8266 Powered Tank With Voice Control”