Hackaday editors Elliot Williams and Mike Szczys are enamored by this week’s fabrication hacks. There’s a PCB mill that isolates traces by scratching rather than cutting. You won’t believe how awesome this angle-cutter jig is at creating tapered augers for injection molding/extruding plastic. And you may not need an interactive way to cut foam, but the art from the cut pieces is more than a mere shadow of excellence. Plus we gab about a clever rotary encoder circuit, which IDE is the least frustrating, and the go-to tools for hard drive recovery.
Take a look at the links below if you want to follow along, and as always, tell us what you think about this episode in the comments!
Take a look at the links below if you want to follow along, and as always, tell us what you think about this episode in the comments!
There was a time when building realistic simulations of vehicles was the stuff of NASA and big corporations. Today, many people have sophisticated virtual cockpits or race cars that they use with high-resolution screens or even virtual reality gear. If you think about it, a virtual car isn’t that hard to pull off. All you really need is a steering wheel, a few pedals, and a gear shifter. Sure, you can build fans to simulate the wind and put haptics in your seat, but really the input devices alone get you most of the way there. [Oli] decided he wanted a quick and easy USB gear shifter so he took a trip to the hardware store, picked up an arcade joystick, and tied it all together with an Arduino Leonardo. The finished product that you can see in the video below cost about $30 and took less than six hours to build.
The Leonardo, of course, has the ability to act like a USB human interface device (HID) so it can emulate a mouse or a keyboard or a joystick. That comes in handy for this project, as you would expect. The computer simply has to read the four joystick buttons and then decide which gear matches which buttons. For example up and to the left is first gear, while 4th gear is only the down button depressed. A custom-cut wooden shifter plate gives you the typical H pattern you expect from a stick shift.
Twitter just had their biggest security breach in years. Mike warned us about it on Wednesday, but it’s worth revisiting a few of the details. The story is still developing, but it appears that malicious actors used social engineering to access an internal Twitter dashboard. This dashboard, among other interesting things, allows directly changing the email address associated with an account. Once the address is changed to the attacker’s, it’s simple to do a password reset and gain access.
The bitcoin address used in the crypto scam ended up receiving nearly $120,000 USD worth of bitcoin, all of which has been shuffled off into different accounts. It’s an old and simple scam, but was apparently rather believable because the messages were posted by verified Twitter accounts.
A series of screenshots have been posted, claiming to be the internal Twitter dashboard used in the attack. More than a few eyebrows have been raised, as a result of that dashboard. First off, the fact that Twitter employees can directly change an account’s email address is asking for trouble. Even more interesting are the tags that can be added to an account. “Trends Blacklist” and “Search Blacklist” do call to mind the rumors of shadow-banning, but at this point it’s impossible to know the details. Motherboard is reporting that Twitter is removing that screenshot across the board when it’s posted, and even suspending accounts that post it. Of course, they’d do that if it were faked as well, so who knows? Continue reading “This Week In Security: Twitter, Windows DNS, SAP RECON”→
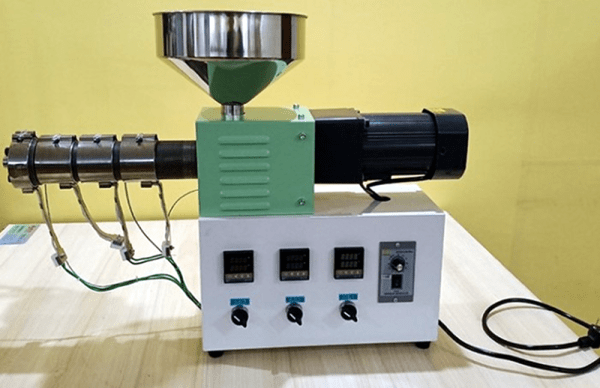
According to [Alex] it is easy to make your own rolls of 3D printing filament, even though existing off-the-shelf solutions don’t work very well. His explanation for this is economics. He built a filament extruder using a high torque induction motor and gearbox that was locally sourced. He argues that shipping heavy gear around would make a similar extruder commercially unattractive. He sunk about $600 into the device but estimates that a company would need to charge at least $1,500 or more for the same thing. That may seem steep but as [Alex] points out, a 1 kg roll of filament really only has about 750 grams for filament and plastic pellets cost $2 to $3 per kilogram.
There are other costs, of course, like the electricity required to heat and move the plastic. Still, the system appears to use about $1 of electricity for every 10 kg of filament. You can see the process in the video below.
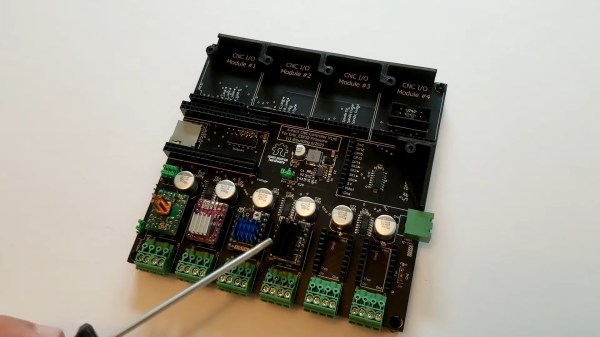
If you’re building a CNC machine from scratch, the number of decisions you have to make is nearly boundless. Metal or wood construction? Welded or bolted? Timing belts or lead screws? And even once the mechanical bits are sorted, you still face a universe of choices in terms of control electronics. That’s where something like this modular CNC controller could really prove to be a game-changer.
The idea behind [Barton Dring]’s latest creation started with his port of GRBL to the ESP32. In fact, the current controller bears a strong family resemblance to his version 1.0 dev board, with a few conspicuous and intriguing additions. First, everything is modular — the main PCB is basically a motherboard with little more than a 5-volt power supply and some housekeeping electronics, plus a lot of headers. There’s support for up to six channels of steppers, either directly on the board with Pololu-style modules or as external drivers using pluggable screw terminal blocks. There’s also room for five IO modules; the current collection of modules includes a four-channel switch input, a relay output, an RS-485 module and a 0-10-V interface for talking to a variable frequency drive (VFD) spindle controllers, and buffered 5-V output module. The best part is that the IO module spec is completely open, so designing custom modules should be a snap.
The video below gives a quick tour of the controller. We’re really impressed with the thought that went into this, and we’ll venture a guess that having something like this available is going to kickstart a lot of stalled CNC machine projects. We can think of one shop that finally lost its last excuse for making the move.
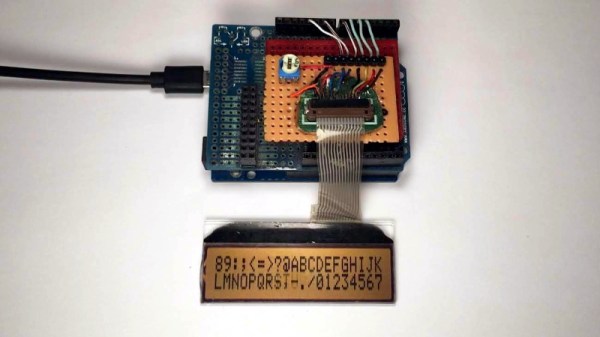
Most Hackaday readers are likely to be familiar with character LCDs driven by the extremely common Hitachi HD44780 controller chip. If you’re looking for a cheap and easy way for your microcontroller project to display some data, they’re pretty much the go-to solution. But as popular as these displays are, there’s no denying that they’re starting to look a bit dated in 2020. Which is why the tweaks [Joseph Rautenbach] is working on are so interesting.
With one of these displays, the controller puts a single character on each 5×8 block of pixels. There’s also support for creating custom characters, which can be used for rudimentary icons. You’re pretty limited by the per-block resolution, but with a little imagination, you can usually get the point across. With a bit of dead space between each block of the display there’s little point in trying to make icons that “bridge” multiple blocks, as they’ll always be segmented.
Hardware support is not guaranteed.
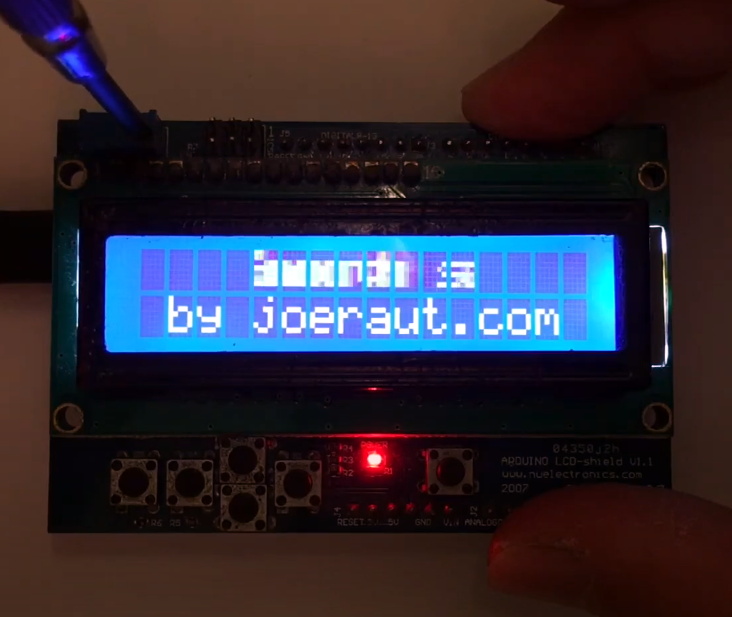
But as [Joseph] realized, that’s less of a problem for scrolling text. So he wrote some code that takes an ASCII string and breaks it down into partial letters and numbers which can be displayed as custom characters. The controller only has space for 8 of these characters though, so the code needs to continually step through the string and generate the appropriate offset characters as the position of the text changes.
While the effect looks pretty good in the video after the break, [Joseph] has found that real-world utilization is a bit finicky. He tried the same code on one of the displays that uses white text on a blue background, and the scrolling text ended up ghosting together so it looked like gibberish. So while he’s released the source code for others to experiment with this trick, your mileage may vary.
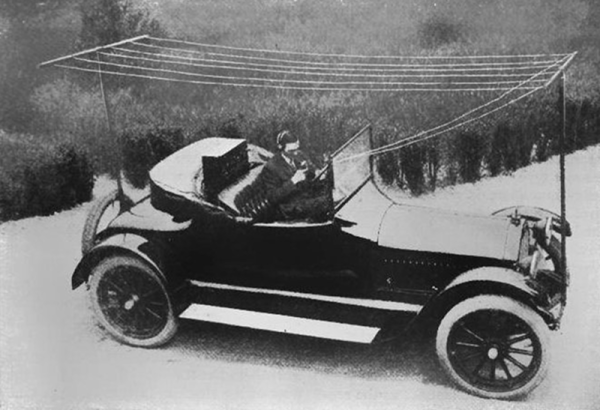
You used to be able to tell a die-hard ham radio operator on the road by the number and length of antennas protruding porcupine-like from their vehicle. There are still some mobile high frequency operators that have respectable car-mounted antenna farms, but they have nothing on Alfred H. Grebe. In 1919, he fitted a medium wave transmitter in his car that operated around 2 MHz. Since it needed a very large antenna, Grebe rigged a wire antenna that looked like a clothesline between the two bumpers. Obviously, you had to stop, set up your antenna, and then operate — you couldn’t talk and drive. But this may have been the world’s first automotive radio setup for voice communication.
The car had a separate battery for the radio and a dynamotor to generate high voltage for the tubes. Although many radio enthusiasts found ways to add receivers to their cars in the 1920s, it would be 1930 before Motorola made radios especially for cars in production quantities.