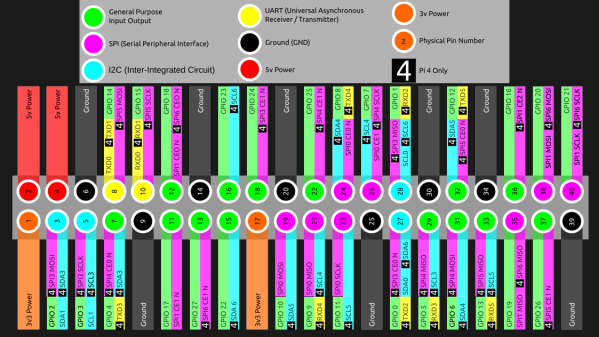
A pinout diagram of the new Pi 4, showing all the alternate interfaces available.

Did You Know That The Raspberry Pi 4 Has More SPI, I2C, UART Ports?

We’ve gotten used to the GPIO-available functions of Raspberry Pi computers remaining largely the same over the years, which is why it might have flown a little bit under the radar: the Raspberry Pi 4 has six SPI controllers, six I2C controllers, and six UARTs – all on its 40-pin header. You can’t make use of all of these at once, but with up to four different connections wired to a single pin you can carve out a pretty powerful combination of peripherals for your next robotics, automation or cat herding project.

The datasheet for these peripherals is pleasant to go through, with all the register maps nicely laid out – even if you don’t plan to work with the register mappings yourself, the maintainers of your preferred hardware enablement libraries will have an easier time! And, of course, these peripherals are present on the Compute Module 4, too. It might feel like such a deluge of interfaces is excessive, however, it lets you achieve some pretty cool stuff that wouldn’t be possible otherwise.

Having multiple I2C interfaces helps deal with various I2C-specific problems, such as address conflicts, throughput issues, and mixing devices that support different maximum speeds, which means you no longer need fancy mux chips to run five low-resolution Melexis thermal camera sensors at once. (Oh, and the I2C clock stretching bug has been fixed!) SPI interfaces are used for devices with high bandwidth, and with a few separate SPI ports, you could run multiple relatively high-resolution displays at once, No-Nixie Nixie clock style.

As for UARTs, the Raspberry Pi’s one-and-a-half UART interface has long been an issue in robotics and home automation applications. With a slew of devices like radio receivers/transmitters, LIDARs and resilient RS485 multi-drop interfaces available in UART form, it’s nice that you no longer have to sacrifice Bluetooth or a debug console to get some fancy sensors wired up to your robot’s brain. You can enable up to six UARTs. Continue reading “Did You Know That The Raspberry Pi 4 Has More SPI, I2C, UART Ports?”

A complex arrangement of LEGO gears

Analog Computer Made From LEGO Predicts Tides

Although the tides in the ocean are caused by the motion of the Sun and the Moon, both of which are easy to observe, accurately predicting the tide more than a few days in advance turns out to be rather difficult. The math behind the tidal movement is so complex that some of the earliest analog computers were built specifically to perform tide calculations. Sir William Thomson (better known as Lord Kelvin) designed one such “tide-predicting machine”, an impressive arrangement of gears and pulleys, back in the late 19th century.

[Pepijn de Vos] built a modern interpretation of Thomson’s machine out of LEGO parts, and it’s no less impressive than the original. A total of 96 LEGO gears move perfectly in sync to the ocean’s natural rhythms, while a set of pulleys connect four banks of gears together to create the sum of the constituent frequencies. An ultrasonic sensor reads the output value and sends the result back to a PC.

One interesting problem that [Pepijn] ran into, and which he explains in great detail on his blog, is that LEGO gears can only provide a very limited set of gear ratios. In order to match the tide calculations to any kind of precision, he needed to connect many gears in series without creating too much friction and backlash in the mechanism. Optimizing this setup was a non-trivial task that required a significant amount of computing power by itself.

As you can see in the video embedded below, the machine makes beautifully smooth movements, which correspond quite accurately to the actual motion of tides. If you’re interested in the science behind analog tide predictors, we’ve got an in-depth article about just that.

Continue reading “Analog Computer Made From LEGO Predicts Tides”

How The Hunga Tonga Volcano Eruption Was Felt Around The World

On the 14th of January, 2022, the Hunga Tonga-Hunga Ha’apai volcano began a gigantic eruption that would go on to peak in ferocity the next day. The uninhabited island volcano would quickly make headlines as the country of Tonga was cut off the world and tsunamis bore out from the eurption zone.

In a volcanic event of this size, the effects can be felt around the world. With modern instruments, they can be properly understood too. Let’s take a look at how the effects of the Hunga Tonga eruption were captured and measured across the globe.

Continue reading “How The Hunga Tonga Volcano Eruption Was Felt Around The World”

Radio Amateurs & Skywatchers Rejoice, Sat Operators Worry: Solar Storm Incoming

How do you look back over your life and divide it up? Maybe by decades, cultural moments, or geopolitical events. For radio amateurs with older callsigns there’s a temptation to do so by solar cycles, as the roughly 11-year period of the Sun’s activity had a huge effect on radio propagation through the charge it creates in the upper atmosphere. We’re now in solar cycle 25, numbered since the 18th century when the science of solar observation began, and as never before we’re surrounded by information from experts such as [Dr. Tamitha Skov], the so-called [Space Weather Woman]. When she says something is on the way we listen, so a recent Tweet predicting a direct hit from a solar storm with a good probability of auroras in lower latitudes is very much worth sharing.

We must extend our commiserations to readers in equatorial climes and ever through the lower half of the USA, southern Europe, the Middle East, India, Japan, and China. You won’t see the aurora we’ll catch in Europe along with our friends in New Zealand, Canada, Russia, and northern USA. But even then to those of us at moderate latitudes an aurora is a pretty rare event, so we’re hoping for clear skies on the 2nd of February and would advise you to look out too if you’re in the likely zone even if they won’t be quite as impressive as those in our header picture. Meanwhile radio amateurs everywhere don’t have to see pretty lights in the sky to reap the benefits in terms of propagation, so happy DX hunting! The Tweet is embedded below the break, so you can play the timeline for yourselves.

Continue reading “Radio Amateurs & Skywatchers Rejoice, Sat Operators Worry: Solar Storm Incoming”

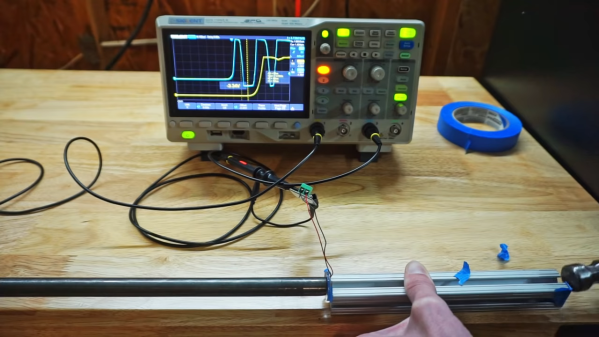
Speed of motion test setup

Simple Setup Answers Complex Question On The Physics Of Solids

Thought experiments can be extremely powerful; after all, pretty much everything that [Einstein] came up with was based on thought experiments. But when a thought experiment turns into a real experiment, that’s when things can get really interesting, and where unexpected insights crop up.

Take [AlphaPhoenix]’s simple question: “Are solid objects really solid?” On the face of it, this seems like a silly and trivial question, but the thought experiment he presents reveals more. He posits that pushing on one end of a solid metal rod a meter or so in length will result in motion at the other end of the rod pretty much instantly. But what if we scale that rod up considerably — say, to one light-second in length. Is a displacement at one end of the rob instantly apparent at the other end? It’s a bit of a mind-boggler.

To answer the question, [AlphaPhoneix] set up a simple experiment with the aforementioned steel rod — the shorter one, of course. The test setup was pretty clever: a piezoelectric sensor at one end of the bar, and a hammer wired to a battery at the other end, to sense when the hammer made contact with the bar. Both sensors were connected to an oscilloscope to set up to capture the pulses and measure the time. It turned out that the test setup was quite a challenge to get right, and troubleshooting the rig took him down a rabbit hole that was just as interesting as answering the original question. We won’t spoil the ending, but suffice it to say we were pleased that our first instinct turned out to be correct, even if for the wrong reasons.

If you haven’t checked out [AlphaPhoenix] yet, you really should. With a doctorate in material science, he’s got an interesting outlook on things, like calculating pi using raindrops or keeping the “ultra” in ultra-high vacuum. Continue reading “Simple Setup Answers Complex Question On The Physics Of Solids”

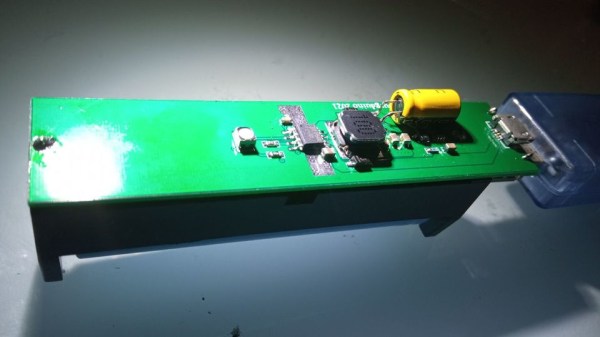
The powerbank PCB, with all the components on one side, 18650 holder on the other, a MicroUSB cable plugged into the PCB's MicroUSB socket

Open Hardware 5V UPS Improves On Cheap Powerbank Design

Often, we need to power a 5V-craving project of ours on the go. So did [Burgduino], and, unhappy with solutions available, designed their own 5V UPS! It takes a cheap powerbank design and augments it with a few parts vital for its UPS purposes.

You might be tempted to reach for a powerbank when facing such a problem, but most of them have a fatal flaw, and you can’t easily tell a flawed one apart from a functioning one before you buy it. This flaw is lack of load sharing – ability to continue powering the output when a charger is inserted. Most store-bought powerbanks just shut the output off, which precludes a project running 24/7 without powering it down, and can cause adverse consequences when something like a Raspberry Pi is involved.

Understandably, [Burgduino] wasn’t okay with that. Their UPS is based on the TP5400, a combined LiIon charging and boost chip, used a lot in simple powerbanks, but not capable of load sharing. For that, an extra LM66100 chip – an “ideal diode” controller is used. You might scoff at it being a Texas Instruments part, but it does seem to be widely available and only a tad more expensive than the TP5400 itself! The design is open hardware, with PCB files available on EasyEDA and the BOM clearly laid out for easy LCSC ordering.

We the hackers might struggle to keep our portable Pi projects powered, employing supercapacitors and modifying badly designed Chinese boards. However, once we find a proper toolkit for our purposes, battery-powered projects tend to open new frontiers – you might even go beyond your Pi and upgrade your router with an UPS addon! Of course, it’s not always smooth sailing, and sometimes seemingly portability-friendly devices can surprise you with their design quirks.

A graph visualising approximation errors - the specific principle pictured is described well by the linked article

Time And Accuracy In Las ATMegas

Do you ever have to ensure that an exact amount of time passes between two tasks in your microcontroller code? Do you know what’s the difference between precision and accuracy? Today, [Jim Mack] tells us about pushing timers and interrupts to their limits when it comes to managing time, while keeping it applicable to an ever-popular ATMega328P target! Every now and then, someone decides to push the frontiers of what’s possible on a given platform, and today’s rules is coding within constraints of an Arduino environment. However, you should check [Jim]’s post out even if you use Arduino as a swearword – purely for all of the theoretical insights laid out, accompanied by hardware-accurate examples!

This will be useful to any hacker looking to implement, say, motor encoder readings, signal frequency calculations, or build a gadget processing or modifying audio in real time. To give you a sample of this article, [Jim] starts by introducing us to distinctions between precision and accuracy, and then presents us with a seemingly simple task – creating exactly 2400 interrupts a second. As much as it might look straightforward, problems quickly arise when clock crystal frequency doesn’t cleanly divide by the sampling frequency that you have to pick for your application! This is just a taste of all the examples of hidden complexity presented, and they’re accompanied with solutions you can use when you eventually encounter one of these examples in your hacker pursuits. In the end, [Jim] concludes with links to other sources you can study if you ever need to dig deeper into this topic.

Keeping our projects true to the passage of time can be an issue, and we’ve been at it for ages – calibrating your RC oscillator is a rite of passage for any ATTiny project. If you ever decide to have an interrupt peripheral help you with timing issues, we’ve gone in-depth on that topic in the past, with a three-part series describing the benefits, the drawbacks and the edgecases of interrupts. Going for a more modern target? Our piece on using interrupts with STM32 is a great path for trying out tools of the modern age.