RGB LED Rings Teach Old Dash New Tricks

We’ve seen several so-called “digital dash” upgrades over the years that either augment, or completely replace, a vehicle’s original dashboard indicators with new displays. Whether its seven segment LEDs or a full-on graphical interface powered by the Raspberry Pi, the end result is the same: a dashboard that looks wildly different than it did when the car rolled off the assembly line.

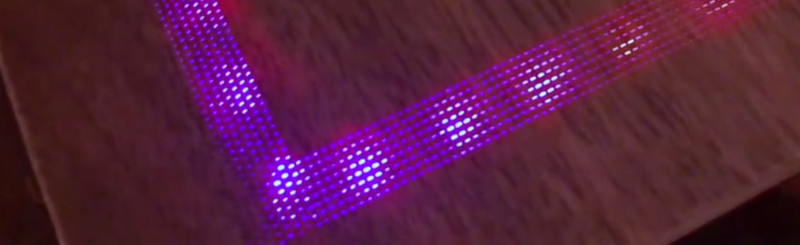
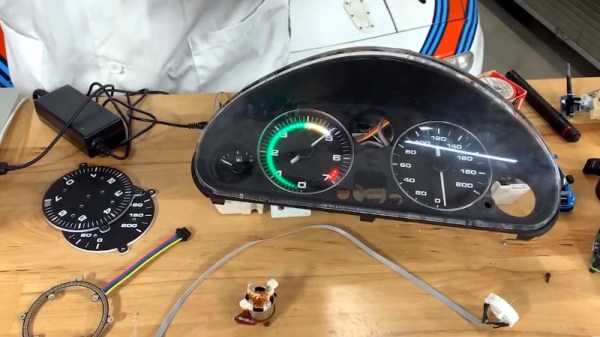
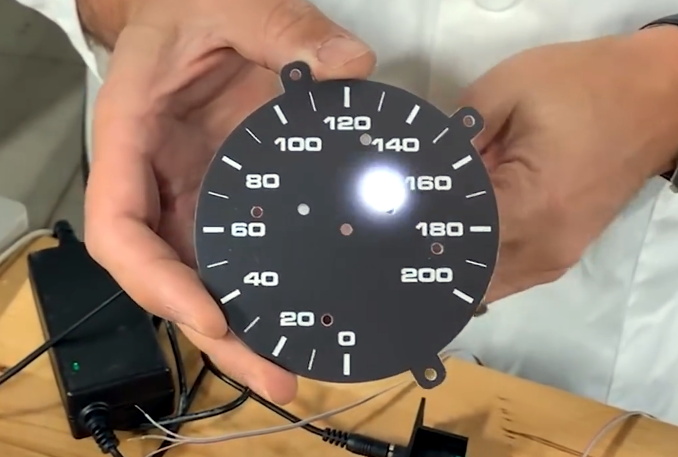
But this LED dashboard project from [Flyin’ Miata] takes a slightly different approach. Rather than replace the analog gauges entirely, rings of RGB LEDs of the same diameter were placed behind their matte black faces. When the LEDs are off you’d never notice them, but once they kick on, the light is clearly visible through the material.

LEDs can easily shine through the gauge face.

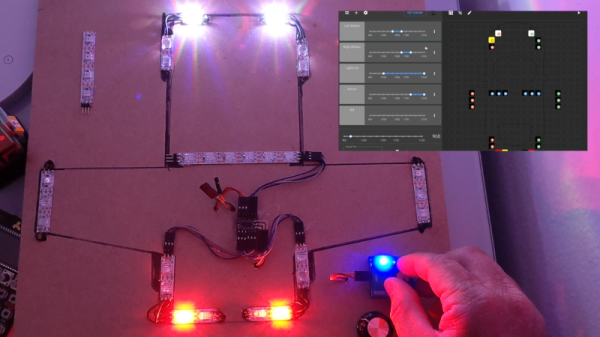
So far, it looks like most of the work seems to have been put into the tachometer. The firmware running on the CAN equipped Adafruit Feather M4 can do things such as light up a dynamic redline based on current engine temperature. It will also light up the LEDs to follow the analog gauge as it moves around, which might not have much practical application, but certainly looks cool.

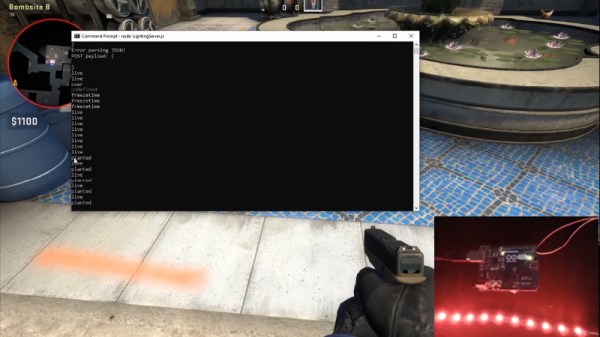
On the speedometer side, the LEDs seem to be used primarily as warning indicators. As demonstrated in the video below, the whole gauge can light up bright red to indicate a critical situation such as low oil pressure. If you wanted to, the system could also be configured with different colors corresponding to various possible fault conditions.

Compared to some of the more aggressive dashboard updates we’ve seen, this is an interesting compromise that helps retain the look of the original instrumentation. Of course, depending on the make and model of the car, you might be able to sneak in a small LCD screen without anyone noticing.

Continue reading “RGB LED Rings Teach Old Dash New Tricks”

Beautiful And Bouncy RGB LED Skirt Reacts To Movement

Is there any garment so freeing to wear as a skirt, assuming it isn’t skin tight? (Well, unless that’s your thing — we won’t judge.) Skirts and dresses are pretty darn freeing compared to pants, so it’s too bad that most of them come without pockets. And it’s really too bad that pretty much all skirts and dresses come without RGB LEDs that can react to movement. Maybe someday.

Until then, we’ll just have to design our own LED skirt like [makeTVee] and his girlfriend did, and hope that it looks half as good. This skirt has six RGB LED strips running down the front for a total of 120 LEDs. The strips are held in place with hook and loop tape and all the electronics — an Adafruit QT Py, a 6-DOF IMU, and a USB power bank — are tucked into the waistband and can be easily removed when it’s time to wash the skirt. Continuing with the practicality theme, there are no LEDs on the back, though they could easily be added in for getting down on the dance floor.

We really love the fabric choices here. The overlay fabric looks good on its own, but it also does a great job of showing and diffusing the light, while at the same time hiding the LED strips themselves. It’s clear that they took comfort and practicality into consideration and made a wearable that’s truly wearable. [makeTVee] calls this a work in progress, but has already got a few nice animations going, which you can see in the video after the break.

If you don’t care whether your wearables are practical, try this fiber optic jellyfish skirt on for size.

Continue reading “Beautiful And Bouncy RGB LED Skirt Reacts To Movement”

Voice Controlled RGB LEDs Go Big

When we see RGB LEDs used in a project, they’re often used more for aesthetic purposes than as a practical source of light. It’s an easy way to throw some color around, but certainly not the sort of thing you’d try to light up anything larger than a desk with. Apparently nobody explained the rules to [Brian Harms] before he built Light[s]well.

Believe it or not, this supersized light installation doesn’t use any exotic hardware you aren’t already familiar with. Fundamentally, what we’re looking at is a WiFi enabled Arduino MKR1000 driving strips of NeoPixel LEDs. It’s just on a far larger scale than we’re used to, with a massive 4 x 8 aluminum extrusion frame suspended over the living room.

Onto that frame, [Brian] has mounted an undulating diffuser made of 74 pieces of laser-cut cardstock. Invoking ideas of waves or clouds, the light looks like its of natural or even biological origin while at the same time having a distinctively otherworldly quality to it.

The effect is even more pronounced when the RGB LEDs kick in, thanks to the smooth transitions between colors. In the video after the break, you can see Light[s]well work its way from bright white to an animated rainbow. As an added touch, he added Alexa voice control through Arduino’s IoT Cloud service.

While LED home lighting is increasingly becoming the norm, projects like Light[s]well remind us that we aren’t really embracing the possibilities offered by the technology. The industry has tried so hard to make LEDs fit into the traditional role of incandescent bulbs, but perhaps its time to rethink things.

Continue reading “Voice Controlled RGB LEDs Go Big”

RGB LED Shutter Shades

[splat238] is back at it again with another cool RGB LED display project. We were contemplating whether or not our readers have had enough of these over the last few weeks, but we’ve learned over the years that you can never have too many LED projects.

Instead of making a cool mask like we’ve covered before, [splat238] decided to trick-out some shutter shades. What’s really cool is he used the PCB itself as the frame, similar to another hack we’ve seen, which we’re sure also made his design process that much more convenient.

[splat238] got his boards pre-assembled since it would be really difficult to solder all those LEDs by hand. There are 76 of them in this design. It’s pretty helpful that he walks the reader through how to get the boards assembled, providing information on reliable fabrication and assembly houses that he’s had good experiences with. Pretty solid information if you don’t already have a go-to one-stop-house or have never designed for assembly before.

The glasses use an ESP8266-based microcontroller since it has plenty of space for storing LED patterns and has the potential benefit of including WiFi control in later revisions. However, we think you’ll be pretty happy with simply toggling through the patterns with a simple pushbutton.

The LEDs use a whopping 2.5 A at maximum and rely on an external power bank, so you’ll probably want to be really careful wearing this over an extended period of time. Maybe consider doing a bit of PWM to help reduce power consumption.

Another cool project [splat238]! Keep them coming. Continue reading “RGB LED Shutter Shades”

Laser Cutting Your Way To An RGB LED Table

You’ve got the RGB keyboard, maybe even the RGB mouse. But can you really call yourself master of the technicolor LED if you don’t have an RGB table to game on? We think you already know the answer. Luckily, as [ItKindaWorks] shows in his latest project, it’s easy to build your own. Assuming you’ve got a big enough laser cutter anyway…

The construction of the table is quite straightforward. Using an 80 watt laser cutter, he puts a channel into a sheet of MDF to accept RGB LED strips, a pocket to hold a Qi wireless charger, and a hole to run all the wires out through. This is then backed with a second, solid, sheet of MDF.

Next, a piece of thin wood veneer goes into the laser cutter. In the video after the break you can see its natural tendency to roll up gave [ItKindaWorks] a little bit of trouble, but when strategically weighted down, it eventually lays out flat. He then uses the laser to blast an array of tiny holes in the veneer, through which the light from the LEDs will shine when it’s been glued over the MDF. A few strips of plastic laid over the strips serve both to diffuse the light and support the top surface.

The end result is truly gorgeous and has a very futuristic feel. Assuming you’ve got the equipment, it’s also a relatively simple concept to experiment with. It’s yet another example of the unique construction techniques possible when you add a high-powered laser to your arsenal.

Continue reading “Laser Cutting Your Way To An RGB LED Table”

Counter-Strike Gets The RGB LED Treatment

Inspired by the over-the-top stage lighting and pyrotechnics used during e-sport events, [Hans Peter] set out to develop a scaled-down version (minus the flames) for his personal Counter-Strike: Global Offensive sessions. It might seem like pulling something like this off would involve hacking the game engine, but as it turns out, Valve was kind enough to implement a game state API that made it relatively easy.

According to the documentation, the CS:GO client can be configured to send out state information to a HTTP server at regular intervals. It even provided example code for implementing a simple state server in Node.js, which [Hans] adapted for this project by adding some conditional statements that analyze the status of the current game.

These functions fire off serial commands to the attached Arduino, which in turn controls the WS2812B LEDs. The Arduino code takes the information provided by the HTTP server and breaks that down into various lighting routines for different conditions such as wins and losses. But things really kick into gear when a bomb is active.

[Hans] wanted to synchronize the flashing LEDs with the beeping sound the bomb makes in the game, but the API doesn’t provide granular enough data. So he recorded the audio of the bomb arming sequence, used Audacity to precisely time the beeps, and implemented the sequence in his Arduino code. In the video after the break you can see that the synchronization isn’t perfect, but it’s certainly close enough to get the point across in the heat of battle.

With the special place that Counter-Strike occupies in the hearts of hackers and gamers alike, it’s little surprise people are still finding unique ways to experience the game.

Continue reading “Counter-Strike Gets The RGB LED Treatment”

A Chrome Extension For Configuring RGB LEDs

Like pretty much all of us, [Andy Schwarz] loves RGB LEDs. Specifically he likes to put them on RC vehicles, such as navigation lights on airplanes or flashers and headlights on cars. He found himself often rewriting very similar Arduino code for each one of these installations, and eventually decided he could save himself (and all the other hackers in the world) some time by creating a customizable Arduino firmware specifically for driving RGB LEDs.

The software side of this project, which he’s calling BitsyLED, actually comes in two parts. The first is the firmware itself, which is designed to control common RGB LEDs such as the WS2812 or members of the NeoPixel family. It can run on an Arduino Pro Mini with no problems, but [Andy] has also designed his own open hardware control board based on the ATtiny84 that you can build yourself. Currently you need a USBASP to program it, but he’s working on a second version which will add USB support.

With your controller of choice running the BitsyLED firmware, you need something to configure it. For that, [Andy] has developed a Chrome extension which offers a very slick user interface for setting up colors and patterns. The tool even allows you to create a visual representation of your LEDs so you can get an idea of what it’s going to look like when all the hardware is powered up.

RGB LEDs such as the WS2812 are some of the most common components we see in projects today, mainly because they’re so easy to physically interface with a microcontroller. But even though it only takes a couple of wires to control a large number of LEDs, you still need to write the code for it all. BitsyLED takes a lot of the hassle out of that last part, and we’re very interested to see what the hacker community makes of it.

Continue reading “A Chrome Extension For Configuring RGB LEDs”