While mobile gaming has largely moved to smartphones these days, the classic Game Boy remains a hugely popular platform for retro enthusiasts, owing in no small part to its enormous library of quality games. The original Game Boy hardware is pretty much bulletproof, but feels a bit outdated today because it lacks modern conveniences like a large, backlit display or a rechargeable battery.
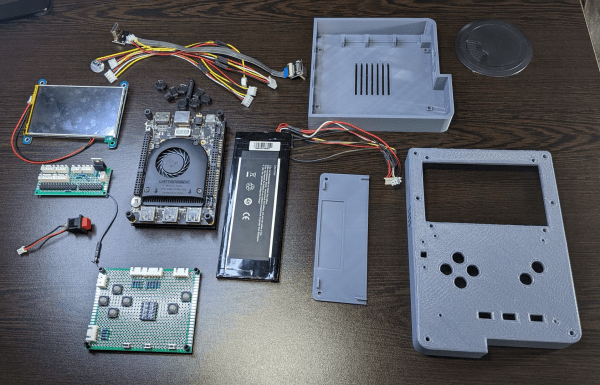
[iketsj] wanted to build a modern take on the Game Boy design and designed what’s in effect a 3D-printed, oversized copy of the classic handheld powered by a modern single-board computer. Most people would have gone for something obvious like a Raspberry Pi running Linux, but not [Ike]: he decided to go for a LattePanda Alpha board and run macOS Monterey on it. That makes this a Hackintosh, and probably one of the last ones as well since Apple is busy migrating all of its products onto its own proprietary CPUs.
The LattePanda also has an Arduino integrated on its board, which is used to read out the Game Boy’s buttons as well as the resistive touch screen. It communicates with the macOS system through a Python script that emulates mouse movements and keypresses. Sadly, the touch function is not working because [Ike] accidentally damaged the touch-sensitive system while trying to slim down the display module. Still, the seven pushbuttons are more than enough when running a Game Boy emulator, and there’s also a USB connector available to connect external peripherals like a keyboard, mouse or monitor.
We’ve seen several great Game Boy projects over the years: some made from brass, some very wide, and some that stuff modern computing platforms inside an original Game Boy case. Combining a Game Boy with a Hackintosh is definitely a new development, though it matches well with [Ike]’s history of unusual Hackintosh designs. Continue reading “This Big 3D-Printed Game Boy Actually Runs MacOS”