Old-school rail monitoring systems had amazing displays of stations and tracks covered in flashing lights that tracked the progress of trains along a route. While it’s unlikely you’ll fit such big iron from the mid-20th century in your home, you can get a similar aesthetic with [Kothe’s] interactive subway information display.
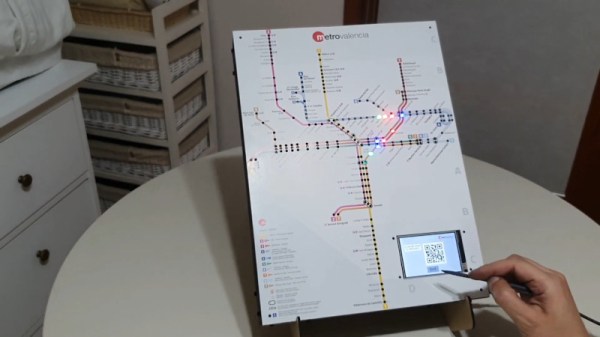
The display relies on an Arduino Mega 2560 Pro Mini as the brains of the operation. It drives strings of WS2812B LEDs which correspond to stations along the various metro lines in the area. Additionally, the microcontroller drives a 4.3″ Nextion LCD display. The Nextion displays have the benefit of acting as a self-contained human machine interface, running their own controller on board. This means the Arduino doesn’t have to spend cycles driving the display, and the Nextion hardware comes with a useful software package for quickly and easily designing GUI interfaces. For further feedback, a DFPlayer MP3 module is used to allow the system to playback prerecorded voice samples that provide information on the rail system. The attractive front panel is made with lasercut acrylic and a color printed acetate sheet.
It’s a build that bears striking similarity to real rail information systems fielded by railways around the world. We can imagine such a device being particularly useful in a backpacker’s hostel or university dorm to help those new to town find their way around. If you prefer a more stripped-back aesthetic, we’ve seen a barebones PCB build done as well. Video after the break.
Continue reading “Interactive Subway Map Talks You Through The Route”