A Tiny Terminal For Your Serial Access Needs

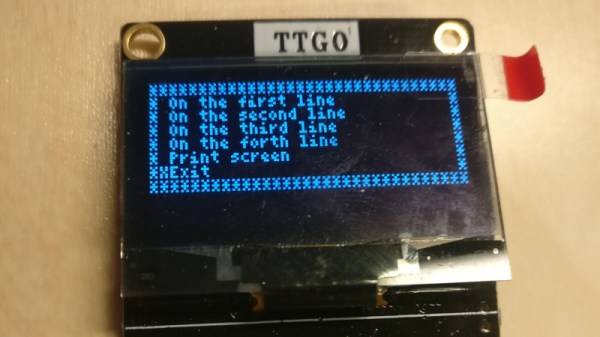
Some pieces of computing equipment have faded away without a trace, for example a modem is not a device that detains many hackers as they strive for that perfect emulation of a venerable Hayes on an Arduino. But there are some other devices that continue to hold a fascination, even years after they departed from the professional arena. A great example is the serial terminal. Once to be found on many a desk as it provided a way into a minicomputer, it has long ago been supplanted by terminal emulators or simply other portals into computing services such as the web. But in our community there are still plenty of serial terminals to be found, for example [RedHog]’s little emulated VT220 on an ESP8266 platform.

If you were hoping for a full-green screen and keyboard to plug into a hefty D-connector serial port then you’ll be a bit disappointed, as with a tiny screen and only a few buttons on a dev board or an Arduboy it’s not going to allow any 1337 vi mastery even with its on-screen keyboard. Take a look, we’ve placed a video below the  break. But despite all that it shows promise, with ability to use either the logic-level serial port or the USB serial interface. We can see that it might find a use as a serial display though, but it would fascinate us to see what could be done were it to use the 8266’s on-board WiFi in some form. If you’d like to experiment you can do so with the code on GitHub.

This isn’t the first such terminal we’ve seen here before of course, some of them have been extremely practical, while others we just want to own because they’re cool.

Continue reading “A Tiny Terminal For Your Serial Access Needs”

CircuitPython Sculpture Clock Adds Character To Any Desk

We can probably all relate to the origin story of this one. [Alex] was working on a bigger, more involved clock project when this cute little desk clock idea caught his mind’s eye. Who wouldn’t want a clock with character and a little bit of an attitude?

This little guy’s brain is an ItsyBitsy M0 Express, and he gets his time data from an Adalogger FeatherWing RTC. Those antennae aren’t just for looks – [Alex] chose the ItsyBitsy because it can easily do capacitive touch out of the box without extra components. In the brief demo after the break, [Alex] shows how touching them triggers either an animated face or a still face before switching to the clock face.

We love functional circuit sculptures, especially ones with this much character. [Alex] was inspired by [Mohit Bhoite]’s breathtaking circuit sculptures and seems to follow his great example of laying it all out on paper first. Incidentally, our last HackChat before Supercon starred [Mohit] and his circuit sculptures. Missed it? Read the transcript here.

Continue reading “CircuitPython Sculpture Clock Adds Character To Any Desk”

Creating Lookalike Valves With Resin Casting

Valves (tubes) certainly have a die hard fan base in the electronic community, praised for their warm sound, desirable distortion characteristics and attractive aesthetic. However, sometimes you just want the look of a valve for a prop or a toy, without actually needing the functionality. For those cases, this project from [Ajaxjones] might be just the ticket.

The build consists of taking an existing valve, combining it with a 3D printed base, and using this to create a silicone mould. 3D printed parts and dressmaker’s pins are then used to create the internal parts of the valve, and are inserted into the mould. Clear resin is then degassed, and poured into the mould to create the part. Once cured, the part is removed and the base painted to complete the look. An LED is then installed into a void in the base to give the piece a warm glow as you’d expect.

It’s a simple tutorial to producing high-quality clear plastic parts, and one that should prove useful to many prop builders and cosplayers alike. If you’re wanting to take your resin game to the next level, consider trying some overmolded parts. Video after the break.

Continue reading “Creating Lookalike Valves With Resin Casting”

Building A Front Panel For The RC2014 Computer

The RC2014 is a slick Z80 computer kit that’s graced these pages a number of times in the past. It allows anyone with a soldering iron and a USB-to-serial adapter to experience the thrill of early 1980s desktop computing. But what if you’re looking for an even more vintage experience? In that case, this custom RC2014 front panel from [James Stanley] might be just the thing to scratch that Altair itch.

The front panel allows you to view and alter the contents of memory with nothing more complex than toggle switches and LEDs, just like on the early microcomputers of the 1970s. If you’ve ever wanted to learn how a computer works on the most basic level, single-stepping through instructions and reading them out in binary is a great way to do it.

[James] says he was inspired to take on this project after reading a 1978 issue of Kilobaud Magazine (as one does), and seeing an article about building a homebrew Z80 machine with a front panel. Obviously he had to modify the approach a bit to mate up with this relatively modern variation on the venerable CPU, but the idea was essentially the same.

His documentation for the project is sure to be fascinating for anyone enamored with those iconic computers of yesteryear, but even readers with more modern sensibilities will likely find some interesting details. The way [James] coaxes the data and various status states out of the kit computer takes up the bulk of the write-up, but afterwards he talks about how he designed the PCB and wraps up with his tips for creating a professional looking front panel.

This isn’t the first time we’ve seen a modern Z80 computer kitted out with blinkenlights, but it’s certainly one of the most professional looking. If you combine the RC2014 kits available on Tindie with the details provided by [James], you’ll soon be learning the fine art of programming a computer with toggle switches.

Continue reading “Building A Front Panel For The RC2014 Computer”

Casting Gears At Home

Automatic doors and gates are great, except when they fail, which seems to be about every three days in our experience. [MAD WHEEL] had just such a failure, with a plastic gear being the culprit. Rather than buy a new drive unit, they set about casting a replacement in metal.

The video is light on instructions and heavy on progressive rock, and may be a little difficult to follow for beginners. The process begins by gluing the original plastic part back together, and filling in the gaps with epoxy putty. A mould is then created by setting the gear in a gelatine/glycerine mixture. This mould is then filled with wax to create a wax copy of the original part. The wax gear is fitted with cylindrical stems to act as runners for molten metal, and then a plaster mould is made around the wax positive. Two plaster moulds are made, which are placed in an oven to melt out the wax.

The aim was to cast a replacement part in aluminium. The first attempt failed, with the aluminium cooling too rapidly. This meant fine details like the gear teeth simply didn’t cast properly, creating a useless metal blob. On the second attempt, the plaster mould was heated first, and this kept things hot enough to allow the aluminium to fill in the finer details. With that done, it was a simple matter of some post-processing to remove the runners, clean up the gear teeth and refine the shape of the gear on the lathe.

The resulting part does its job well, meshing properly with the other gears in the drivetrain and moving the gate effectively. Many in the comments have stated that the original gear being plastic was likely as a safety measure, to strip out in the event the gate is jammed. While this may be true, it’s a far more robust design practice to instead use a breakable plastic key rather than breaking an entire gear in the event of a problem.

Casting is quite accessible to the dedicated home maker. It’s a great way to make custom metal parts once you’ve learned the fundamentals! Video after the break.

Continue reading “Casting Gears At Home”

Little Flash Charges In 40 Seconds Thanks To Super Capacitors

We’ve all committed the sin of making a little arduino robot and running it off AA batteries. Little Flash is better than that and runs off three 350 F capacitors.

In fact, that’s the entire mission of the robot. [Mike Rigsby] wants people to know there’s a better way. What’s really cool is that 10 A for 40 seconds lets the robot run for over 25 minutes!

The robot itself is really simple. The case is 3D printed with an eye towards simplicity. The brains are an Arduino nano and the primary input is a bump sensor. The robot runs around randomly, but avoids getting stuck with the classic reverse-and-turn on collision.

It’s cool to see how far these capacitors have come. We remember people wondering about these high priced specialty parts when they first dropped on the hobby scene, but they’re becoming more and more prevalent compared to other solutions such as coin-cells and solder tab lithium batteries for PCB power solutions.

Retrotechtacular: 934 MHz CB Radio

The radio spectrum is carefully regulated and divided up by Governments worldwide. Some of it is shared across jurisdictions under the terms of international treaties, while other allocations exist only in individual countries. Often these can contain some surprising oddities, and one of these is our subject today. Did you know that the UK’s first legal CB radio channels included a set in the UHF range, at 934 MHz? Don’t worry, neither did most Brits. Behind it lies a tale of bureaucracy, and of a bungled attempt to create an industry around a barely usable product.

Hey, 2019, Got Your Ears On?

Did this car make you want a CB radio? Stuurm [CC BY-SA 3.0]
Mention CB radio in 2019 it’s likely that the image conjured in the mind of the listener will be one from a previous decade. Burt Reynolds and Jerry Reed in Smokey and the Bandit perhaps, or C. W. McCall’s Convoy. It may not be very cool in the age of WhatsApp, but in the 1970s a CB rig was the last word in fashionable auto accessories and a serious object of desire into which otherwise sane adults yearned to speak the slang of the long-haul trucker.

If you weren’t American though, CB could be a risky business. Much of the rest of the world didn’t have a legal CB allocation, and correspondingly didn’t have access to legal CB rigs. The bombardment of CB references in exported American culture created a huge demand for CB though, and for British would-be CBers that was satisfied by illegally imported American equipment. A vibrant community erupted around UK illegal 27 MHz AM CB in the late 1970s, and Government anger was met with campaigning for a legal allocation. Brits eventually got a legal 27 MHz allocation in November 1981, but the years leading up to that produced a few surprises.

Continue reading “Retrotechtacular: 934 MHz CB Radio”