[Diyguypt] may be an altruist to provide the means for people who can’t manipulate chess pieces to play the game. Or he may just have his hands too busy with food and drink to play. Either way, his voice command chessboard appears to work, although it has a lot of moving parts both figuratively and literally. You can check out the video below to see how it works.
The speech part is handled by an Android phone and uses Google’s voice services, so if you don’t want Google listening to your latest opening gambit, you’ll want to pass this one up. The phone uses an app that talks to the Arduino via Bluetooth, which means the Arduino needs a Bluetooth module.
There’s been a marked trend towards modern tablets and phones having fewer expansion options. It’s becoming rarer to find a microSD slot available, which can be particularly frustrating. For [davisr], this simply wouldn’t do, and they set about hacking their ReMarkable tablet.
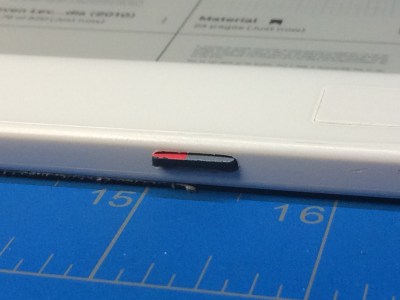
A rotary tool was used to make a tidy slot for the microSD card.
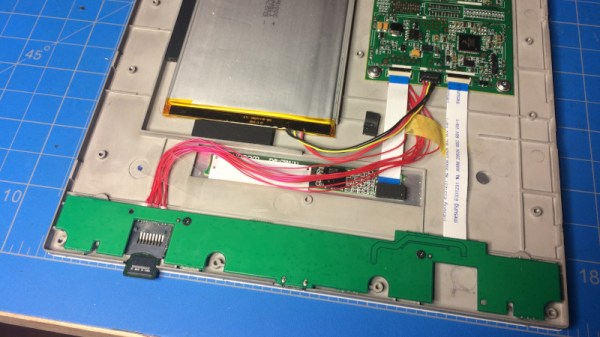
The ReMarkable already has a set of pads for an SDHC interface on the main board, ready to go. Despite this, both hardware and software modifications are required to get things up and running. [davisr] started by soldering some wires to the main board, feeding them to a microSD socket, which was mounted on the edge of the tablet in a convenient nook. The case was then delicately modified to make a slot for cards to be inserted and removed. With this done, the kernel was then recompiled to enable support for the SDHC interface, and everything was up and running.
High resolution digital cameras are built into half of the devices we own (whether we want them or not), so why is it still so hard to find good pictures of all the incredible projects our readers are working on? In the recently concluded Beautiful Hardware Contest, we challenged you to take your project photography to the next level. Rather than being an afterthought, this time the pictures would take center stage. Ranging from creative images of personal projects to new ways of looking at existing pieces of hardware, the 100+ entries we received for this contest proved that there’s more beauty in a hacker’s parts bin than most of them probably realize.
As always, it was a struggle to narrow down all the fantastic entries to just a handful of winners. But without further adieu, let’s take a look at the photos that we think truly blurred the line between workbench and work of art:
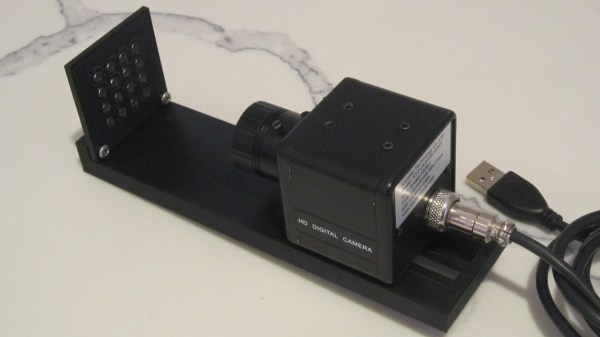
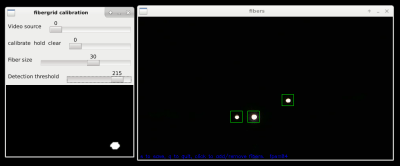
When building robots, or indeed other complex mechanical systems, it’s often the case that more and more limit switches, light gates and sensors are amassed as the project evolves. Each addition brings more IO pin usage, cost, potentially new interfacing requirements and accompanying microcontrollers or ADCs. If you don’t have much electronics experience, that’s not ideal. With this in mind, for a Hackaday prize entry [rand3289] is working on FiberGrid, a clever shortcut for interfacing multiple sensors without complex hardware. It doesn’t completely solve the problems above, but it aims to be a cheap, foolproof way to easily add sensors with minimal hardware needed.
The idea is simple: make your sensors from light gates using fiber optics, feed the ends of the plastic fibers into a grid, then film the grid with a camera. After calibrating the software, built with OpenCV, you can “sample” the sensors through a neat abstraction layer. This approach is easier and cheaper than you might think and makes it very easy to add new sensors.
Naturally, it’s not fantastic for sample rates, unless you want to splash out on a fancy high-framerate camera, and even then you likely have to rely on an OS being able to process the frames in time. It’s also not very compact, but fortunately you can connect quite a few sensors to one camera – up to 216 in [rand3289]’s prototype.
There are many novel uses for this kind of setup, for example, rotation sensors made with polarising filters. We’ve even written about optical flex sensors before.
What do hackers do on vacation? What do hackers do whenever they have free time? What do you love to do? That’s right. But how much more fun would it be if you could get together with 5,000 other hackers, share your crazy projects and ideas, eat, drink, dance, swim, and camp out all together for five days, naturally with power and Internet? That’s the idea of the Chaos Communication Camp, and it’s a once-in-four-years highlight of hacker life.
Held not too far outside of Berlin, the Camp draws heavily on hackers from Europe and the UK, but American hackers have been part of the scene since almost the beginning. (And Camp played an important role in the new-wave hackerspaces in the US, but that’s another story.) It’s one thing to meet up with the folks in your local hackerspace and work together on a project or brainstorm the next one, but it’s entirely a different thing when you’re drawing on hackers from all over the world. There was certainly more to see and do at Camp than you could in a month, not to mention in only five days, and this could be overwhelming. But if you dig in, the sense of community that came from shared effort and shared interests was the real take-home. And nearly everything at Camp should have its own article on Hackaday.
Hackaday Editors Mike Szczys and Elliot Williams are back from Chaos Communication Camp, and obviously had way too much fun. We cover all there was to see and do, and dig into the best hacks from the past week. NASA has a cute little nuclear reactor they want to send to the moon, you’ve never seen a car phone quite like this little robot, and Ardupilot (Ardurover?) is going to be the lawn mowing solution of the future. Plus you need to get serious about debugging embedded projects, and brush up on your knowledge of the data being used to train facial recognition neural networks.
Take a look at the links below if you want to follow along, and as always tell us what you think about this episode in the comments!
Take a look at the links below if you want to follow along, and as always, tell us what you think about this episode in the comments!
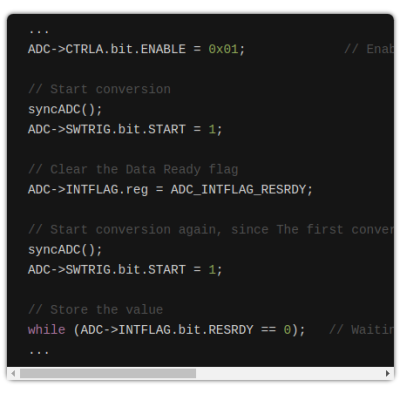
One of the great things about the Arduino environment is that it covers a wide variety of hardware with a common interface. Importantly, this isn’t just about language, but also about abstracting away the gory details of the underlying silicon. The problem is, of course, that someone has to decode often cryptic datasheets to write that interface layer in the first place. In a recent blog post on omzlo.com, [Alain] explains how they found a bug in the Arduino SAMD21 analogRead() code which causes the output to be offset by between 25 mV and 57 mV. For a 12-bit ADC operating with a reference of 3.3 V, this represents a whopping error of up to 70 least-significant-bits!
Excerpt from the SAMD wiring_analog.c file in the Arduino Core repo.
While developing a shield that interfaces to 24 V systems, the development team noticed that the ADC readings on a SAMD21-based board were off by a consistent 35 mV; expanding their tests to a number of different analog pins and SAMD21 boards, they saw offsets between 25 mV and 57 mV. It seems like this offset was a known issue; Arduino actually provides code to calibrate the ADC on SAMD boards, which will “fix” the problem with software gain and offset factors, although this can reduce the range of the ADC slightly. Still, having to correct for this level of error on a microcontroller ADC in 2019 — or even 2015 when the code was written — seems really wrong.
After writing their own ADC read routine that produced errors of only between 1 mV and 5 mV (1 to 6 LSB), the team turned their attention to the Arduino code. That code disables the ADC between measurements, and when it is re-enabled for each measurement, the first result needs to be discarded. It turns out that the Arduino code doesn’t wait for the first, garbage, result to finish before starting the next one. That is enough to cause the observed offset issue.
It seems odd to us that such a bug would go unnoticed for so long, but we’ve all seen stranger things happen. There are instructions on the blog page on how to quickly test this bug. We didn’t have a SAMD21-based Arduino available for testing before press time, but if you’ve got one handy and can replicate these experiments to verify the results, definitely let us know in the comments section below.